Allegion Developer Portal
Allegion Developer Portal

Last modified: 07.22.2025
The purpose of this guide is to walk a software development team through the steps necessary to build the Schlage Employee Badge Mobile Credential Google Wallet App. The Schlage Employee Badge Android Quick Start App, along with the Allegion Mobile Access Android SDK, allows organizations to understand how to build their own app that delivers NFC-based Schlage Credentials to the Google Wallet for use as a replacement or alongside physical card-based credentials. This guide covers the steps for building a Quick Start app. With the information covered in this guide, a software team is prepared to implement their own production ready version of the app.
If you're already familiar with the high-level details of an Employee Badge project and are looking for implementation specifics you can jump to the Building the Employee Badge Quick Start App for Google Wallet section of this guide.
The Employee Badge Mobile Credentials App is a fairly simple to use, and the application code is not very complex, however; the process to build the app involves a significant amount of up-front setup and configuration work. This guide seeks to walk through all requirements, dependencies and setup steps to complete the process in a straight-forward and easy-to-consume manner. Where necessary, references to other relevant guides will be linked to ensure no gaps exist to completing integration.
This guide does not assume the reader has advance knowledge of Wallet-based app development. The reader may choose to skip ahead as necessary where topics are already known or dependencies are already in place. Dependencies are listed in the Dependencies section of this guide.
This guide is intended to be read and used by anyone who is responsible for technical implementation of a Schlage Employee Badge Mobile Credential project, including mobile app developers, backend developers and project managers. It will also be useful for technical resources responsible for provisioning credential management systems and technical administrators responsible for managing credentials.
Since not everyone who reads this guide will be familiar with language used in physical security and access management, this section covers definitions for terms commonly used in the space.
| Term | Definition |
|---|---|
| Access Control System (ACS) | An Access Control System is a software platform that manages access rights of physical spaces and resources based on predefined rules, policies and user access rights. ACSs provide a unified platform for managing access to spaces and resources across an enterprise and capture real-time information related to who is attempting to use/access spaces and resources at all times. Access control systems work alongside access control devices such as locks, credential readers and modules to control physical space access and govern assignment of credentials to support access control management policies. |
| Bluetooth Low Energy (BLE) | BLE is a short-range wireless networking protocol based on Bluetooth, designed especially for short-range communication and used extensively in security, IoT and other applications where device-to-device communication is a requirement. BLE is useful where device battery life is prioritized over high data transfer requirements. Most smart phones available today are BLE-compatible. BLE (beacons) has an indoor broadcast signal range of 10-30 meters. |
| Credential | In access control, a credential is a piece of data, document or physical object owned by or granted to an individual by a third party that establishes the individual's identity and authority within a given physical and digital environment. Examples of credentials are plastic employee badges, pin codes, physical door keys, or a person's fingerprint or retina. |
| Near-Field Communication (NFC) | NFC is a very close proximity wireless communication standard, NFC based on the Radio Frequency Identification (RFID) standard, designed especially for near-physical communication and used extensively in security, IoT and other applications where device-to-device communication is a requirement. Most smart phones available today are NFC-compatible. NFC (tags) has a broadcast range of 4 centimeters. |
| Patron | In access control, a patron is a bearer and user of a credential. |
| Reader (or Module) | A reader is a device that controls access to a given space or resource. Readers communicate with and 'read' credentials presented to them and work alongside an Access Control System to determine if a patron has authorization to the resource or space it controls. Readers communicate access requests to an access control system, including unauthorized access requests, tamper attempts and breaches. |
This section covers the high-level process overview of the Employee Badge implementation project and description of each phase of the project.
![]()
The company will sign required Google NDA and Service Agreements to begin receiving access to proprietary documentation and processes as part of initial discovery.
Allegion and the company will conduct a site survey and discovery meetings to determine all requirements, relevant systems and dependencies for implementing a mobile access project. This will include evaluating existing hardware to determine all firmware requirements and configuration updates. This may also include onsite hardware testing and demonstration of readiness.
A company's developers will be granted access to the Schlage Mobile Access NFC SDK and Allegion Mobile Access APIs and the Schlage NFC Quick Start app for Google Wallet. The quick start app will be particularly useful in understanding the structure of an app.
After requirements have been collected, Allegion and company will work together to confirm project goals and determine solutions for any identified gaps.
Your Allegion representative(s) will work with you to determine project scope and requirements
Project work begins including development work against Schlage APIs and SDKs:
The company will work with Allegion to request access to Google Wallet-specific developer entitlements for Google mobile development. These entitlements are granted by Google only during implementation of a Google wallet-based project.
Development work will commence to connect the Allegion Cloud with the company's access control system. This work allows the company to send new patron records to Allegion and receive back a record of a new credential for that patron.
Company hardware (locks, readers) will be configured and prepared for use with Google Wallet-based mobile credentials
Patron training materials will be developed from template content including how-to guides, FAQs and other supporting documentation
Testing - including end-to-end testing and user acceptance testing - will be completed. Testing will also require review, validation and certification of test cases by Allegion.
Existing credential support staff will be trained on the use of the new wallet-based mobile credential technology and prepared for inbound patron technical support requests.
Production support plan will be implemented based on previously defined and agreed support requirements.
A pilot will be conducted to with a subset of patrons to validate the solution is working and address any outstanding issues with the solution.
The full launch will commence.
Implementing an Employee Badge project involves work and coordination across the following organizations and resources:
Allegion - provides software and hardware to support implementation. Allegion will also assign a Project Manager and Technical Account Manager to every Mobile Credentials project.
Integrator - The integrator is typically responsible for access control hardware installations, management and firmware updates. Employee Badge projects will always include the integrator as they will have critical information and important responsibilities necessary to prepare and configure hardware to support the project.
Mobile App Developers - If an app is being built to support this project, mobile app developers will be engaged to complete development. The mobile app is used to authorize the patron, associate the patron with a credential and store newly provisioned credentials into the Google Wallet.
Cloud Developers - An engineer will need to implement an integration between an existing Access Control System and the Allegion Cloud. This integration is required to provision new credentials.
Cloud System Engineers - An engineer or technical resource will need to configure single sign-on with the corporate identity service used to manage patron identity. This resource will also support ensuring all systems are able to communicate with each other and supporting activities such as system configurations, whitelisting of IP addresses, etc.
Project Manager - A project manager will manage this project and will manage not only the implementation but also support testing, documentation development, support process development, employee/patron training and system launch.
This section covers the required and/or supported hardware, software as well as developer tools and development experience required to implement an Employee Badge app for Google Wallet.
Because this is a technical solution and requires development to implement, the development topics in this guide cover topics at a level that expect developers to have knowledge of Android development processes, tools and technology, including experience with the Android Studio IDE and use of Gradle Build Manager. It also assumes developers have had previous experience developing and distributing Android mobile applications to the Google Play store.
Schlage Employee Badge solutions are deployed within and supported by a corporate information technology environment and infrastructure. There are some technologies that need to exist in that corporate environment to support this solution:
Physical Access Control System (PACS) - The organization must manage their locks and readers using a PACS. Allegion can support all major PACS for Employee Badge. Your Allegion Customer Success engineer can provide full details on PACS requirements, the scope of which is not covered in this guide.
Identity Management System (IdM) and Single Sign-On (SSO) - The organization must have an IdM deployed that validates employee identity and authenticates/authorizes employee access to corporate applications and systems. SSO must be supported for user authentication.
Any Android device that has NFC Hardware, can download the Google Wallet app and is running Android 12 or later
Note: Google Wallet Partner Terms and Conditions must be accepted
Google Play Services version 25.20.* or later is required for proper functionality of Mobile Credentials.
To verify the Google Play Services version on your Android device, follow these steps:
Express Mode is a streamlined access flow that lets an authorized mobile credential unlock a door immediately on proximity or a single simple action without additional confirmation/biometric input or extended app interaction. It's intended to speed entry for frequent, low-risk use while preserving appropriate security constraints.
Terminal Requested Authentication (TRA) is an optional feature that allows a terminal (reader) to request that the cardholder authenticate on the device (unlock device) before the card will allow certain operations. This lets the reader enforce device-based user authentication even when the card itself is configured to allow transactions without on-device authentication (Express mode). This feature can be applied to a reader through a configuration card. Reach out to your Developer Support Engineer to request a configuration card to enable this feature.
The table below lists all Schlage locks that support the Mobile Credentials solution:
| Locks that support Android NFC | Hardware Version Info | Firmware Version for Initial Android NFC Certification | Certification Status |
|---|---|---|---|
| Schlage Control B Locks | All hardware versions support Android NFC | 04.12.00 | Complete |
| Schlage Control BM Locks | All hardware versions support Android NFC | 05.11.39 | Complete |
| Schlage NDEB Locks | All hardware versions support Android NFC | 03.07.01 | Complete |
| Schlage LEB Locks | All hardware versions support Android NFC | 03.07.01 | Complete |
| Schlage NDEB Si Locks | All hardware versions support Android NFC | 03.09.07 | Complete |
| Schlage LEB Si Locks | All hardware versions support Android NFC | 03.09.07 | Complete |
| Schlage AD300 | Must have MT2/MTK2 Reader | AD.A.125 | Complete |
| Schlage AD400 | Must have MT2/MTK2 Reader AD | AD.A.125 | Complete |
The table below lists all Schlage readers & modules that support the Mobile Credentials solution:
| Readers that support Android NFC | Hardware Version Info | Firmware Version for Initial Android NFC Certification | Certification Status |
|---|---|---|---|
| Schlage
RC Reader Controller
(RC11, RC15, RCK15) |
All hardware versions support Android NFC | 01.08.02 | In process |
| Schlage
MTB Readers (MTB11, MTB15, MTBK15) |
All hardware versions support Android NFC | 60.47.14, 60.47.27 |
In process |
| Schlage MT15, MTK15, MT11, MTMS15, MTMSK15 Readers | All hardware versions support Android NFC | 22.02 | Complete |
| Schlage OEM200 Modules | All hardware versions support Android NFC | 2.01 | Complete |
| Schlage MT20 Enrollment Readers | All hardware versions support Android NFC | 9.02 | Complete |
![]()
Schlage Mobile Credentials give patrons the ability to use an NFC-based credential - known as a pass - stored in their phone's Google Wallet - to gain access to secured spaces managed by an Access Control System (ACS).
Schlage Employee Badge Mobile Credentials for Google Wallet are implemented using two technologies from Schlage:
The Schlage Employee Badge Product API - hosted in the Schlage Cloud, this API exposes the following capabilities:
Creation of a patron record and user access rights in the Allegion Cloud (also known as ingress)
Gives the PACS partner the ability to suspend, resume and delete user credentials (and propagates these changes with Google)
Gives the PACS partner the ability to update information on the pass including name, photo, email address and other patron information.
Other components needed for implementation include:
A Physical Access Control System (PACS - may be provided by Allegion)
An Identity Management Platform/Service
A Single Sign-On solution
An endpoint established to capture inbound data responses from the Schlage Cloud
Compatible hardware (locks and readers)
The remainder of this document will focus on implementation development activities and is intended for a technical audience (Developers, System Administrators).
The steps in this topic will focus on preparing your environment and then building the Employee Badge Quick Start app for Android. This guide assumes the developers working to build the app meet the following minimum dependencies for completing such a task:
Developers have access to the latest version of the Android Studio IDE.
Developers have experience building Android mobile apps.
Developers have experience using the Gradle build manager to manage code.
If you have not already done so, you'll need to create an account in the Allegion Developer Portal in order to gain access to the API and SDK documentation for the Allegion Employee Badge product. You'll also need this account to obtain a Mobile SDK Subscription Key, which is required to initialize and use the SDK within your app.
As you build an Employee Badge solution, your team will be working with APIs and SDKs across two different projects. Each project outlines specific areas of development effort and uses a different subscription key to interact with Allegion. For this guide/project, we'll be focused on mobile app development and so we'll be using the Mobile SDK Subscription Key to interact with Allegion SDKs.
When building the integration between an Access Control System and Allegion Cloud (the subject of a different guide), an API Subscription Key is used. These are each different keys with different permissions, and are not interchangeable. Mixing/matching keys will result in errors and frustration, so we'll make this callout in several places throughout this and other guides.
Follow these steps to create your account and request your Mobile SDK Subscription Key:
![]()
Click the Sign In link in the top right corner of the landing page.
If you have an account, enter your account details and click Login to log in.
![]()
If you don't have an account, click the Create Profile button to create an account. Enter required details to create an account and complete the email verification step to continue. You'll also need to complete profile details to proceed.
Once you have your profile you'll be directed to your Account Profile page. This is the area where you'll see
Product subscriptions to which you've been granted access. If you've never requested access to use Allegion
Products then you'll see an empty list here that displays, "No results found":
![]()
To obtain a key, send an email to Allegion Customer Success requesting a "Mobile SDK Product Subscription Key (https://developersupport.allegion.com/hc/en-us/requests/new?ticket_form_id=32387239325844&tf_22658560153748=new_integration) for the Employee Badge Android Mobile App. Expect to get a response in no less than 24-48 hours.
Once a response from Allegion is received confirming your access request has been processed, navigate to the products tab, from the Allegion Developer Portal click the "Schlage Mobile Credentials" product appropriate for your environment (Allegion pilot or production), enter the desired name for your subscription key, and click subscribe.
After you have get your Mobile SDK Subscription Key, navigate to your profile - here you will be able to view your subscription keys.
![]()
Next, we'll request access to the Schlage Employee Badge Quick Start App for Android codebase. The app uses the Allegion Mobile Access NFC SDK alongside the Allegion Employee Badge APIs to demonstrate how to get an app built and running. You'll need to request access to both Github repositories. This Quick start app will serve as a reference app to follow along to while you build your own. To make the request just reach out to your Allegion Customer Success engineer and request this access (https://developersupport.allegion.com/hc/en-us/requests/new?ticket_form_id=32387239325844&tf_22658560153748=new_integration) and provide the Github username/email address associated with the Github account to which you need access granted.
Once you have access to the Allegion Github repository, you'll need to download the Quick Start App Project and open it in android studio.
NFCQuickStartAppAndroid
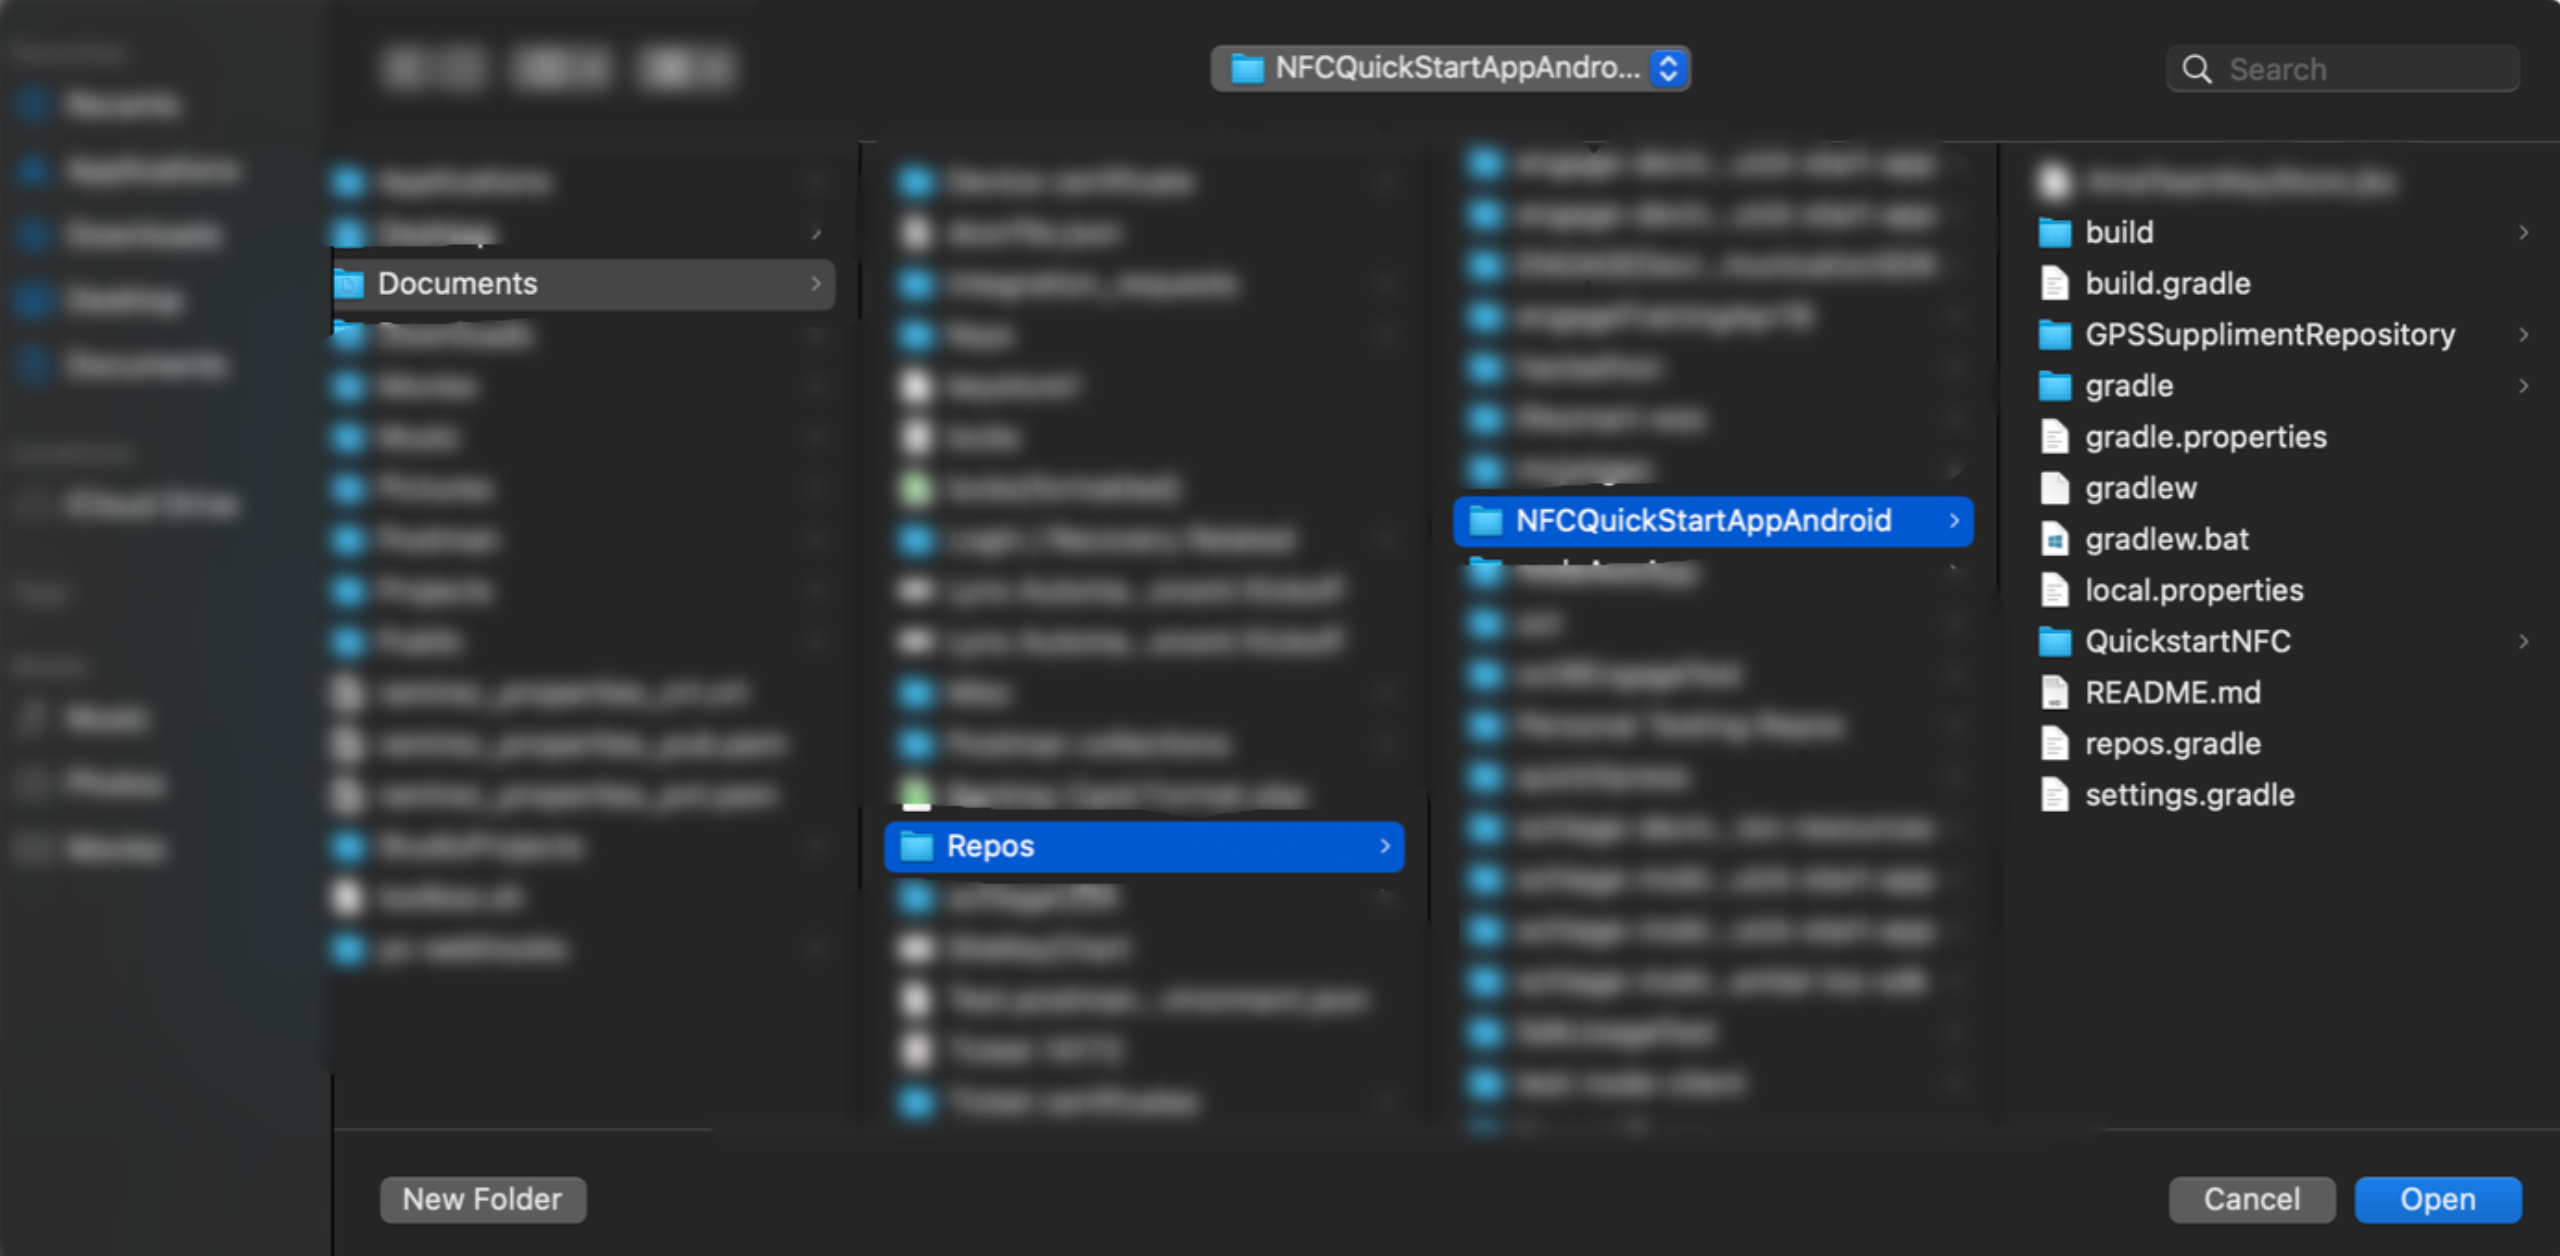
Now we can move on to configure the environment and build the app.
This section will set environment details and provide more detail how the app works. Before we cover steps to configure the environment, it's important to understand what the app is designed to do.
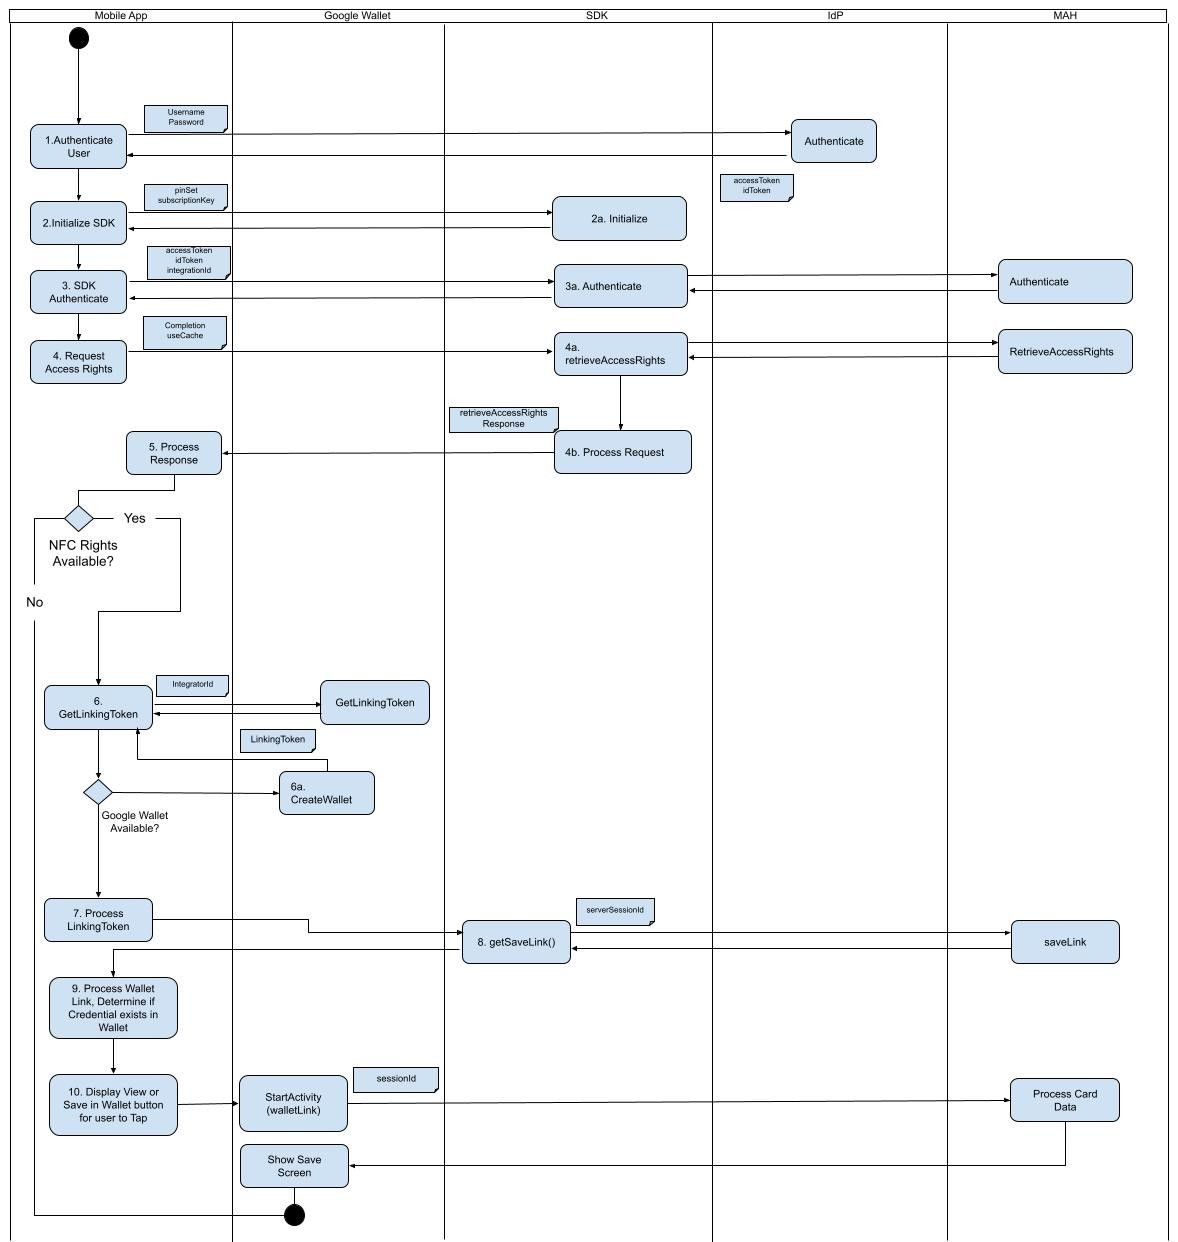
The purpose of this app is to create a digital credential for an authorized user/patron and deposit that credential into the Google Wallet. The user's identify must be verified as valid in order for the app to progress to generating a credential on their behalf. The process of verifying identity relies on a corporate Identity Management System (IdM). The app will challenge the user to supply a username and password and have the IdM confirm the user as valid. Once the user has been authorized, the app will generate a digital credential and allow the user to deposit/store it in the Google Wallet. The complete app flow is detailed below.
This sequence diagram illustrates the flow of activities the Quick Start app follows in order to deposit a digital credential into the Google Wallet, and is an appropriate best practice design for developers to follow as they build/modify their own application to include this capability. This flow covers activities across the mobile app, the Allegion Mobile Access SDK, a generic IdP and the Google (Android) wallet.
Note: The following instructions are only for connected Wear OS devices. For Android devices, use the TapAndPay environment settings method above.
adb shell touch /sdcard/Download/android_pay_env_override_sandbox
adb rebootadb shell rm /sdcard/Download/android_pay_env_override_sandbox
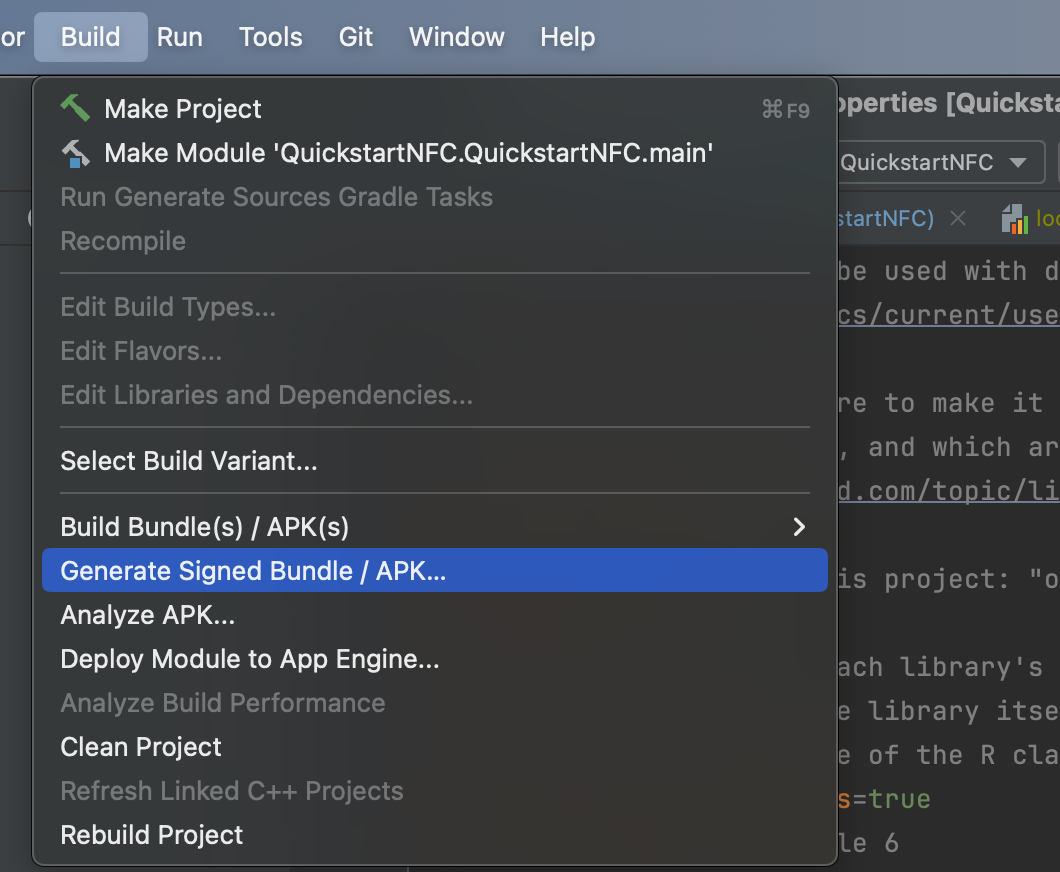
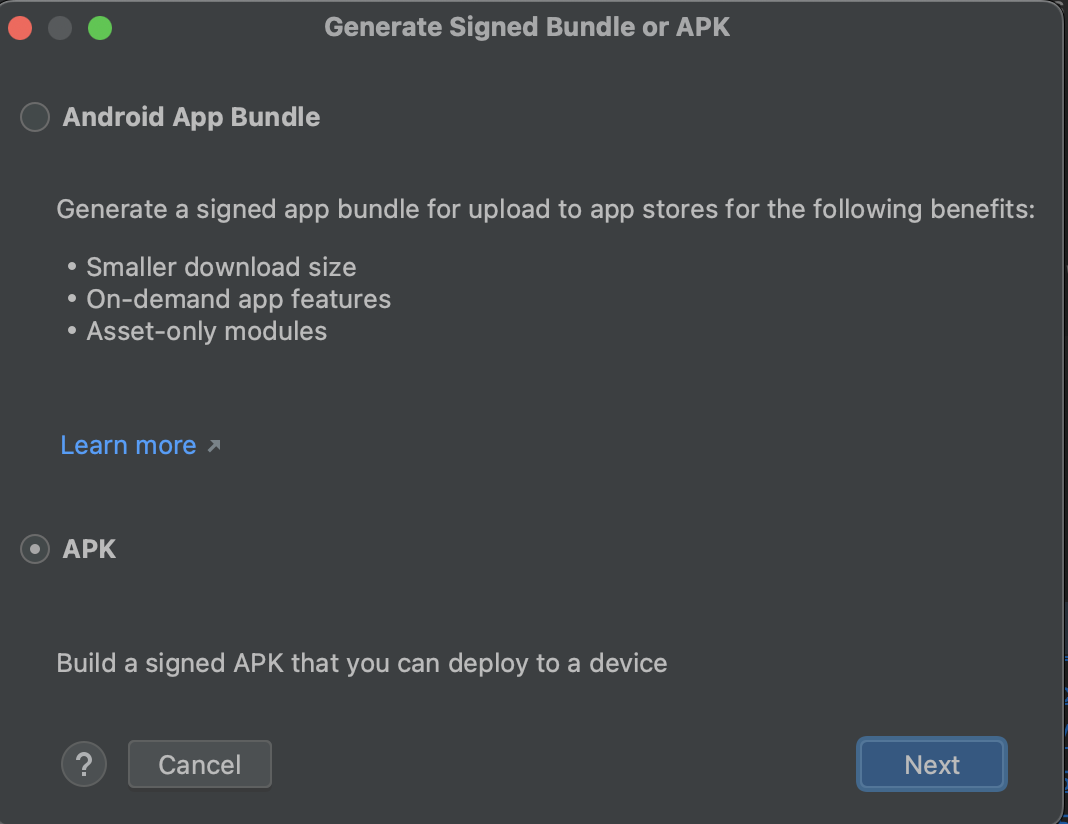
adb rebootBuild > Generate signed bundle or APK
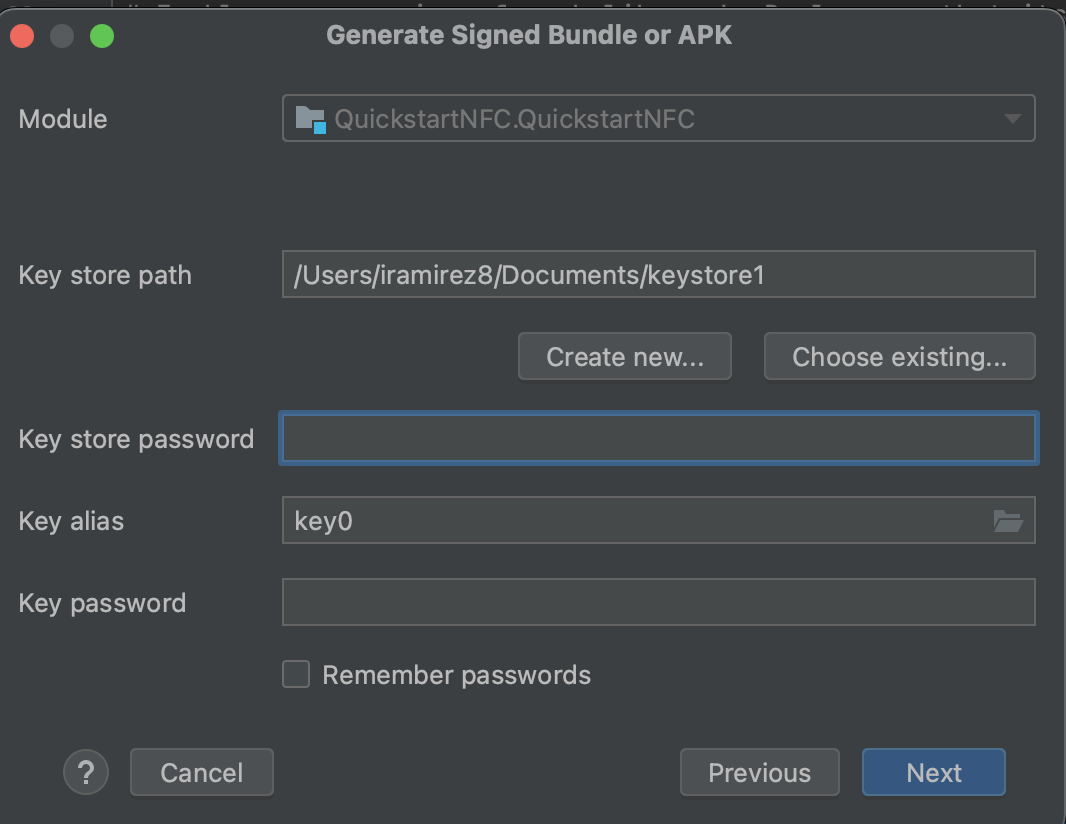
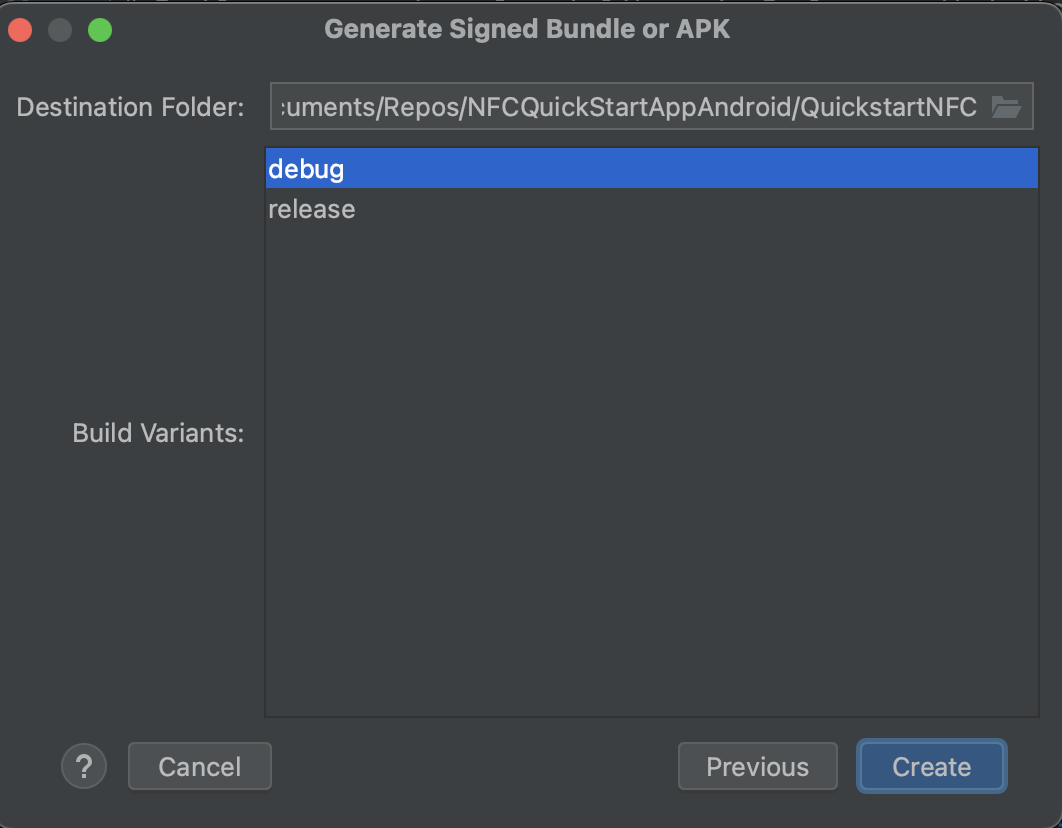
build.gradle > Android > SigningConfigs and insert the following code
snippet -
debug {

      storeFile file('..\\{YOUR_KEYSTORE}.jks')

      storePassword properties.getProperty('{YOUR_SIGNING_PASSWORD}')

      keyAlias 'key0'

      keyPassword properties.getProperty('{YOUR_SIGNING_PASSWORD}')

    }
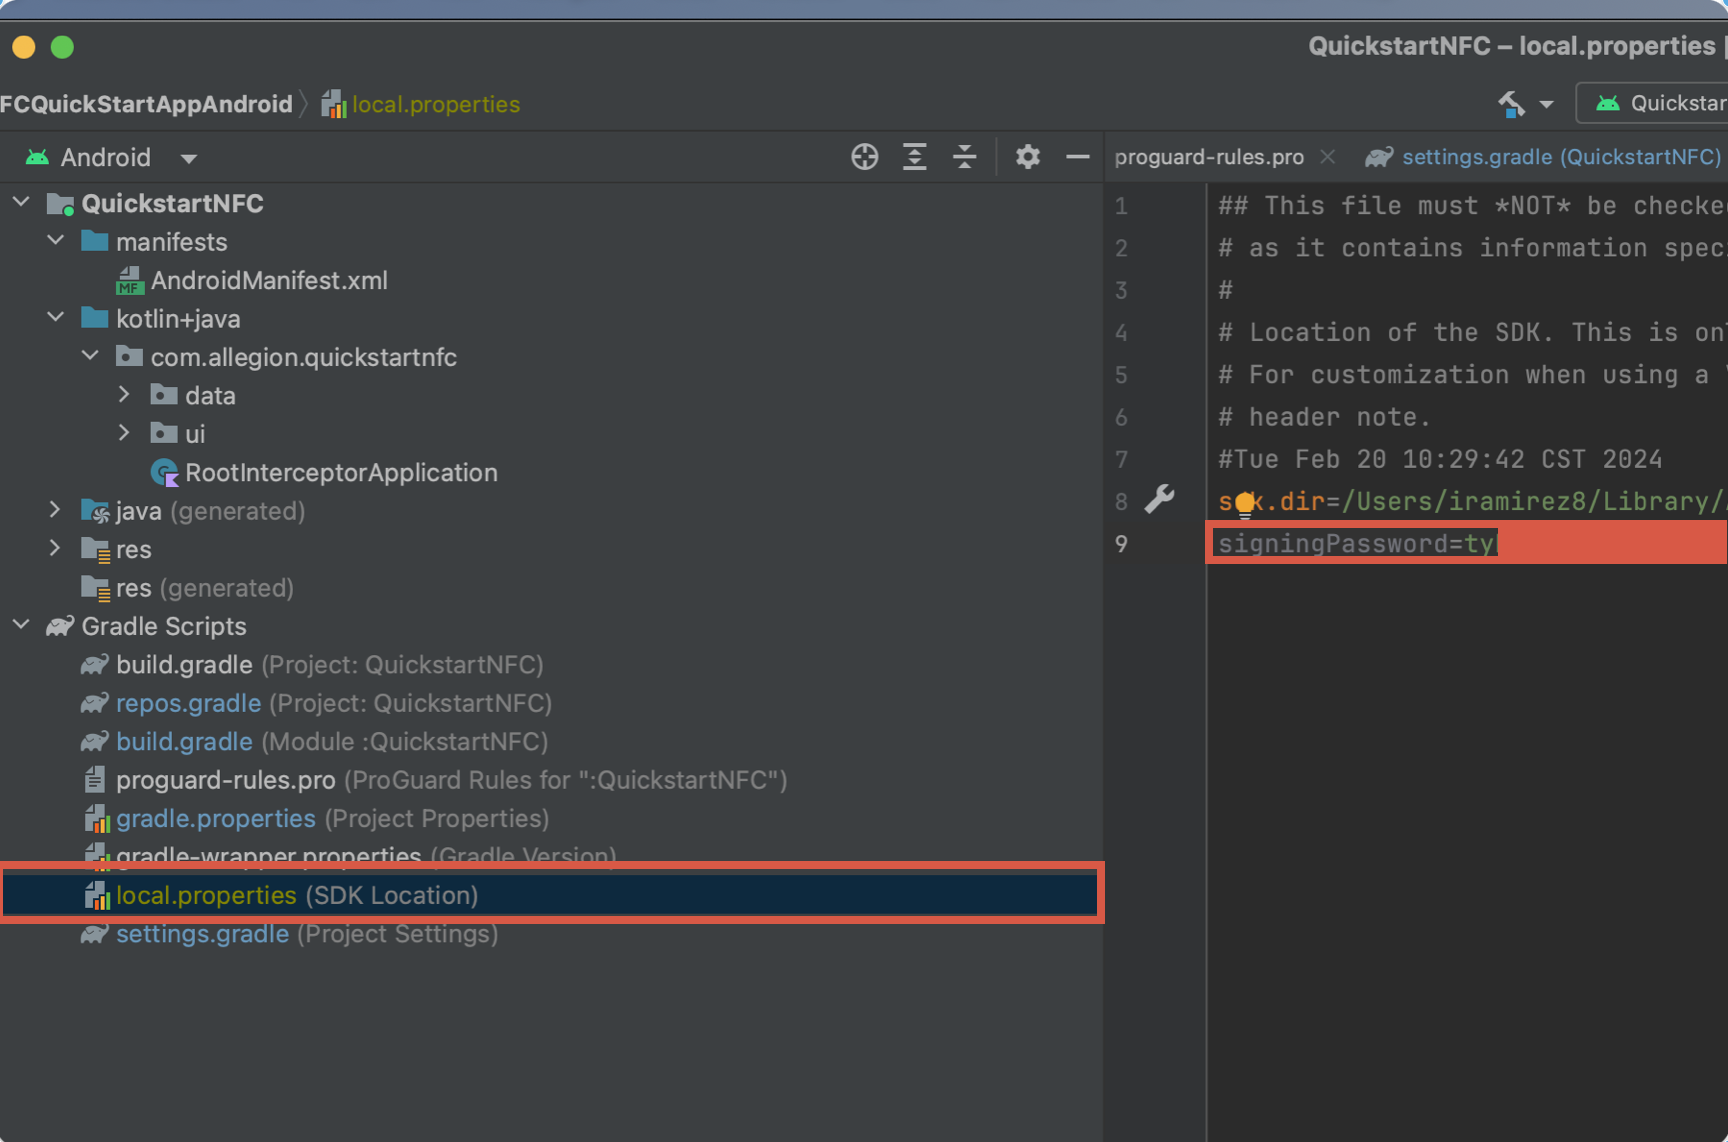
signingPassword={SINGING_PASSWORD}
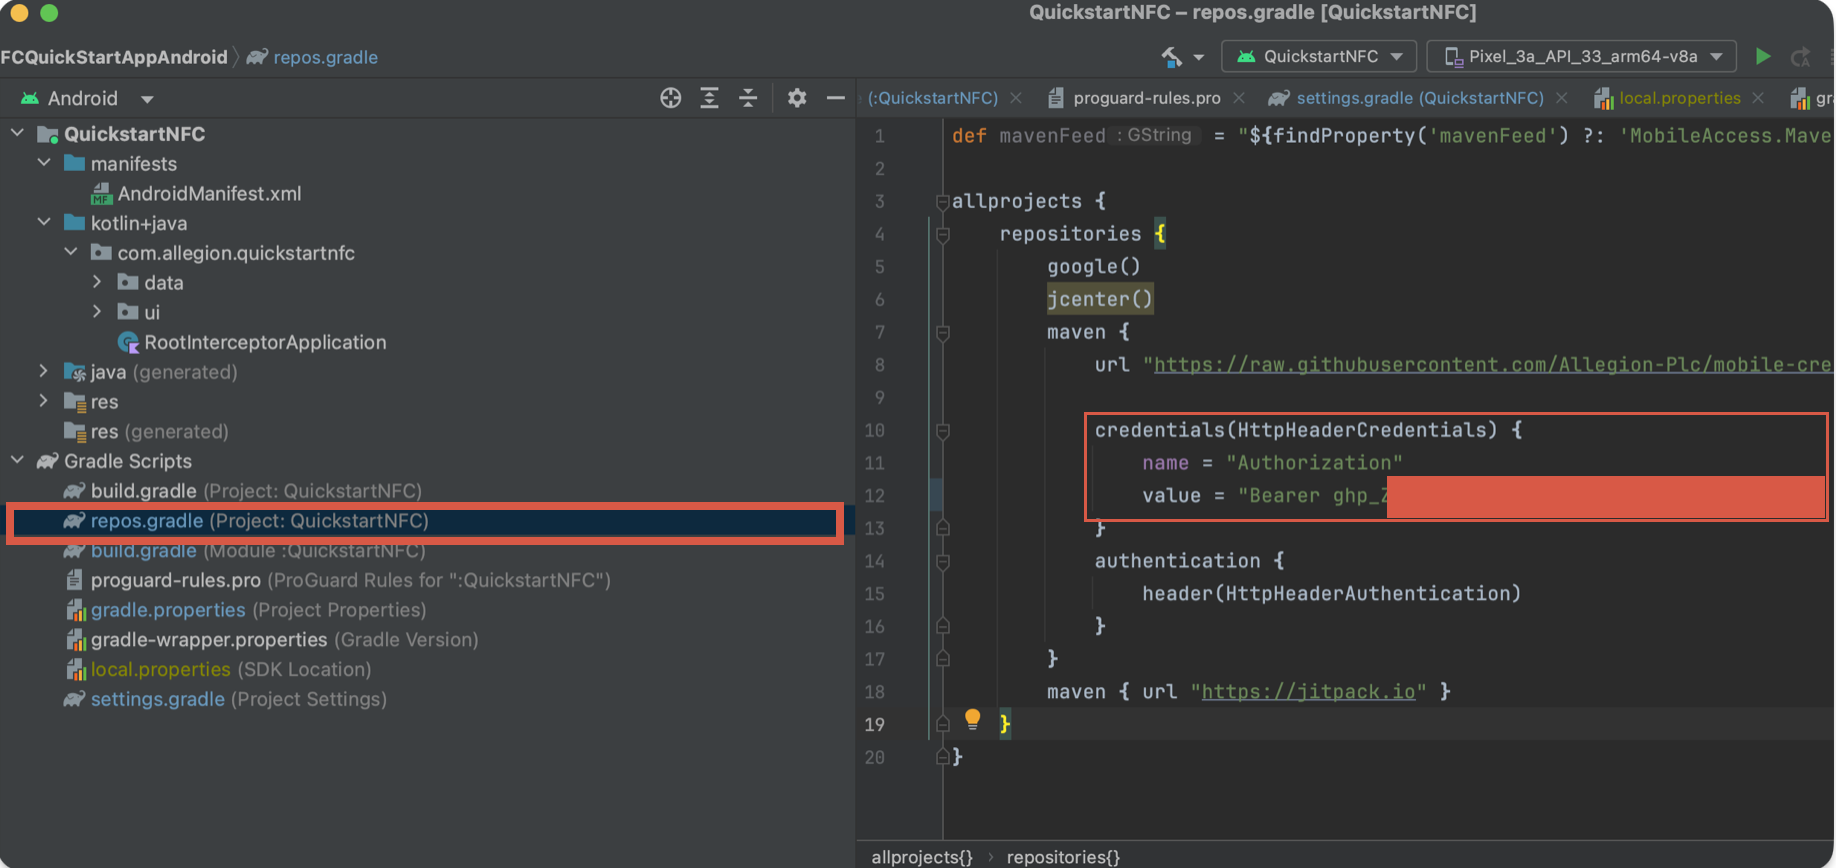
Your Github Profile > settings > Developer Settings > Personal Access Tokens > Tokens (Classic) > Generate New Token
Currently, the github personal access token must be put as plaintext in the repos.gradle file as shown below.
In order to present the "Add to Wallet" button, as well as push a credential to the google wallet, google must grant access
to those resources.
A link to the form to request access to the tap and pay client can be found here.
A link to the form the rquest access to the APIs and "Add to Wallet" button can be found here.
Once those forms are filled and submitted a google representivite will be in contact and will be able to provide access to the private
documentation that covers usage of the API and tap and pay client. Using the guidance from that documentation one will need to add the Tap and Pay source
code to the quickstart app and/or project.
The Quick Start App was designed to use a standard OAuth flow to process authorization requests. You'll need to
configure your Identity Management System to recognize requests coming from the Quick Start app in order for the
OAuth process to properly flow. To do this, you'll need to specify your Quick Start App as a valid client for
performing authorization requests, which involves designating the app's callback and logout URLs.
The Quick Start app uses Auth0 for this purpose, so this guide will demonstrate where to make this change in
Auth0, however any IdM will allow this setting to be applied.
Log into Auth0.
Browse to Applications and select the application associated with your app. If you have not created one then create a new application by clicking the Create Application button and following the prompts.
![]()
Once in the Application details, scroll down to the Application URIs section. You'll be populating the Allowed Callback URL and Allowed Logout URL:
![]()
[App Bundle ID]://[IDM Domain]/android/[App Bundle ID]/callback
Replace both references of [App Bundle ID] with your App's Bundle Identifier and replacing
[IDM Domain] with your Auth0 domain (found at the top of the Auth0 application details page). For
instance, given Auth0 domain of myapp.us.auth0.com and App Bundle Identifier of
com.mycompany.thisCompanyBadgeApp, you would populate the Allowed Callback URL as:
com.mycompany.thisCompanyBadgeApp://myapp.us.auth0.com/android/com.mycompany.thisCompanyBadgeApp/callback
![]()
[App Bundle ID]://[Auth0 Domain]/android/[App Bundle ID]/callback
(Note: The Quick Start app happens to use /callback as the endpoint for both callback and logout
URLs.)
Replace both references of [App Bundle ID] with your App's Bundle Identifier and replacing
[IDM Domain] with your Auth0 domain (found at the top of the Auth0 application details page). For
instance, given Auth0 domain of myapp.us.auth0.com and App Bundle Identifier of
com.mycompany.thisCompanyBadgeApp, you would populate the Allowed Callback URL as:
com.mycompany.thisCompanyBadgeApp://myapp.us.auth0.com/android/com.mycompany.thisCompanyBadgeApp/callback
![]()
![]()
Your Identity Management System will need to provide an API to Allegion so tokens generated in your mobile app can be validated for use with the Allegion Cloud service. Specifically, you'll need to create an API that represents Allegion as the target - or, Audience - for tokens representing this user. Auth0 uses the term Identifier to represent the Audience claim for an API. Your app will then specify a URL representing Allegion's Cloud Service as the Audience. This is a simple task in Auth0 but must be done before the Quick Start app will recognize token that Allegion's cloud will consider valid for processing user requests.
From the Auth0 dashboard, browse to Applications --> APIs
![]()
Click the Create API button.
![]()
For the Name field, enter a name for your new API such as Allegion Employee Badge App API
For the Identifier field, enter https://api.allegion.com/employeebadge/partnerqa - note that this is the required audience for an employee badge token
![]()
Click the Create button to create the API. Once done, your API should be successfully created and ready to process requests from your app.
![]()
Allegion relies on a custom claim sent within your access token (JWT) to capture the email address of the user
attempting to add a mobile credential, aswell as another custom claim to identify the integration ID. The email address is an important piece of information because it's used as
the key/unique identifier that ties identity of the user in the IdM and the Access Control System to a
User Access Right record in Allegion's cloud. While other claims in access tokens generated by
your IdM may already contain the user email address (such as emailor subclaims), there
is no standard or requirement that an IdM must use a specific claim to assert email address. Allegion uses a
custom claim to enforce a standard approach for asserting user email since it's important and required
name that asserts that the name of the user
authenticating is "Isaac Bond". Claim represent information as name/value pairs where the name is a string and
the value can be any valid JSON value. Custom claims are claims that are added to the JWT and arenot part of
any standard.
Here's the structure of the custom claims that should be included in access JWTs when using this option:
"https://api.allegion.com/email": [email]
"https://api.allegion.com/integrationId": [integrationId]
Where [email] is replaced by the email address of the user identified by the accessJWT, and [integrationId] is replaced by the integrationId provided by Allegion.
The process for adding a custom claim to your access JWT will be different depending on the IdM you use.
If you happen to use Auth0 as your IdM provider, the recommended method for adding a custom claim is to add an Action to the Login Flow of your application with custom code to add the claim. Details on adding an action to the Login flow for an Auth0 application for Auth0 are detailed here and a demonstrable video is available here; you may use the following sample code as the basis for your login flow action:
/**
* Handler that will be called during the execution of a PostLogin flow.
*
* @param {Event} event - Details about the user and the context in which they are logging in.
* @param {PostLoginAPI} api - Interface whose methods can be used to change the behavior of the login.
*/
exports.onExecutePostLogin = async (event, api) => {

  // This rule adds the authenticated user's email address to the access and id tokens.
  if (event.authorization) {

    const namespace = "https://api.allegion.com";

    api.accessToken.setCustomClaim(namespace+"/email", event.user.email);
    api.idToken.setCustomClaim(namespace+"/email", event.user.email);
    console.log("Adding custom claim -" + namespace+"/email:" + event.user.email);
  }
};
The code above defines an action that adds the custom claim to both the access token and ID token. It also
outputs a message to the log regarding the additional claim value. If you're using Auth0 you can look at Auth0
logs to confirm your claim is being successfully processed:
![]()
Once you've completed all steps above, you are ready to build and run the app.
If after logging into the app you are presented with the error, "Authentication Error Additional error detail is not available...", this is potentially due to a misconfiguration of the Employee Badge cloud environment, misconfiguration of your Android Studio environment variables or misconfiguration of your Auth0 environment. To check the cause of the issue, open Android Studio and review the latest log output for the following error:
{"errors":null,"errorCode":"IdTokenInvalid",
"type":"https://api.allegion.com/errors/producers/MahApi/errorcodes/IdTokenInvalid",
"details":"Invalid Open Id Token.","producerId":"MahApi","title":"The ID Token failed validation.",
"instance":null,"status":400}
This error points to a problem using the token obtained from the IdM to authorize the user as a valid PACS patron. To solve this problem you'll need to work with Allegion Customer Success to ensure your Employee Badge Cloud environment is properly configured based on the properties supplied to Allegion in the Request API Access step of this guide.
This error points to a problem using the token obtained from the IdM to authorize the user as a valid PACS patron. To solve this problem you'll need to work with Allegion Customer Success to ensure your Employee Badge Cloud environment is properly configured based on the properties supplied to Allegion in the Request API Access step of this guide.
If all steps were successfully complete you should be able to run your app. From here your credential will need to be provisioned in the Physical Access Control System (PACS) in order to be used, which may be similar to the process for provisioning physical credentials. PACS Configuration is unique to your environment and beyond the scope of this document.
Google requires functional testing and certification to be completed for all implementations of mobile credentials before any production launch. The following table lists links to test and certification requirements for Google Wallet Mobile Credentials that will be required to be completed by partners before production certification and/or a site launch.
Note: If you receive a 404 or access denied page you must request access to the Google Wallet documentation as detailed above.
| Vertical | Test Guidelines |
|---|---|
| All | Functional Testing Guidelines for All Verticals |
| Corporate Badge | Corporate Badge Testing Checklist |
| Campus ID | Campus ID Testing Checklist |
| Multifamily | TBD |
Google maintains branding guidelines at the links below:
| Vertical | Branding Guidelines |
|---|---|
| Corporate Badge | Corporate Badge Branding Guidelines |
| Campus ID | Campus ID Branding Guidelines |
| Multifamily | TBD |