Allegion Developer Portal
Allegion Developer Portal

Last modified: 06.10.2024
The purpose of this guide is to walk a software development team through the steps necessary to integrate and use Schlage BLE Mobile Credentials with their Access Control system. The Schlage BLE Quick Start Apps - along with the Allegion Mobile Access SDKs - allows organizations to understand how to build their own solution to create, manage and distribute BLE-based Schlage Credentials for use as a replacement or alongside physical, card-based credentials. This guide covers the steps for building two different Quick Start apps, along with the cloud-based integrations necessary to support a Schlage BLE Mobile Credentials solution. After following the steps in this guide, a development team is ready to build and offer Schlage BLE Moble Credential features from their own branded solutions.
This guide supplements and refererences the formal BLE mobile credentials developer API and SDK documentation found on the Allegion Developer Portal. It is recommended that you read and review all content as you build your solution.
The BLE Mobile Credentials solution is fairly simple to build and use, and application code is not complex, however; the process to build both Quick Start apps along with the cloud-based API integration necessary to achieve integration of a production solution spans several technology stacks depending on if you intend to support both iOS and Android based mobile applications. This guide seeks to walk through all requirements, dependencies and setup steps to complete the process in a straight-forward and easy-to-consume manner, using the iOS Quick Start app implementation. Where necessary, references to other relevant guides will be linked to ensure no gaps exist to completing integration.
This guide assumes the reader has some advanced knowledge of iOS and/or Android app development as well as experience working with secure, REST-based APIs. The reader may choose to skip ahead as necessary where topics are already known or dependencies are already in place. Dependencies are listed in the Dependencies section of this guide.
This guide is intended to be read and used by anyone who is responsible for technical implementation of a Schlage BLE Mobile Credential project, including mobile app developers, backend developers and project managers. It will also be useful for technical resources responsible for provisioning credential management systems and technical administrators responsible for managing credentials.
Since not everyone who reads this guide will be familiar with language used in physical security and access management, this section covers definitions for terms commonly used in the space.
| Term | Definition |
|---|---|
| Access Control System (ACS) | An Access Control System is a software platform that manages access rights of physical spaces and resources based on predefined rules, policies and user access rights. ACSs provide a unified platform for managing access to spaces and resources across an enterprise and capture real-time information related to who is attempting to use/access spaces and resources at all times. Access control systems work alongside access control devices such as locks, credential readers and modules to control physical space access and govern assignment of credentials to support access control management policies. |
| Bluetooth Low Energy (BLE) | BLE is a short-range wireless networking protocol based on Bluetooth, designed especially for short-range communication and used extensively in security, IoT and other applications where device-to-device communication is a requirement. BLE is useful where device battery life is prioritized over high data transfer requirements. Most smart phones available today are BLE-compatible. BLE (beacons) has an indoor broadcast signal range of 10-30 meters. |
| Credential | In access control, a credential is a piece of data, document or physical object owned by or granted to an individual by a third party that establishes the individual's identity and authority within a given physical and digital environment. Examples of credentials are plastic employee badges, pin codes, physical door keys, or a person's fingerprint or retina. |
| Near-Field Communication (NFC) | NFC is a very close proximity wireless communication standard, NFC based on the Radio Frequency Identification (RFID) standard, designed especially for near-physical communication and used extensively in security, IoT and other applications where device-to-device communication is a requirement. Most smart phones available today are NFC-compatible. NFC (tags) has a broadcast range of 4 centimeters. |
| Patron | In access control, a patron is a bearer and user of a credential. |
| Reader (or Module) | A reader is a device that controls access to a given space or resource. Readers communicate with and 'read' credentials presented to them and work alongside an Access Control System to determine if a patron has authorization to the resource or space it controls. Readers communicate access requests to an access control system, including unauthorized access requests, tamper attempts and breaches. |
| Door File | A door file is a JSON-formatted file that is sent to a lock or reader device to instructs it on who has authorized access. |
| Site | A site is a representation of a physical installation of Allegion devices managed by an Access Control System. When devices are commissoined they are formally associated with a single site. |
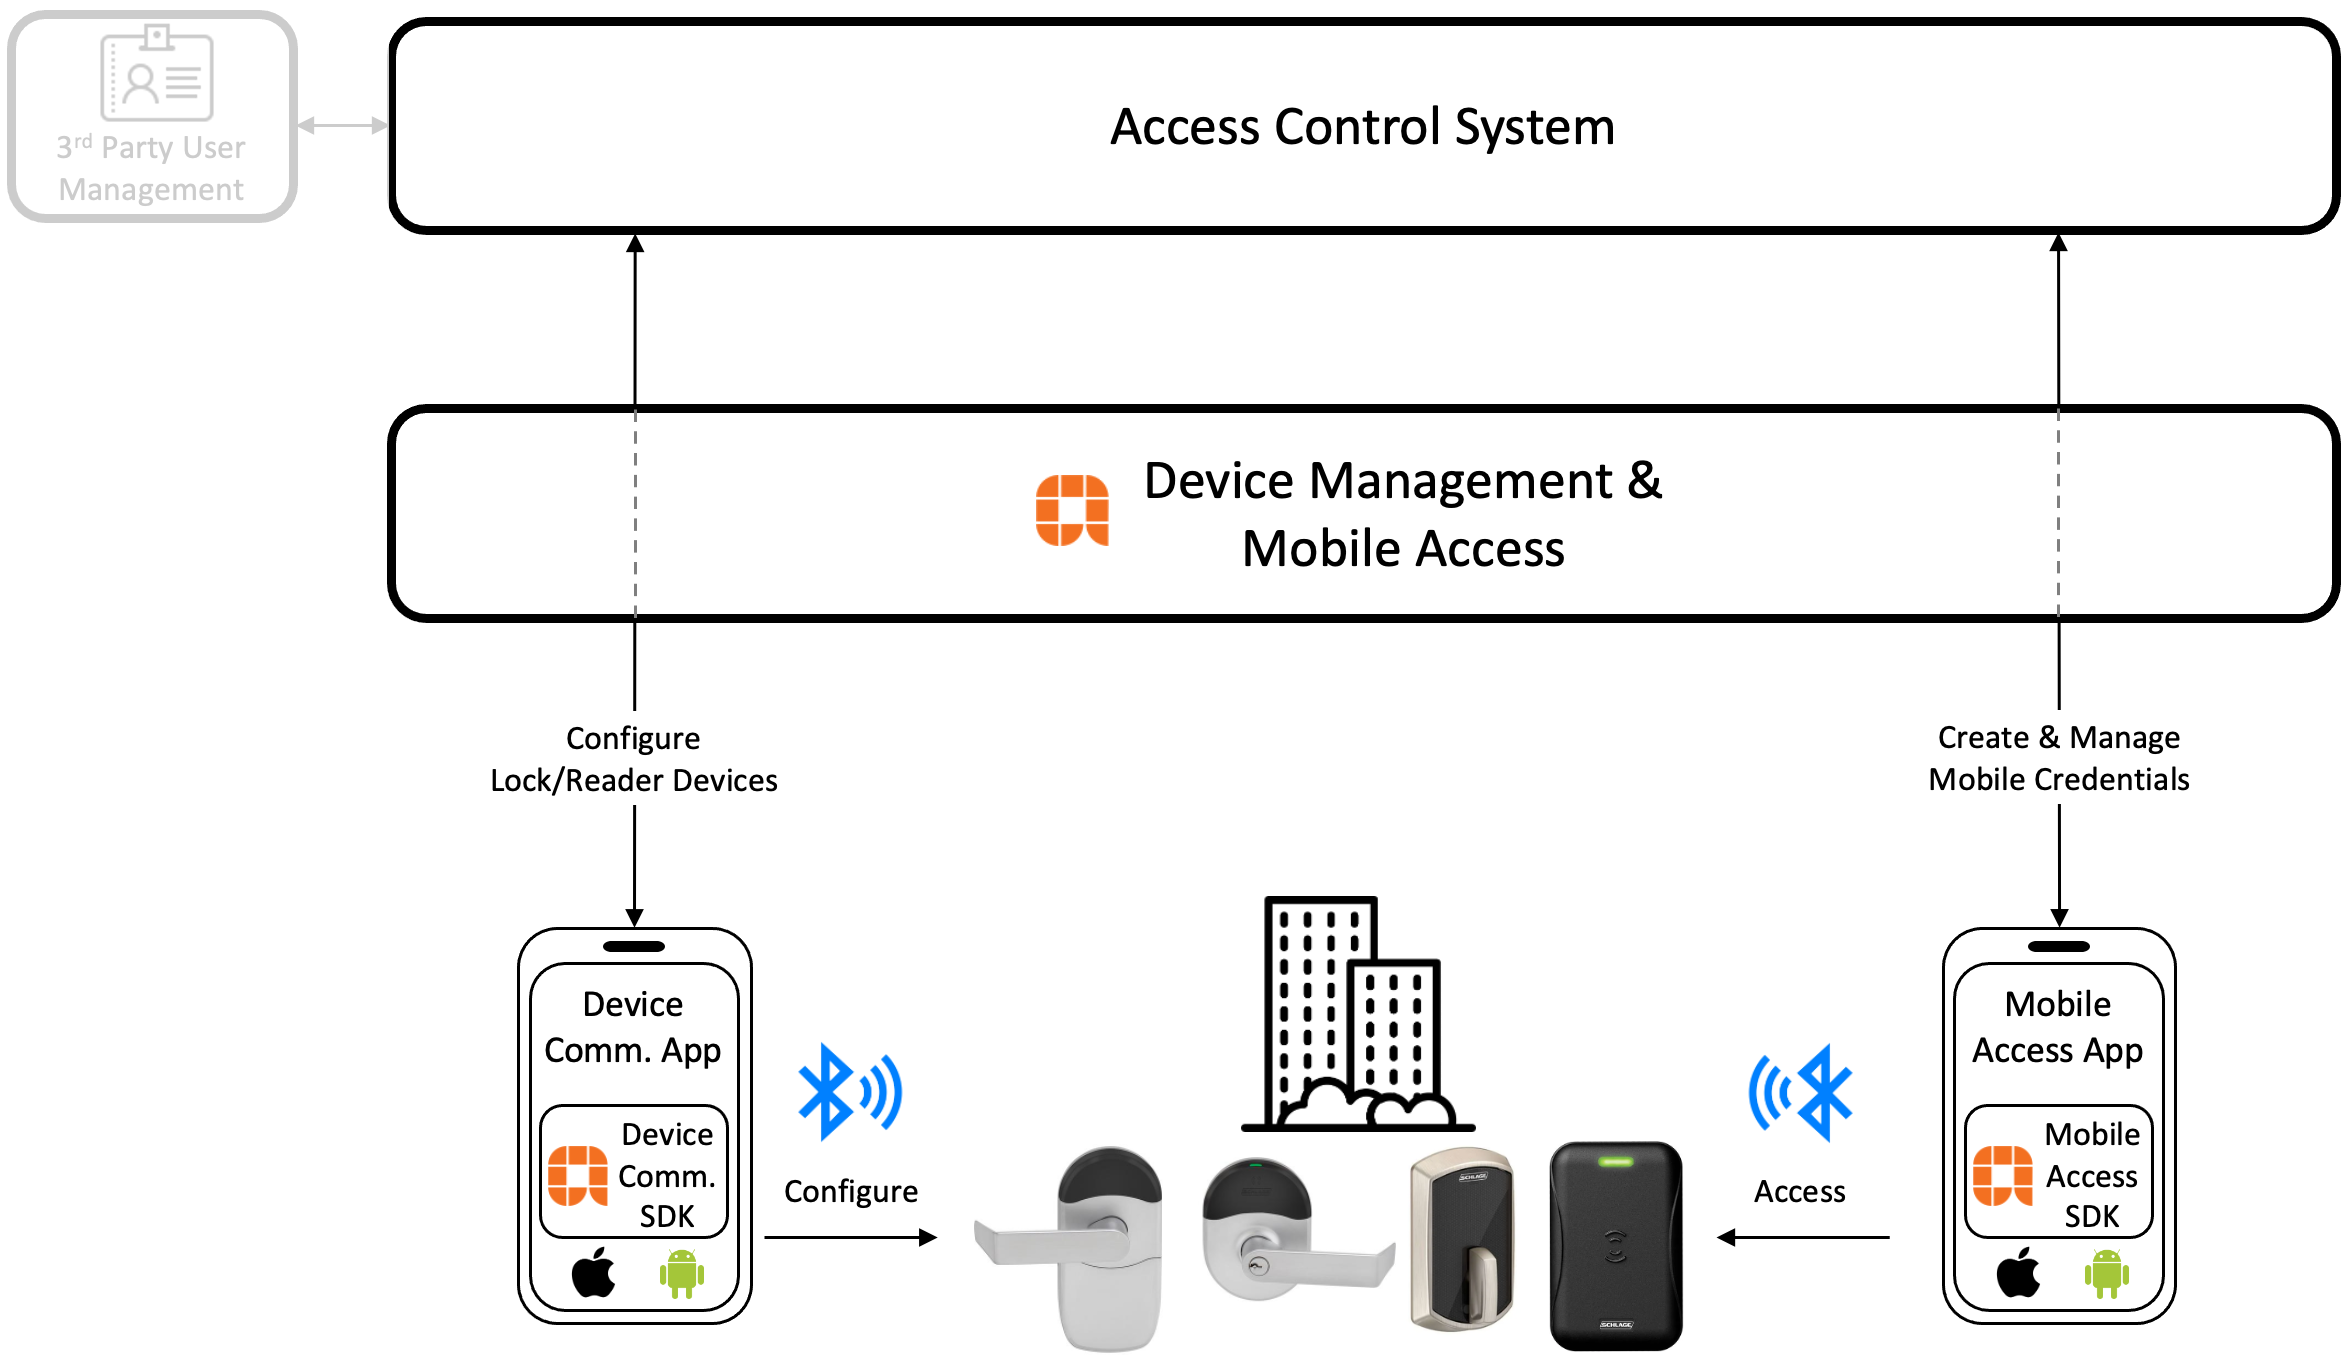
Schlage BLE Mobile Credentials give patrons the ability to use BLE-based credentials to gain access to secured spaces managed by an Access Control System (ACS). There are 3 technologies provided by Allegion to support this solution:
1. The Allegion Device Management & Mobile Access Cloud - The Allegion Device Management & Mobile Access Cloud (also referred to as the Engage Cloud) is Allegion's cloud-based Device Management and BLE Credential Management platform. This platform consists of several cloud-based services hosting secure, RESTful web-based API endpoints used to broker interactions between Allegion security hardware, mobile devices and an Access Management Platform. Developers will build solutions that interact with these services directly as well as through the Allegion SDKs from within mobile applications.
Note that a prequesite to begin working with BLE credentials is a completed integration to the Allegion Device Management Cloud (Engage) for Device Commissioning.
The focus of this guide is to demonstrate how to support BLE Schlage Mobile Credentials with an Access Control System - it is not focused on device commissioning. This guide covers a common use case scenario for establishing an Engage site and commissioning devices and does not intend to address the full range of configuration options available for Access Control System integration. Reach out to your Allegion Technical Account Manager for assistance with more complex deployment models beyond the scope of device commissioning processes covered in this document.
2. The Allegion Device Communication SDK - The Allegion Device Communication SDK is a collection of software development tools provided by Allegion that facilitate interactions to commission, configure and manage Schlage hardware. This SDK implements interactions to the BLE General Attribute Profile (GATT)-defined functions available on Allegion devices along with API calls to the Allegion Mobile Access Cloud to achieve these capabilities. Using this SDK, developers can build apps that building/property managers will use to manage the locks and readers in their buildings, including device commissioning, updating access rights and update firmware. Within the context of BLE Mobile Credentials, this SDK is important to achieve door file dispatch to locks once credentials are created.
The Allegion Device Communication SDK is available for both iOS (Swift library) and
Android
(Java/Kotlin) versions.
In this guide we'll cover building the iOS version of the Allegion Device Communication Quick Start App, which
uses the Allegion Device Communication SDK to demonstrate how to build device communication capability into an app
for use by your customers. The codebase for this app is also available for both iOS and Android versions.
3. The Allegion BLE Mobile Access SDK - The Allegion Mobile Acces SDK is a collection of software development tools provided by Allegion that facilitate interactions to download BLE credentials to a mobile device, search for Schlage device hardware in BLE range and allow users to use their downloaded mobile credentials to access spaces secured by Schlage device hardware. This SDK implements interactions to the BLE General Attribute Profile (GATT)-defined functions available on Allegion devices along with API calls to the Allegion Mobile Access Cloud to achieve these capabilities. Using this SDK, developers can build apps that patrons will use to download BLE credentials, discover in-range security hardware to which they have access and use their downloaded credentials to control devices for which they are authorized.
The Allegion Mobile Access SDK is available for both iOS (using Swift
library) and Android (Java/Kotlin) versions.
In this guide we'll cover building the iOS
version of the Allegion BLE Mobile Access Quick Start App, which uses the Allegion BLE iOS Mobile
Access SDK to demonstrate how to build mobile access capability into an app for use by your customer's patrons.
Note that the codebase for this app is also available for both iOS and Android.
Other components needed for implementation include:
A Physical Access Control System
An Identity Management Platform/Service
A completed integration to Allegion Engage Platform to support device commissioning
Compatible mobile devices
Compatible Allegion security hardware (locks and/or readers)
This section covers the high-level process for completing a BLE Mobile Credentials implementation project.
![]()
Allegion and the company will conduct a site survey and discovery meetings to determine all requirements, relevant systems and dependencies for implementing a mobile access project. This will include evaluating existing hardware to determine all firmware requirements and configuration updates. This may also include onsite hardware testing and demonstration of readiness.
Company's developers will be granted access to the necessary Documentation, SDKs and APIs to begin technical evaluation.
After requirements have been collected, Allegion and company will work together to confirm project goals and determine solutions for any identified gaps.
Your Allegion representative(s) will work with you to determine project scope and requirements
Project work begins including development work against Schlage APIs and SDKs:
Development work will commence to connect the Allegion Cloud with the company's Access Control System (ACS). This work allows the company to send new patron records to Allegion and receive back a record of a new credential for that patron.
Company hardware (locks, readers) will be configured and prepared for use with BLE mobile credentials
Patron training materials will be developed from template content including how-to guides, FAQs and other supporting documentation
Testing - including end-to-end testing and user acceptance testing - will be completed. Testing will also require review, validation and certification of test cases by Allegion.
Existing credential support staff will be trained on the use of the new wallet-based mobile credential technology and prepared for inbound patron technical support requests.
Production support plan will be implemented based on previously defined and agreed support requirements.
A pilot will be conducted to with a subset of patrons to validate the solution is working and address any outstanding issues with the solution.
The full launch will commence.
Implementing a BLE Mobile Credentials project involves work and coordination across the following organizations and resources:
Allegion - provides software and hardware to support implementation. Allegion will also assign a Project Manager and Technical Account Manager to every Mobile Credentials project.
Integrator - The integrator is typically responsible for access control hardware installations, management and firmware updates. Mobile Credentials projects will always include the integrator as they will have critical information and important responsibilities necessary to prepare and configure hardware to support the project.
Mobile App Developers - Mobile app developers will be engaged to complete development. The mobile app is used to authorize the patron, download a BLE credential to the phone and allow the patron to use the credential/app to control devices to access authorized spaces.
Cloud Developers - An engineer will need to implement an integration between an existing Access Control System and the Allegion Cloud. They will also work with the available user identity management systems to ensure app users are authorized and represented/identified across all systems. This integration is required to provision new credentials.
Cloud System Engineers - An engineer or technical resource will need to ensure all systems are able to communicate with each other and supporting activities such as system configurations, whitelisting of IP addresses, etc.
Project Manager - A project manager will manage this project and will manage not only the implementation but also support testing, documentation development, support process development, employee/patron training and system launch.
Technical Writers - A technical writer will be responsible for documenting application use for application end users and ensuring all necessary instructions and guidance is provided to users, system operators and any other stakeholders.
This section covers the required and/or supported hardware, software as well as developer tools and development experience required to implement a mobile credential on iOS.
Because this is a technical solution and requires development to implement, the development topics in this guide cover subjects at a level that expect developers to have knowledge of mobile app and cloud development activities, tools and technology. For instance, if developing the iOS mobile app, developers should have experience with the XCode IDE and use of Cocoapods Dependency Manager. This guide also assumes developers have had previous experience developing and distributing mobile applications through the Apple or Google App stores.
Experience consuming RESTful API’s and API IDE tools such as Postman
Experience cloning and installing code from GitHub repositories
Familiarity with Java Web Tokens (JWT) and public/private key pairs (specifically, ECC keys)
Schlage Mobile Credentials solutions are deployed within and supported by a corporate information technology environment and infrastructure. There are some technologies that need to exist in that corporate environment to support this solution:
Physical Access Control System (PACS) - The organization must manage their locks and readers using a PACS. Allegion can support all major PACS for mobile credentials. Your Allegion Customer Success engineer can provide full details on PACS requirements, the scope of which is not covered in this guide.
User Identity Management System - The organization must have some form of User Management system such as an IdM deployed that can uniquely identify and validate employee identity and authenticate/authorize employee access to receive credentials.
Compatible hardware
iPhone SE, iPhone 6s, iPhone 6s Plus or later running iOS 15.6 or later
Android 11 or later
BLE Mobile Credentials are compatible to be used with the following devices:
| Locks that support BLE | Hardware Version Info |
|---|---|
| Schlage Control B Locks | All versions support BLE |
|
Schlage
MTB Readers (MTB11, MTB15, MTBK15) |
All versions support BLE |
| Schlage
LEB Locks (LEBMS, LEBMB, LEBMD) |
All versions support BLE |
| Schlage NDEB Locks | All versions support BLE |
|
Schlage
RC Reader Controller (RC11, RC15, RCK15) |
All versions support BLE |
For more information please reach out to us here: Go to Contact Us
Implementing a BLE Mobile Credentials project involves the following activities:
If you can already commission locks and configure locks, including sending door files, then you don't need to
repeat that step for this project.
The remainder of this document will focus on implementation development activities and is intended for a technical audience (Developers, System Administrators).
This guide will focus on the iOS implementation of Shlage BLE Mobile Credentials solution. If you are interested in completing an Android implementation you can use our SDK and Quick Start App for Android.
This guide assumes the developers working to build the
app meet the following minimum dependencies for completing such a task:
Developers have access to the latest version of the Apple XCode IDE.
Developers have a paid Apple Developer Account and access to the Apple Developer Portal
Developers have experience building Apple mobile apps.
Developers have experience using the Cocoapods dependency manager to manage code.
In this step we'll complete all the activities necessary to get access to Allegion APIs and SDKs and have
Allegion configure systems necessary for that access. These activities include:
As mentioned above, the Allegion Security Token Agreement serves to ensure a commitment to secure handling and application of a least-privileged-access policy to the artifacts, documentation and systems made available to your company to support development work to integrate Allegion Mobile Credentials. To begin the review process for this document please reach out to us here: Go to Contact Us
Once signed, return here to continue.
If you don't already have one, create an Allegion Device Management Portal account at https://portal.allegionengage.com
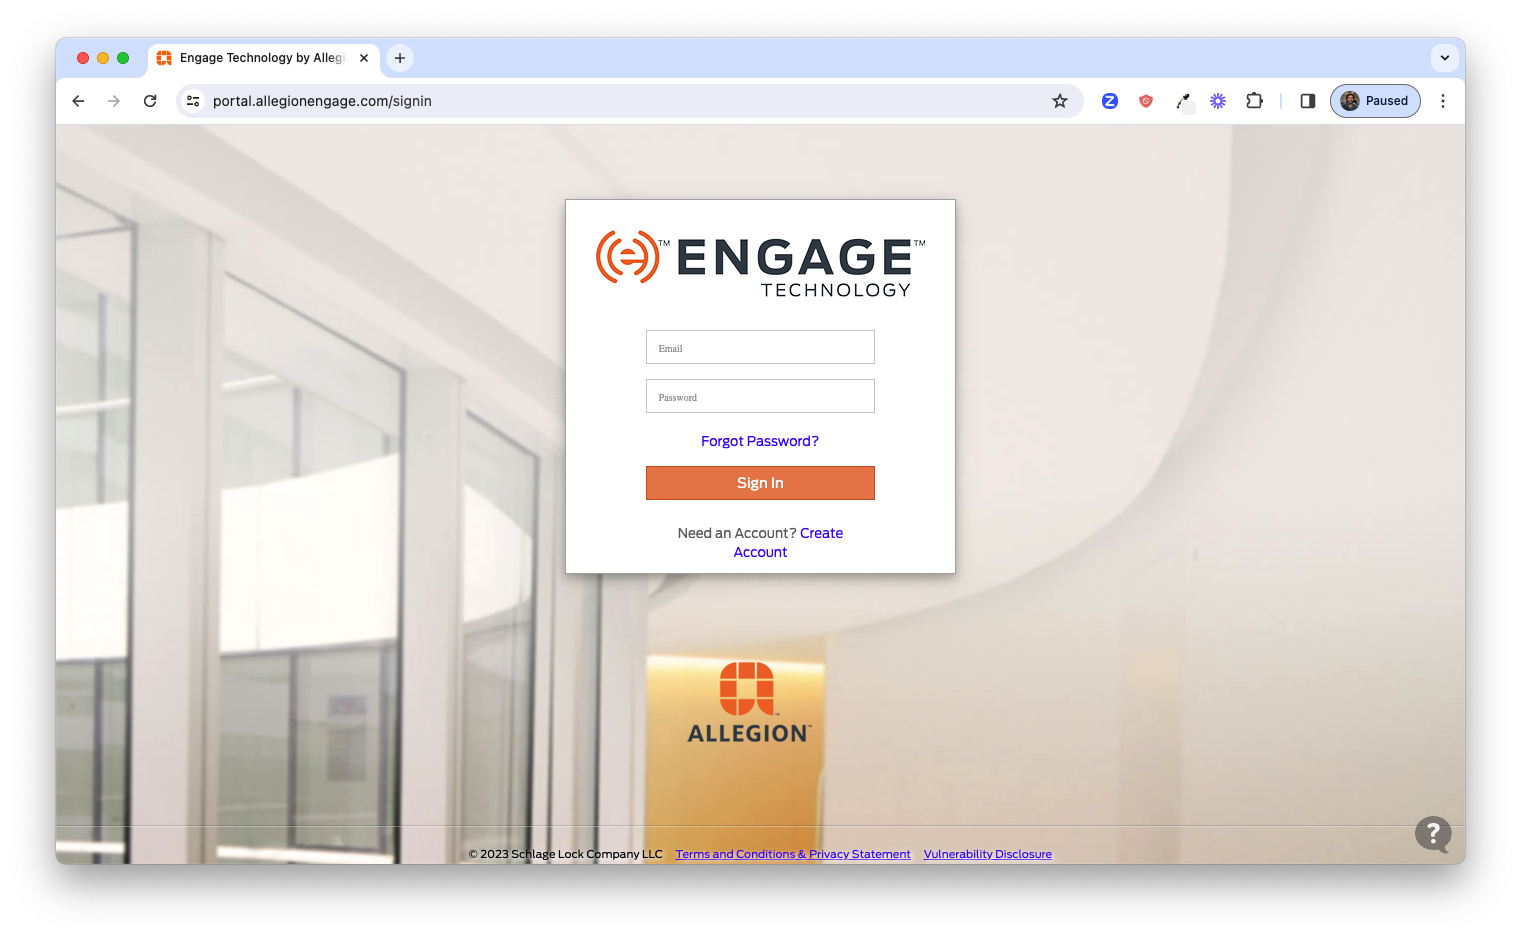
This portal is the management interface for Allegion sites you create. A site is a representation of a physical
installation of Allegion devices managed by an Access Control System. When devices are commissoined they are
formally associated with a single site, along with users, credentials and licenses.
The goal here is to use the available APIs to interact with the Allegion Device Management Cloud, and Allegion
provides APIs to perform all activities that can be done via this portal; however, an administrator account must
be created before you can make API calls. The user id and password used to create this account will be used when
making API calls so this site enforces unique password requirements.
It is best practice to use a group email for this Engage account as opposed to a personal email, since calls to retrieve authorization tokens, and certain API calls
requiring basic auth will use the credentials of this account.
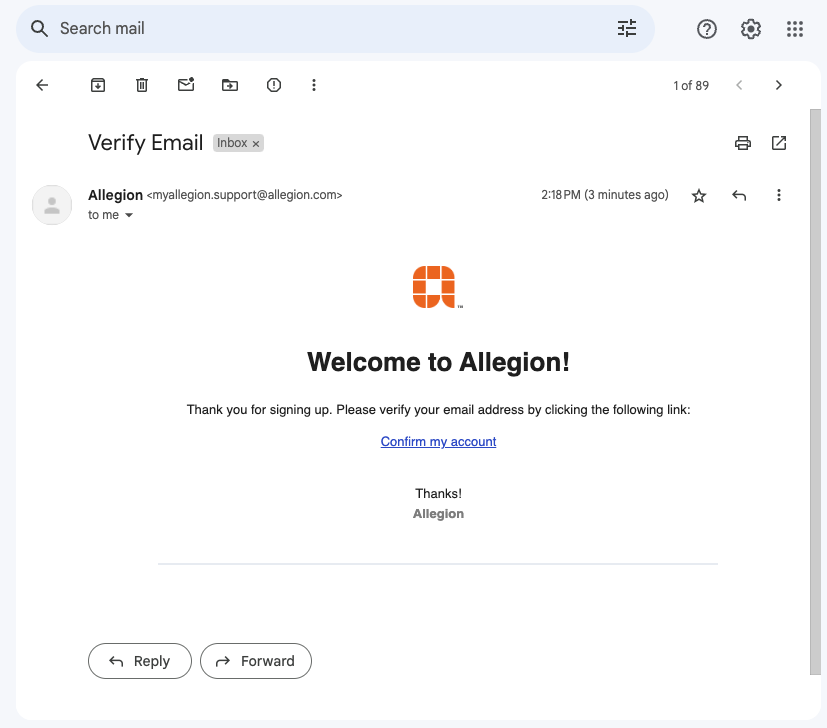
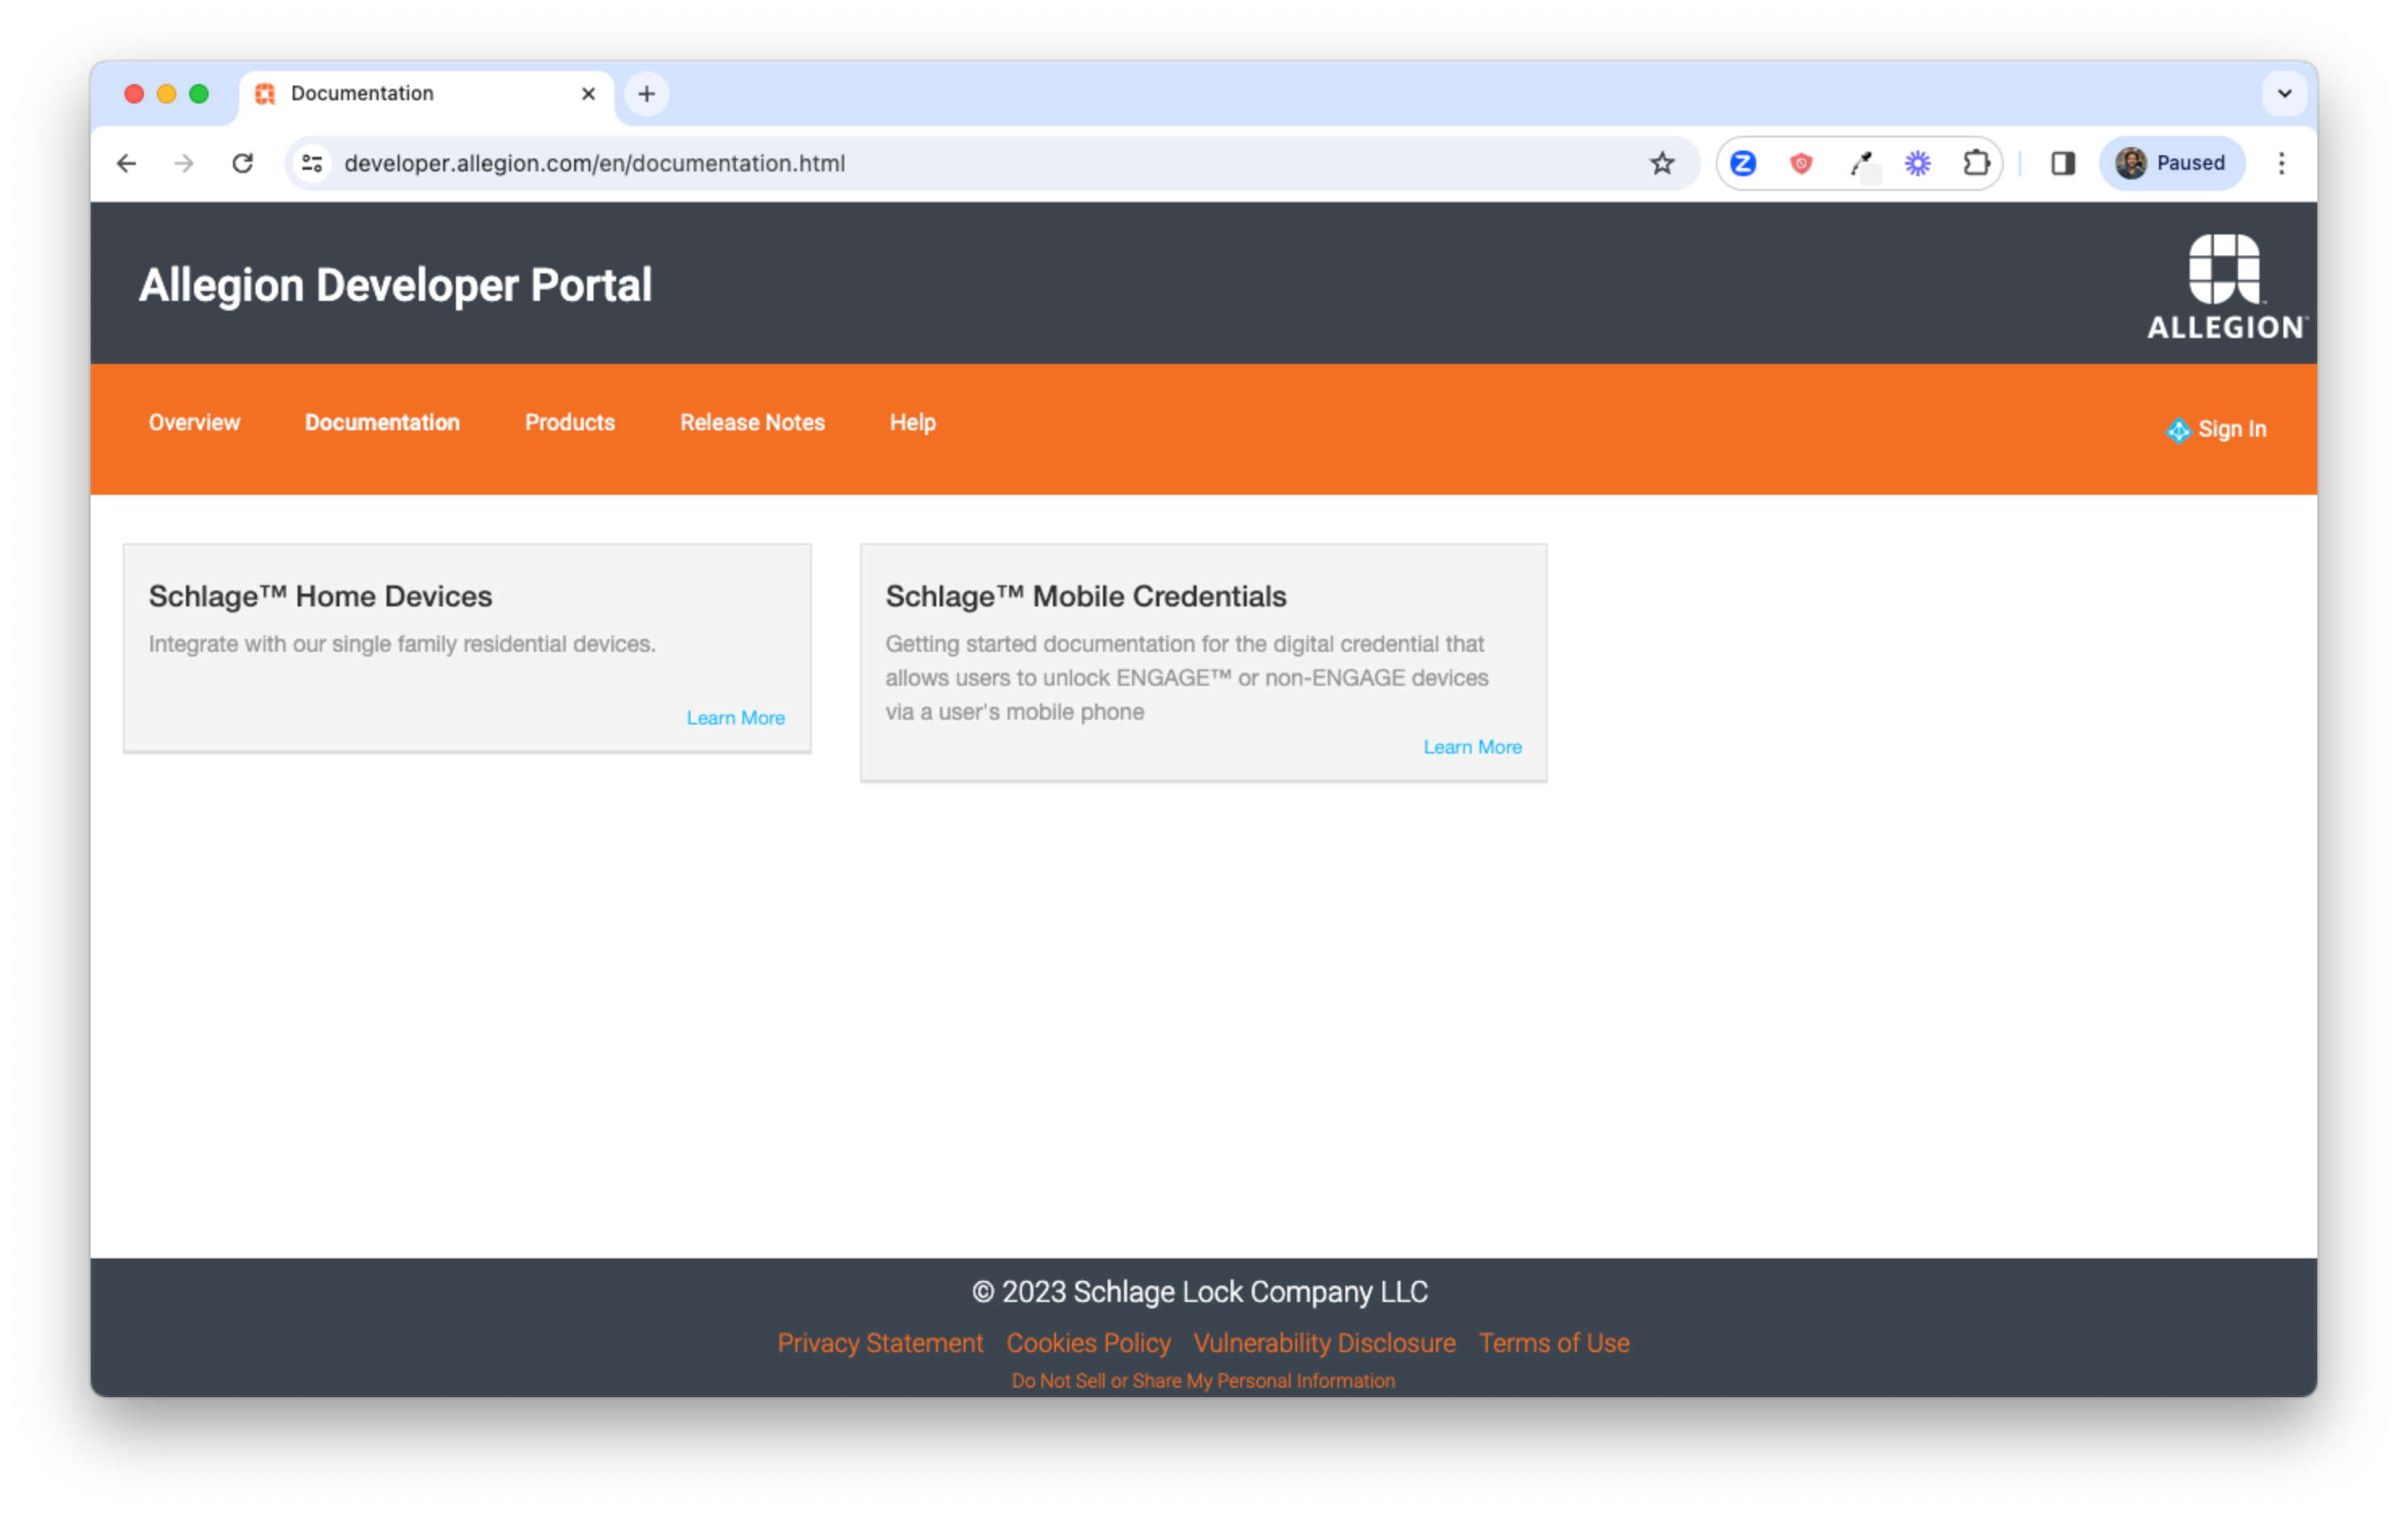
If you don't already have one, create an Allegion Developer Portal account at https://developerapi.allegion.com/signin
The Allegion Development Portal is the starting point for developers looking to get access to Allegion APIs, SDKs and documentation. This portal also houses access to product Subscription Keys, which are required inputs when interacting with the Allegion APIs and SDKs.
Allegion relies on several layers of application security in order to validate users to whom you intend to grant
application access and control are indeed authorized to perform activities. One of those layers is the use of
ECC-signed JSON Web Tokens (JWTs) that allow Allegion to verify user requests sent by users using your
applications are signed using ECC private keys to which only your developers/applications have access. Allegion
will use the public keys you send us - in advance of deployment of your application - to validate JWTs sent by
users using your application. This key-pair signing scheme prevents unauthorized users from sending requests
impersonating your users by allowing Allegion to validate requests are indeed signed using private keys accessible
only to applications you build.
Your application will be responsible for generating two kinds of tokens:
Allegion requires two sets of keypairs for signing JWTS - one pair for ID tokens and one pair for Access
tokens.
Allegion only supports key pairs that use the secp256r1 (NIST P-256) curve for for this process. While your company may rely on an Identity Management System to generate JWTs for users, you'll need to confirm that the JWTs produced are ECC-signed and not signed using a different algorithm.
For the purposes of this guide we'll walk you through steps necessary to create ECC-signed keys using the
openssl command line tool. If you don't already have this application you can download it here.
Follow the steps below to generate an ID token-signing key pair using openssl:
COMPANY with
your company name:openssl ecparam -name secp256r1 -genkey -out COMPANY_id.pem
COMPANY with your company name:openssl ec -in COMPANY_id.pem -pubout -out COMPANY_id_pub.pem
COMPANY with your company name:openssl ec -in COMPANY_id.pem -text
You can choose to have both ID and Access tokens signed using the same key pair, or alternatively you can use a separate key pair for signing access tokens. If you'd like to use a separate key pair for signing access tokens, follow these instructions:
COMPANY with
your company name:openssl ecparam -name secp256r1 -genkey -out COMPANY_access.pem
COMPANY with your company name:openssl ec -in COMPANY_access.pem -pubout -out COMPANY_access_pub.pem
COMPANY with your company name:openssl ec -in COMPANY_access.pem -text
In the next step we'll send the public key(s) along with other information to Allegion in order to obtain API and SDK access.
Now that you have keys and portal accounts you're ready to request access to Allegion Mobile Credential APIs and SDKs.
Use the following link to request access.
The Allegion Developer Support team will process your request. Please allow for some time to confirm your request
and configure the environment, which may take between 1-5 days. Upon completion, you will be given the
following:
audience claim that must be set in the ID and Access Tokens sent to Allegion for
use with the Device Communication SDK and Quick Start App (if you don't already have these).
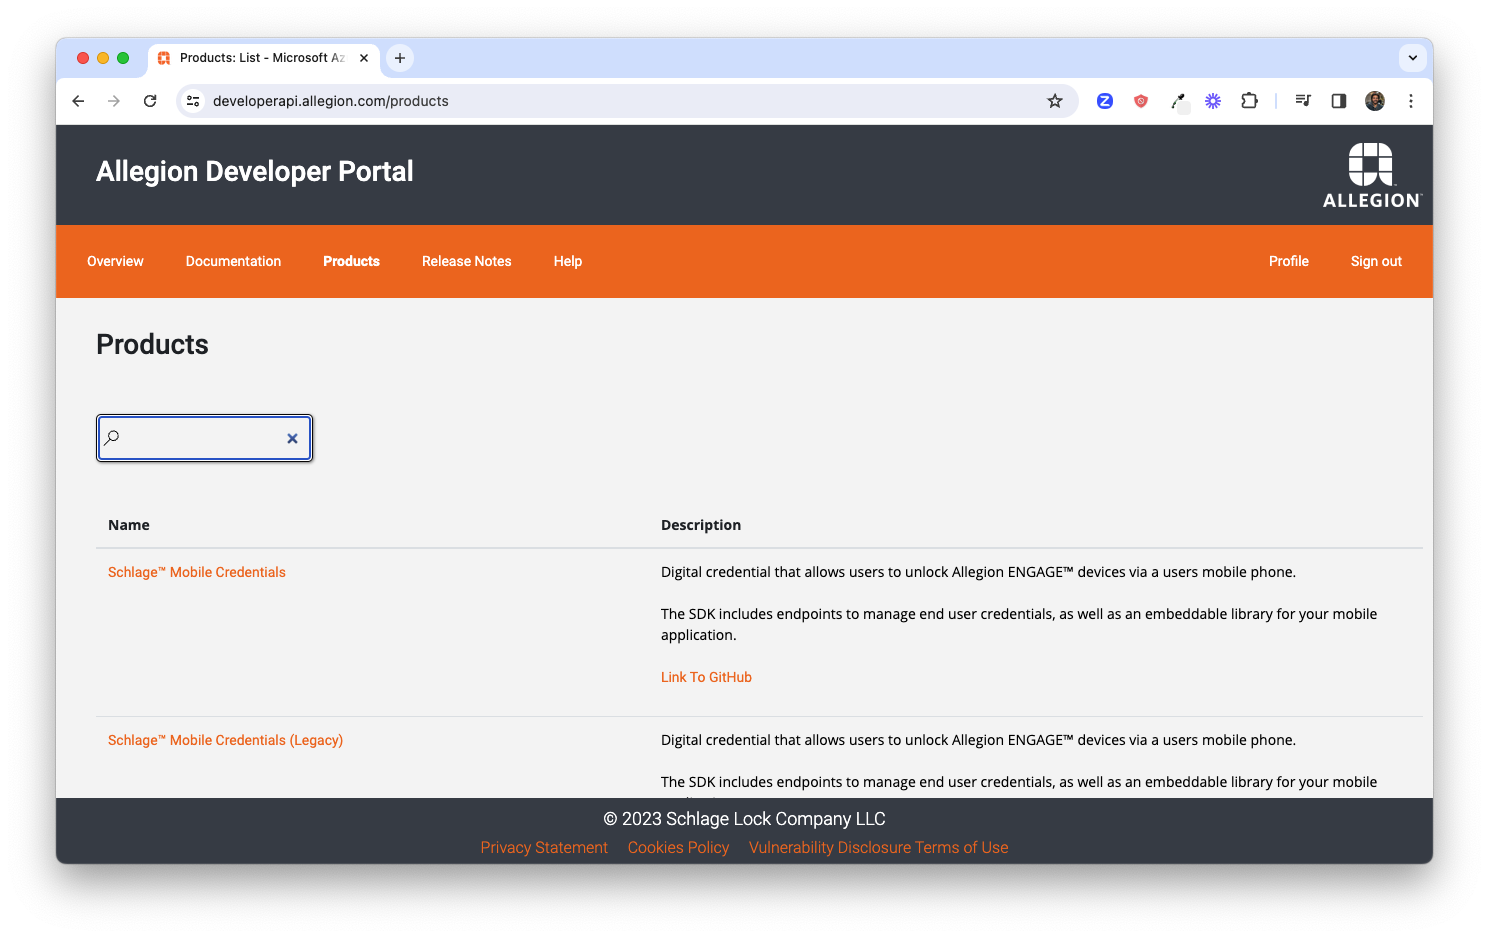
Now that Allegion has granted you product access you should see the Mobile Credentials Product available under the Products section of the Allegion Developer Portal. Browse to the Allegion Developer Portal and login, then click the Products link at the top of the page. If you have been granted access to use more than one product then you'll see multiple items on this page in a list. You should see the Schlage Mobile Credentials product listed. (If you do not see this product please reach out to us here: Go to Contact Us.)
You'll be directed to a page where you can create a subscription. Enter a name for your subscription (such as the name of the app you intend to build) and click the Subscribe button to create a subscription.
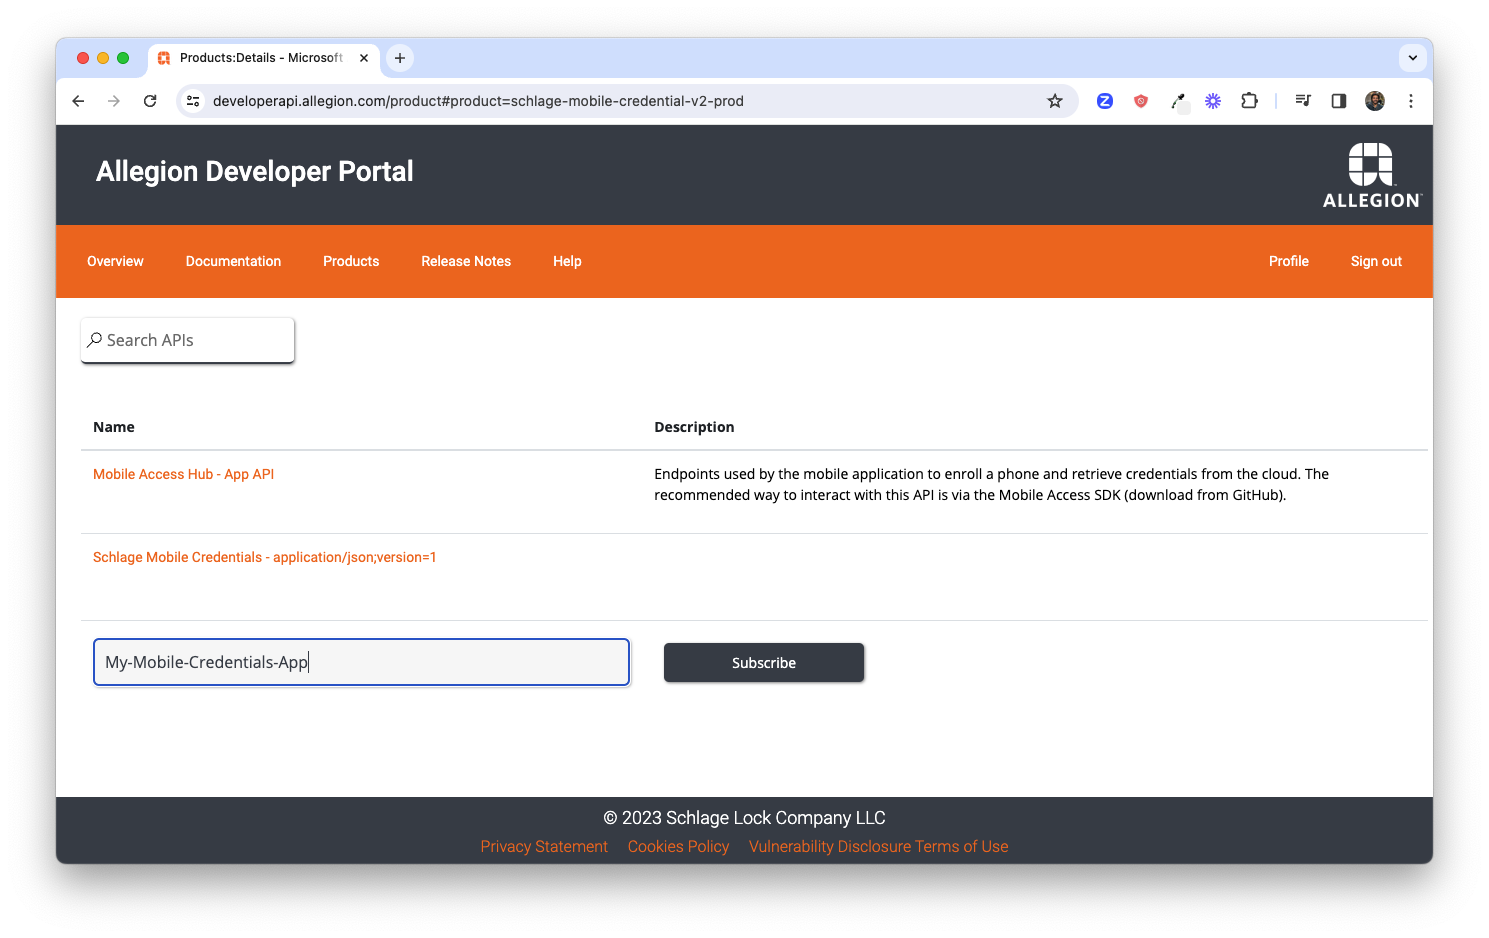
Once created, you'll be directed to your Profile where you'll see a list of all subscriptions to which you have access. Click the Show link next to the Primary key link to reveal the key.
Copy the key - we'll use it in the next step.

You can access the Profile again in the top right corner of the portal screen next to the Sign Out link.
At this point you already have API access; we will use the Allegion Developer Portal to confirm that access has been granted by exercising the API.
Click the Products link from the top menu to get to the list of products to which you have been granted access, then click on the Schlage Mobile Credentials product link to access the subscription you created earlier.
Next, click the named link of the subscription you created to get to the API documentation, where you can review Mobile Credential API requests.
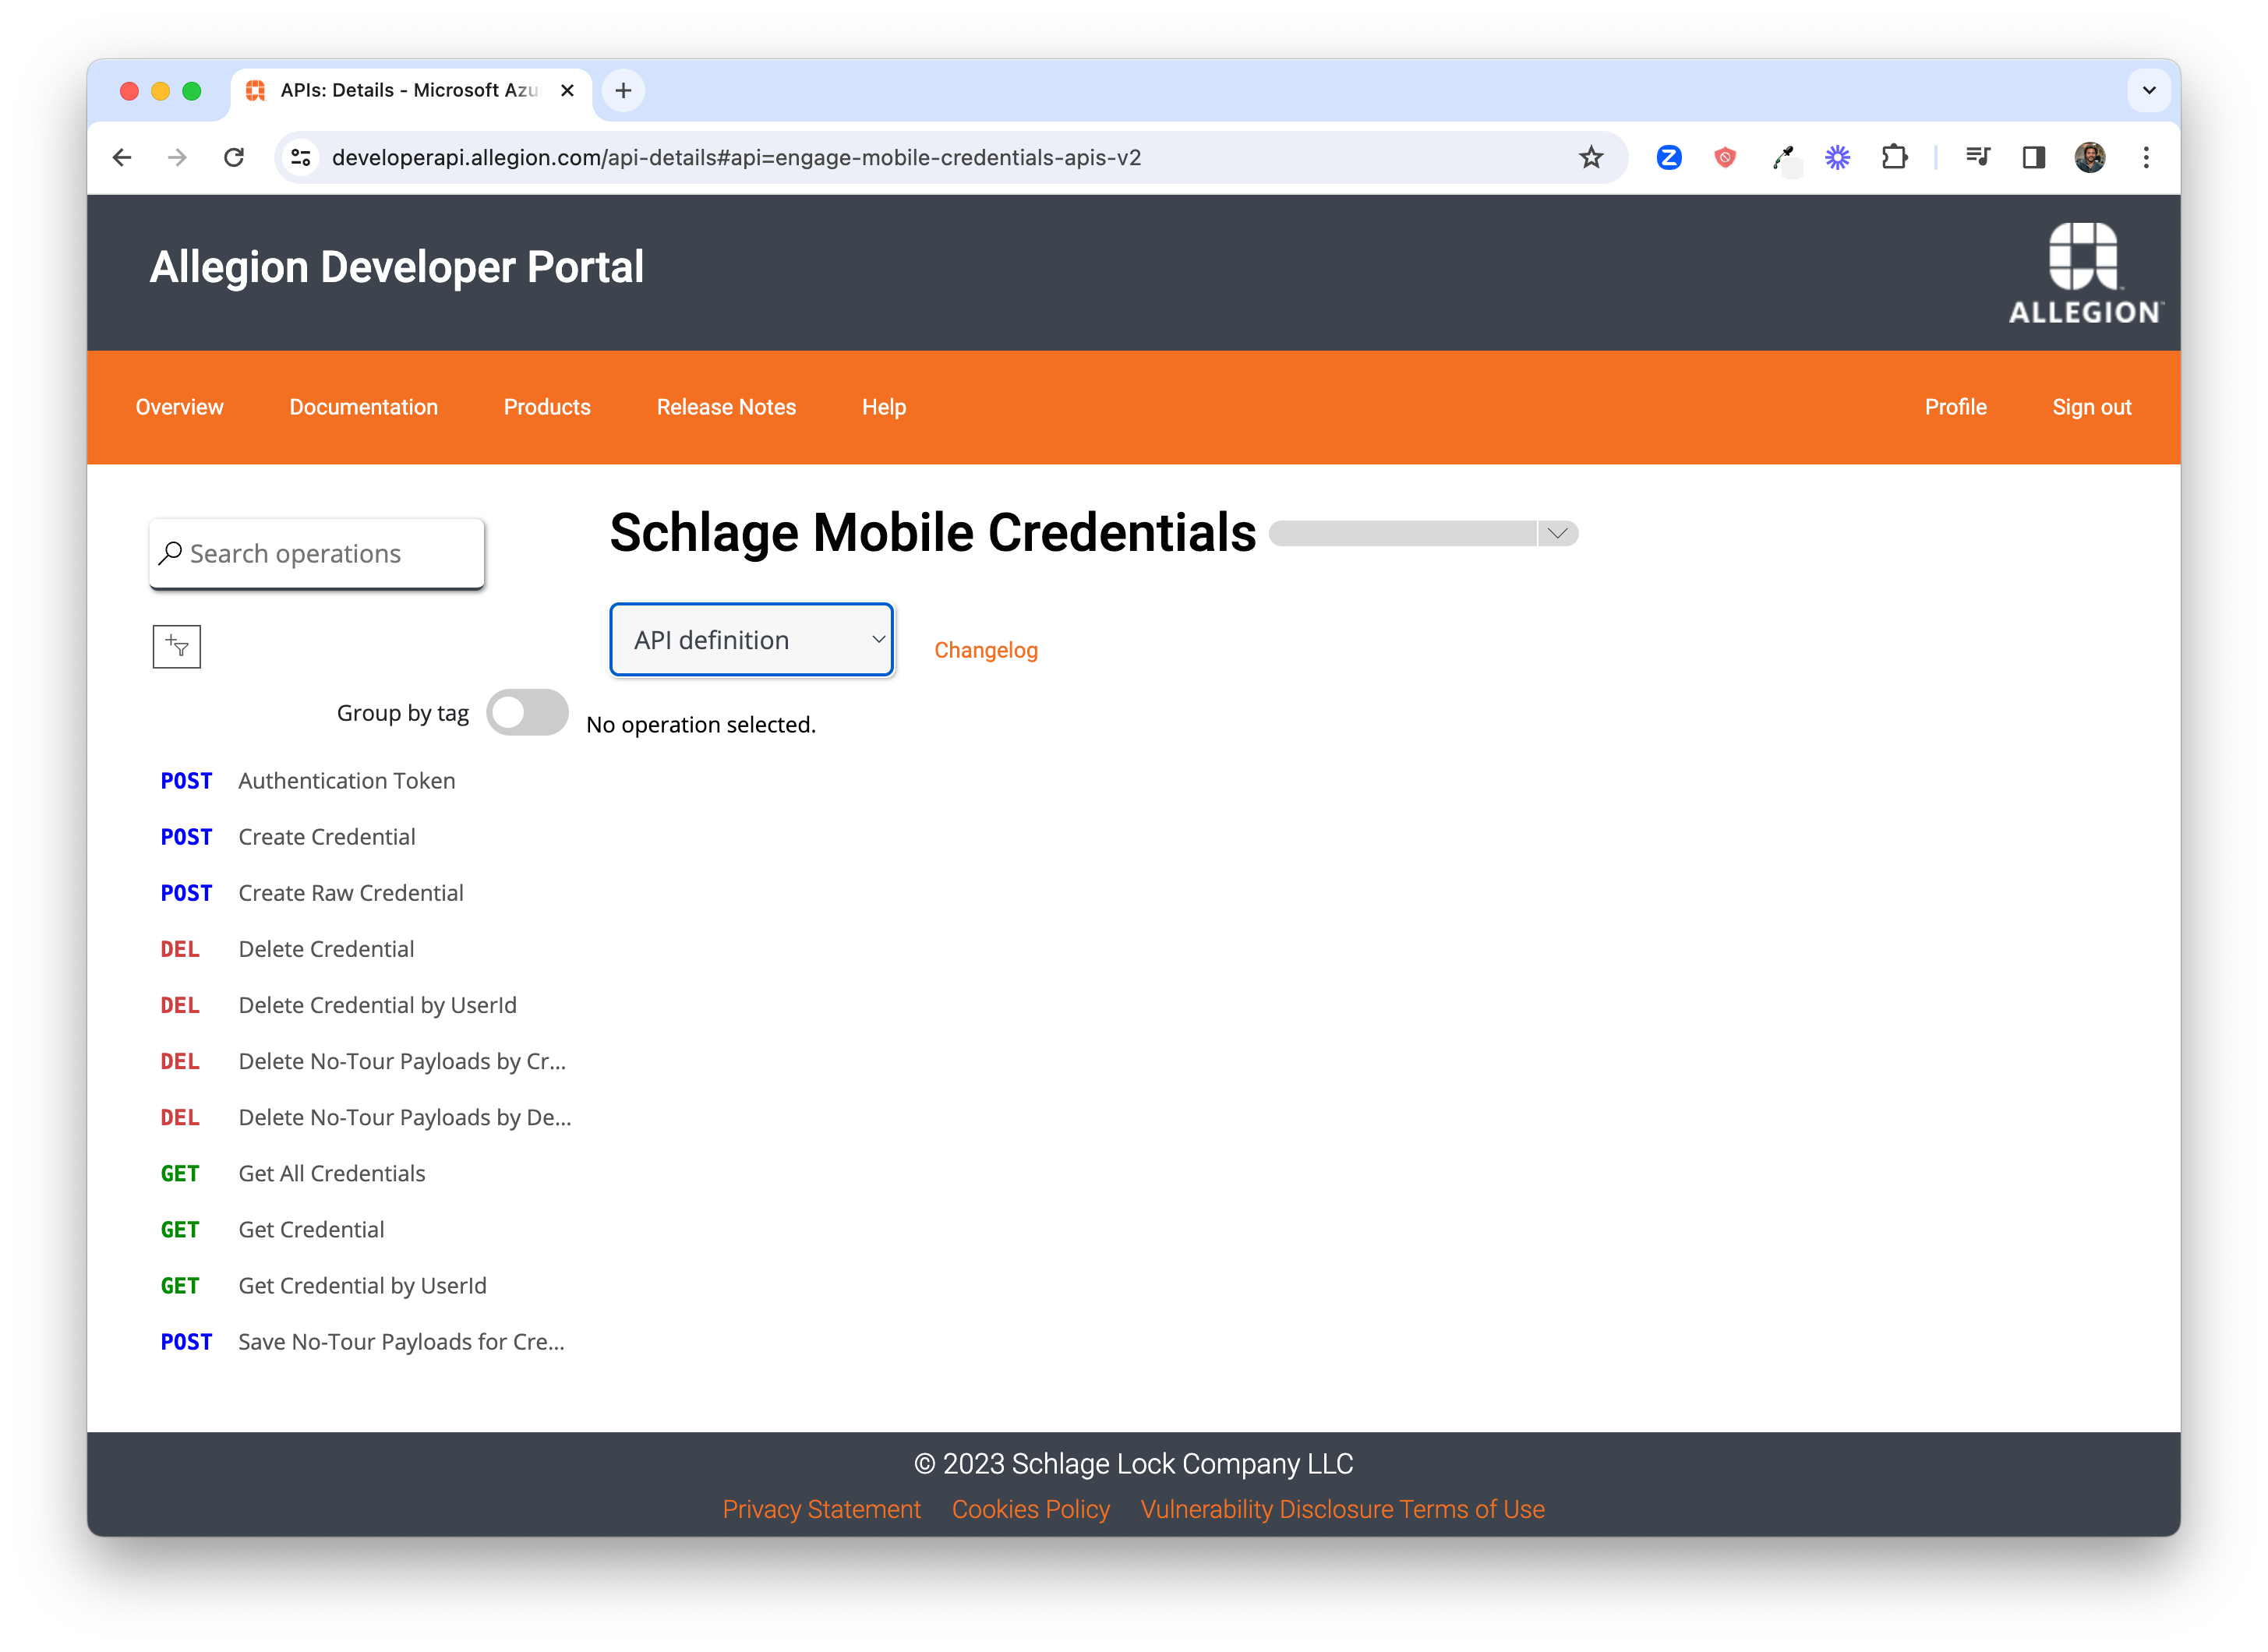
We'll use the Authentication Token call to test the API. This request allows you to obtain an authentication token which is a required parameter for making authenticated API calls to create, modify and delete credentials.
Click the Authentication Token API request link.
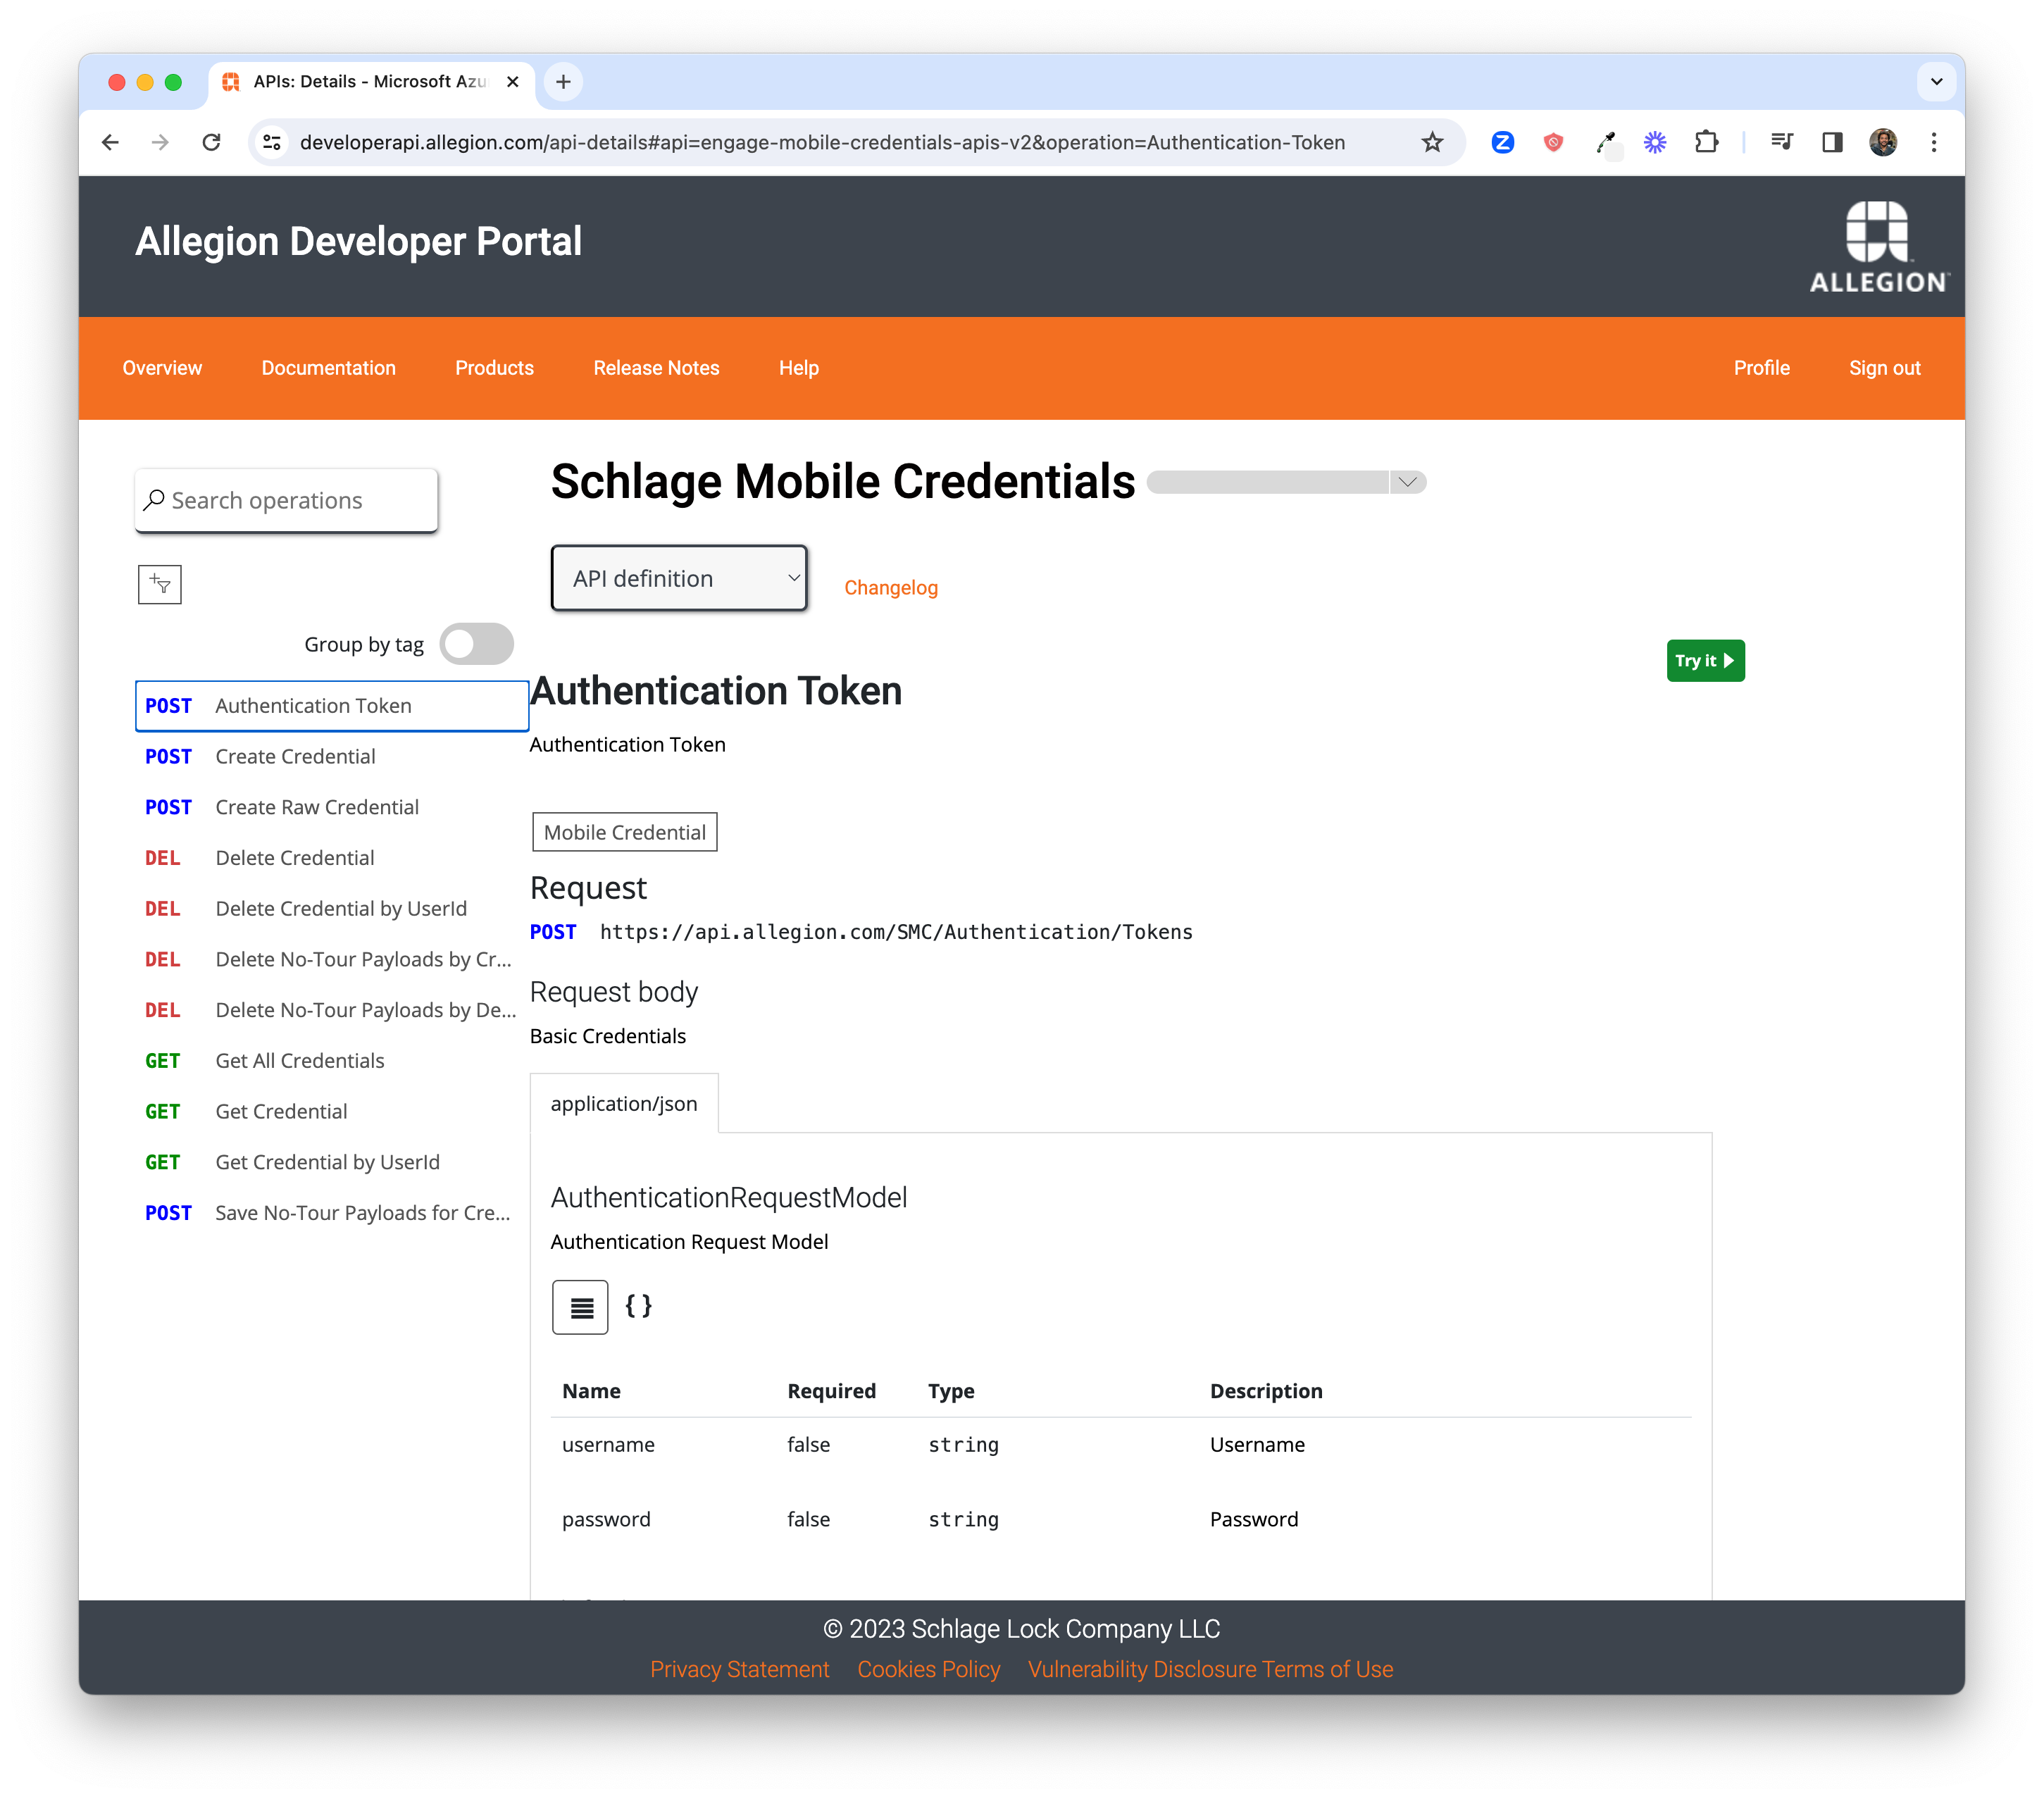
Click on the Try it button to be reveal a test client feature that allows you to execute API
calls from the portal. This client allows you to populate request headers and request body and execute the call
directly from the browser. Notice that the subscription key - named alle-subscription-key - is
already populated as a request header (and the value hidden).
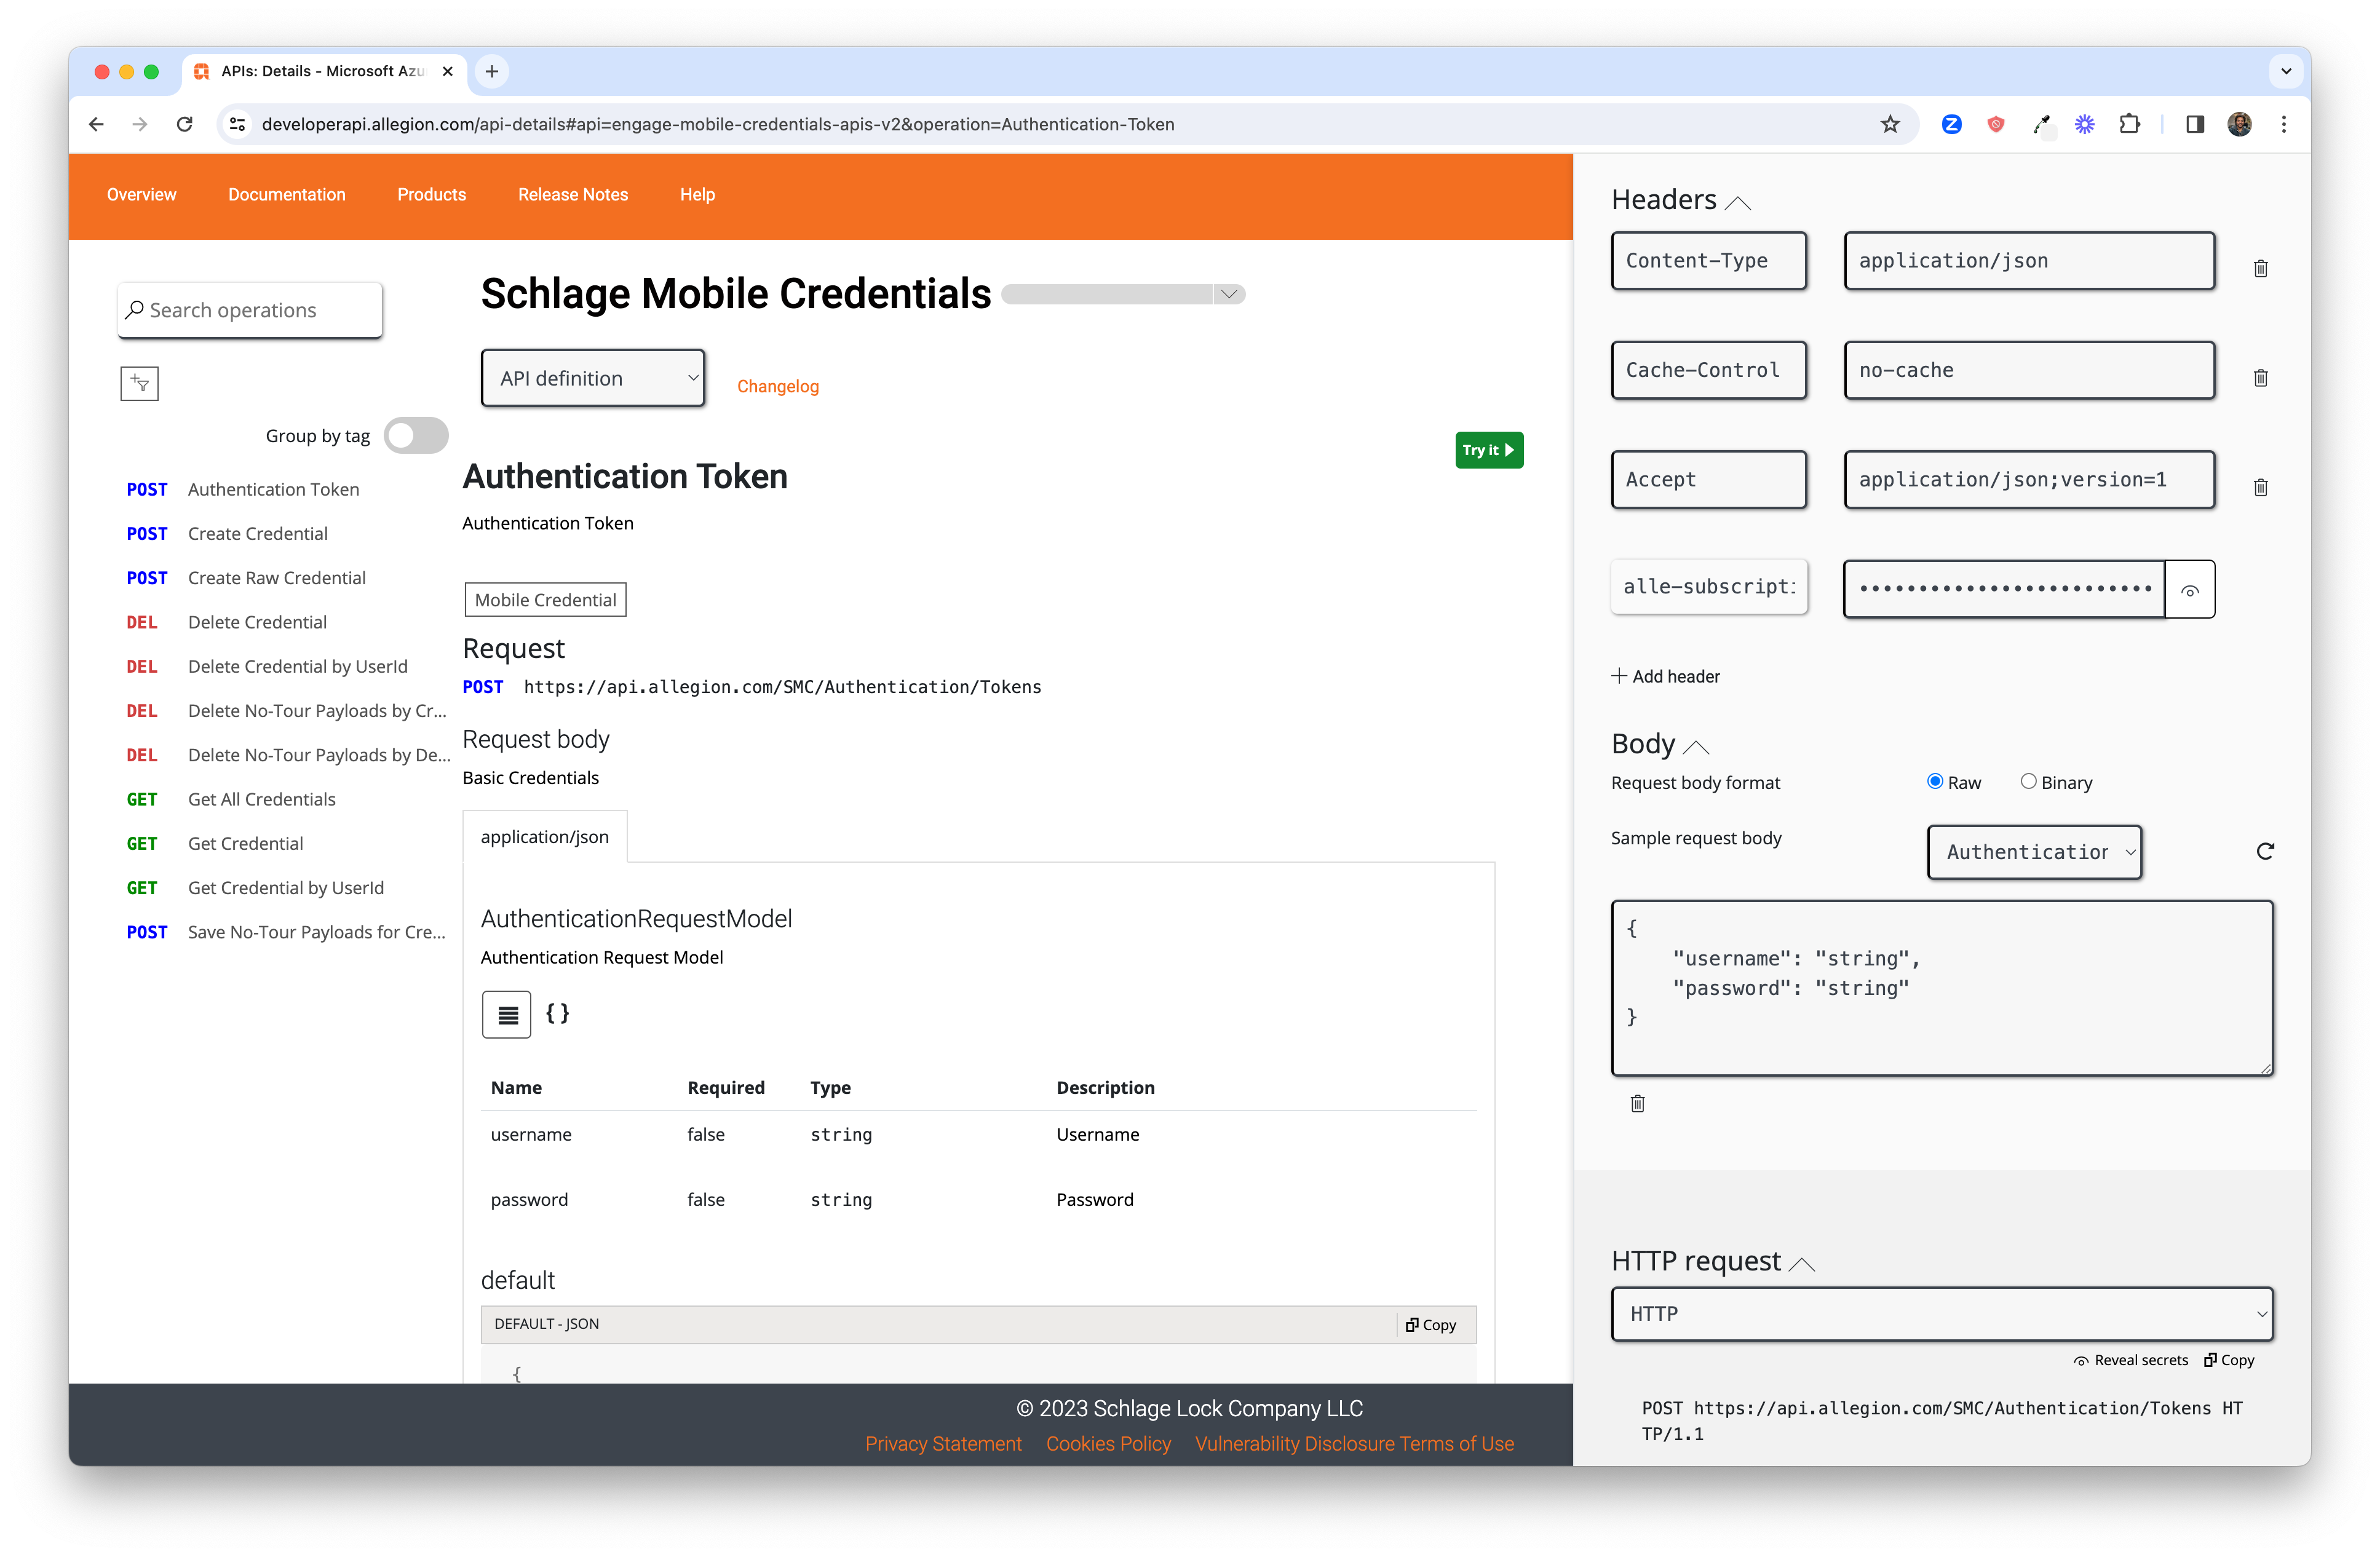
Update the body of this request so that the values of the username and
password parameters are populated with the user/pass used to create your Allegion Engage Device
Management Portal account in the step above.
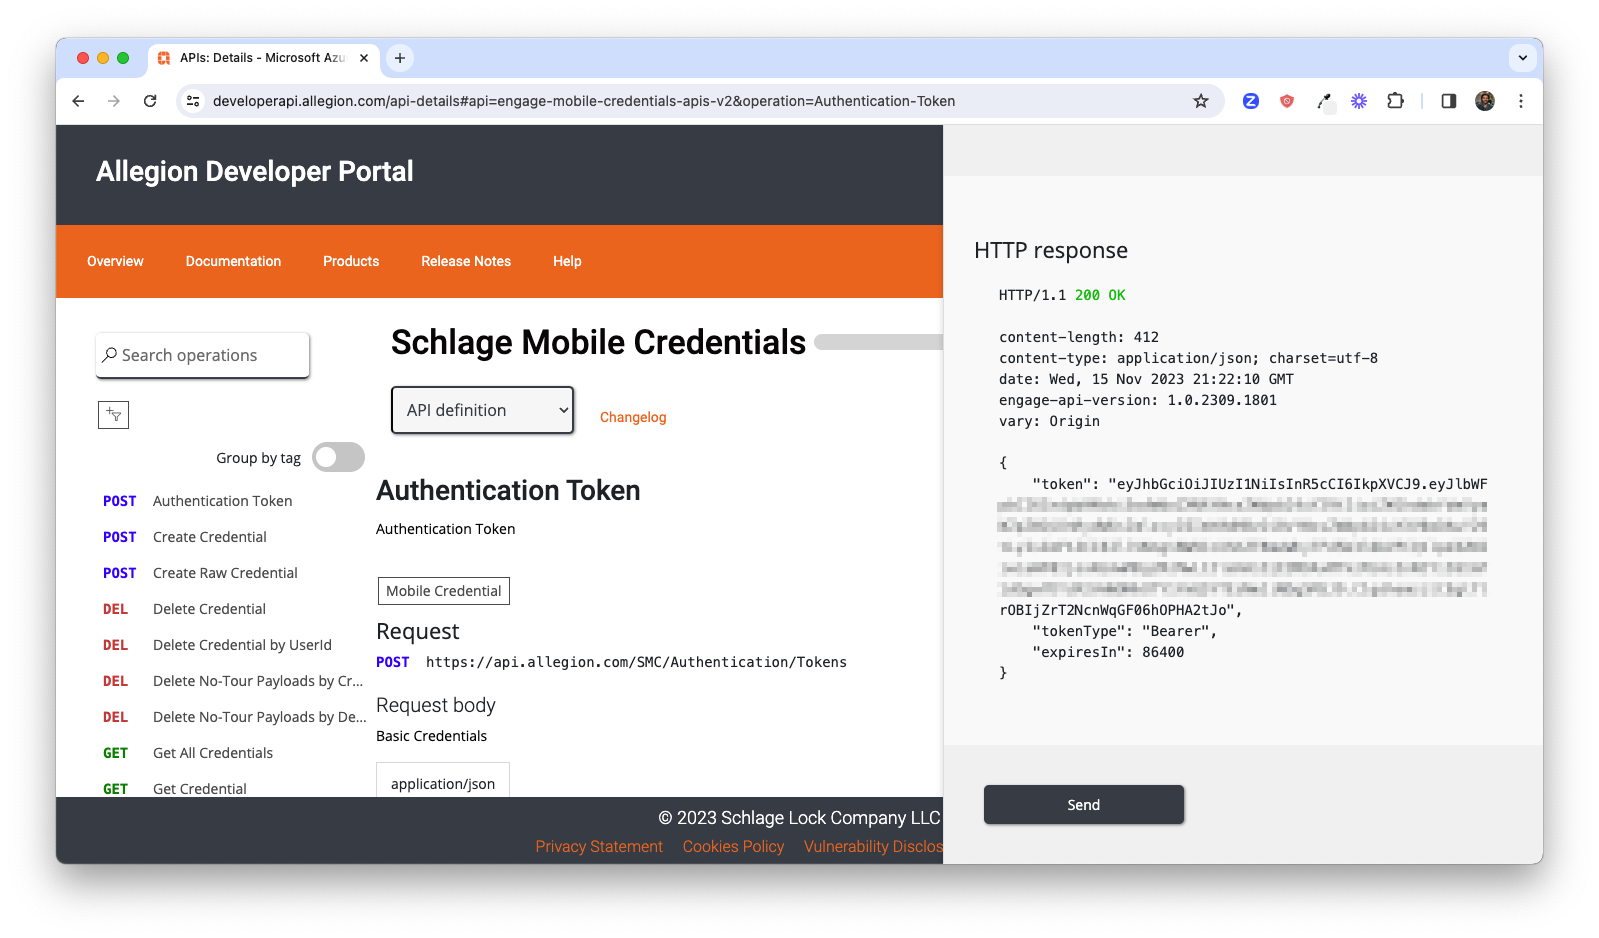
Scroll to the bottom of that pop-out window and click the Send button to execute this request.
If you entered a valid username and password you should have received a 200 response that includes a
token that can be used to make authenticated API calls for other requests such as creating credentials, confirming
API access.
The last step to complete to ensure we have everything we need to begin development is to confirm SDK repository access. There are a minimum of ten (10) repositories to which you should have access in total - four (4) for iOS, four (4) for Android, one for Allegion Cocoapods libraries used for iOS applications and one Device Communication utility repository. Please click on the following links to confirm you can access the Github repositories for Allegion BLE Mobile SDKs and Quick Start Guides:
If you are missing/denied access to any of the repositories above, please use the following link to request access.
Now that we've confirmed access to APIs and SDKs we can move on to the actual development work. The starting point is to connect the Allegion Device Management (Engage) Cloud with your Access Control System so your systems and applications can communicate with and manage Allegion devices. This includes activities such as commissioning a device and sending a door file to a device, which is a file that tells a device who is granted authorized access.
As detailed previously, the work to commission devices will not be fully covered in this guide as it is not in
scope. However, in order to ensure a developer reviewing this guide can get all the way through it, this section
will cover a simple device commissioning implementation so that developers who have not completed this work can
make progress on Mobile Credentials. As such, this section will cover use of an API available to partners for
creating and registering sites to which you now have access, but of which the scope of detail will be limited to
creating objects and not covering the full scope of the API.
This API is called the Allegion Site Administration and
Management API - or SAM API. Allegion's partners use this API to administer
sites - which represent physical locations in the real world into which devices will be installed and managed.
This API essentially allows partners to replicate the same site administration and management capabilities exposed
by the Allegion (Engage) Device Management Portal using management interfaces they build and supply to their
customers.
The answer here is that the Engage Portal does not supply the identifiers necesary to interact programmatically with site objects created through the portal interface. The Engage portal was intended to be used by Allegion customers who fully manage their sites through Allegion-provided solutions and services, and so the objects created through that tool are not suited for programmatic use. This is a simple but critical difference that requires we use the API for site creation.
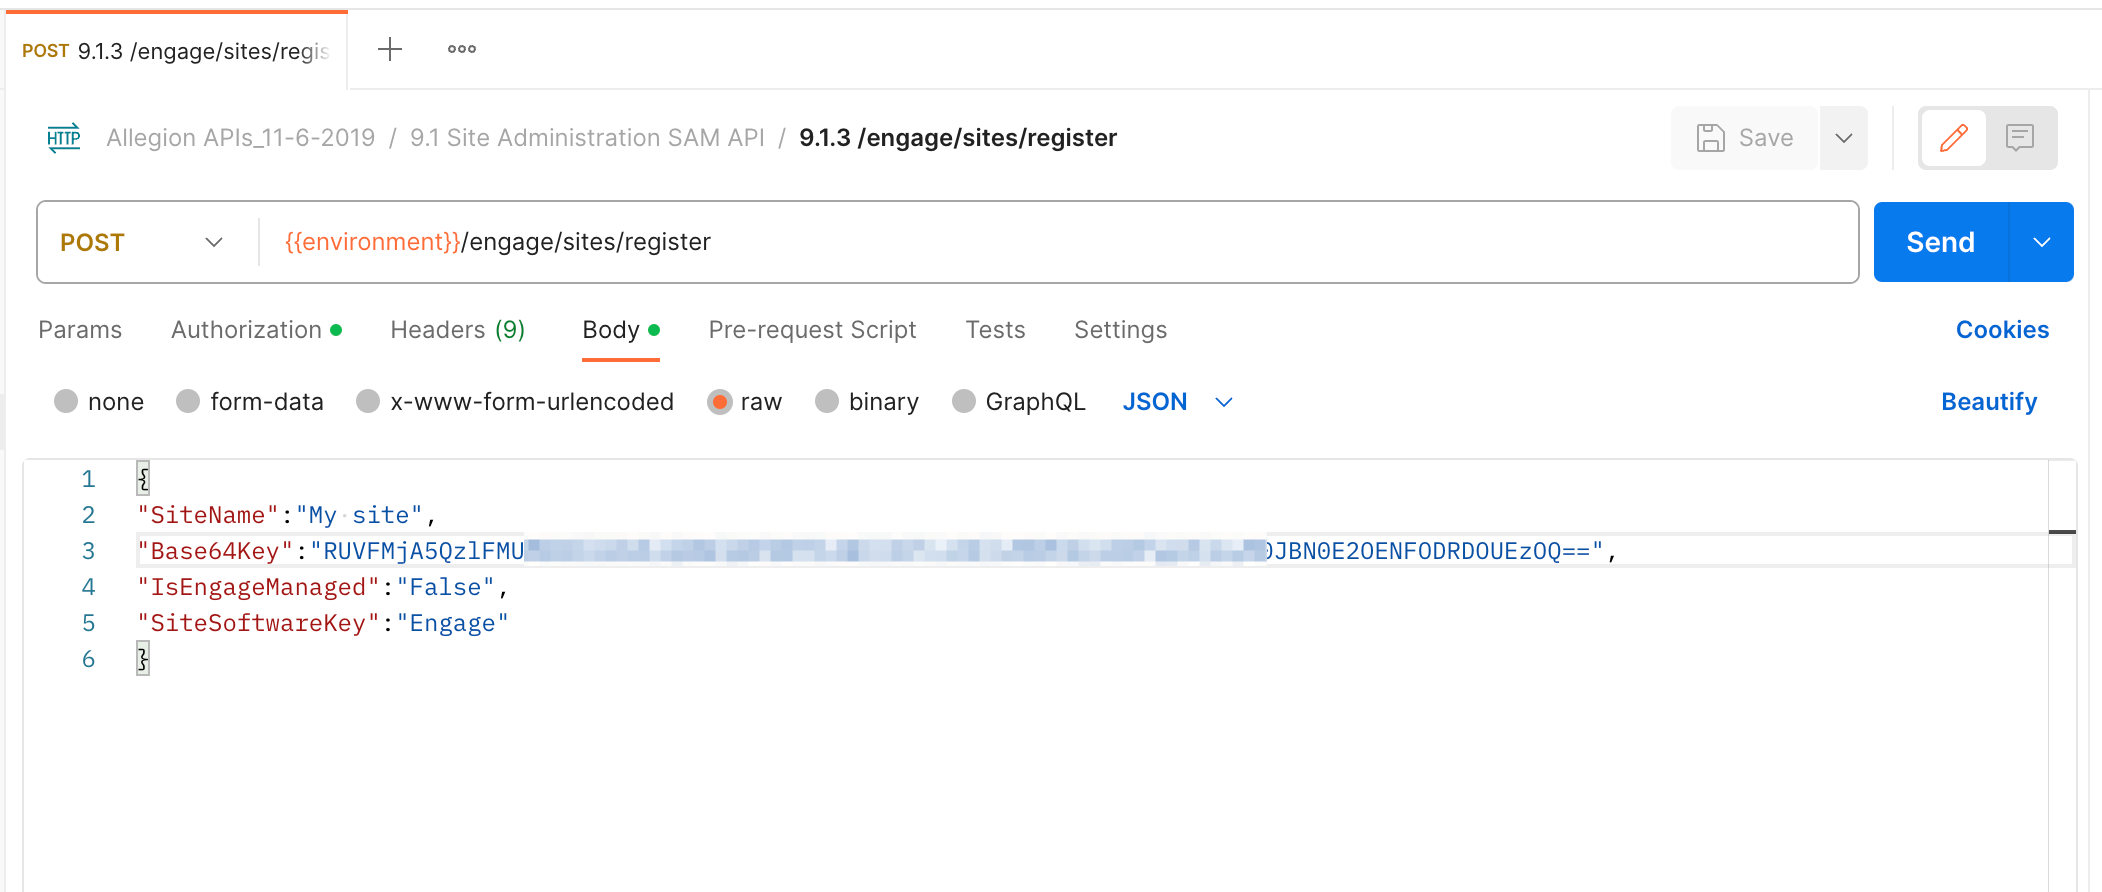
To programmatically create a site we'll send a POST request to the SAM
API/engage/sites/register endpoint with the following information:
SiteName - The site name of your choice.Base64Key - A site key. This will need to be a random, 32-character hexadecimal string that is
base64-encoded. IsEngageManaged - A boolean flag to denote this site as not managed by Engage (as per above, this
site is unique from that of portal-created sites). The value must be false.SiteSoftwareKey - A site software key flag - this is a required element. The value must be
Engage.
You can use the tool below to generate a valid test site key for this API Request. The tool allows you to create a 32-character hexadecimal string and then Base64-encodes the string. This tool is not intended to replace your production solution for generating site keys.

Below are examples of a curl command and a Postman request to run this request - you may use the
tool of choice for your team. Send the following request to the SAM API, replacing relevant variables with
appropriate values as described above:
Using curl:
curl --location 'https://partner.lockwebserv.com/engage/sites/register' \--header 'Content-Type: application/json' \--header 'Authorization: Basic [Base64user:pass]' \--data '{"SiteName":"[SiteName]","Base64Key":"[Base64Key]","IsEngageManaged":"False","SiteSoftwareKey":"Engage"}'
Using Postman:
A successful response will have a 201 status code and the response body will include the
site identifier. Be sure to save this as you'll use it further down in this guide.

GET request to https://partner.lockwebserv.com/engage/sites
Next we'll clone the Allegion Device Communication app from Github repository and configure it. As mentioned, this app is used to connect to and commission devices, update firmware and support lock management functions. In this step we'll configure the app far enough that it can be used to communicate with a lock or reader for commissioning, but we will not send a door file until later in the guide after we create a credential.
You should have been granted access to this repository by now - if you do not have access please review this step for requesting access.
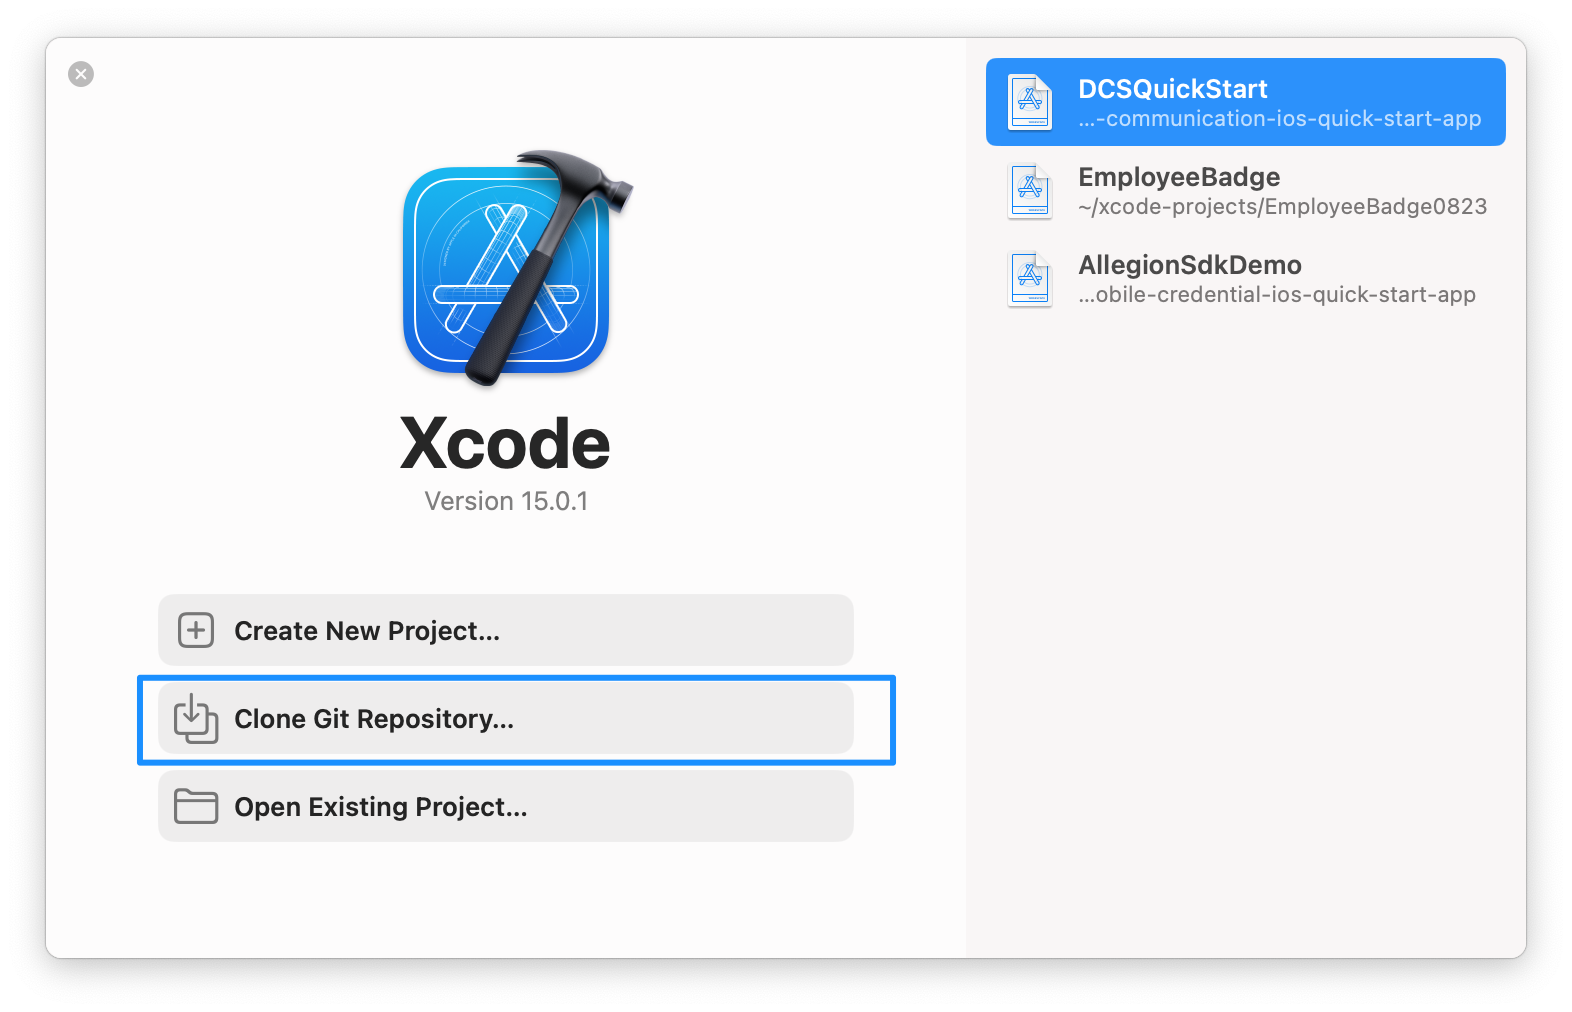
We'll be working with the iOS app in this step; that repository is located here.
You can clone the repository using XCode's Clone command or use whatever tool used by your company to clone Github repositories.
Once cloned you'll need to run the pod install command on the repo to install necessary Cocoapod
dependencies.
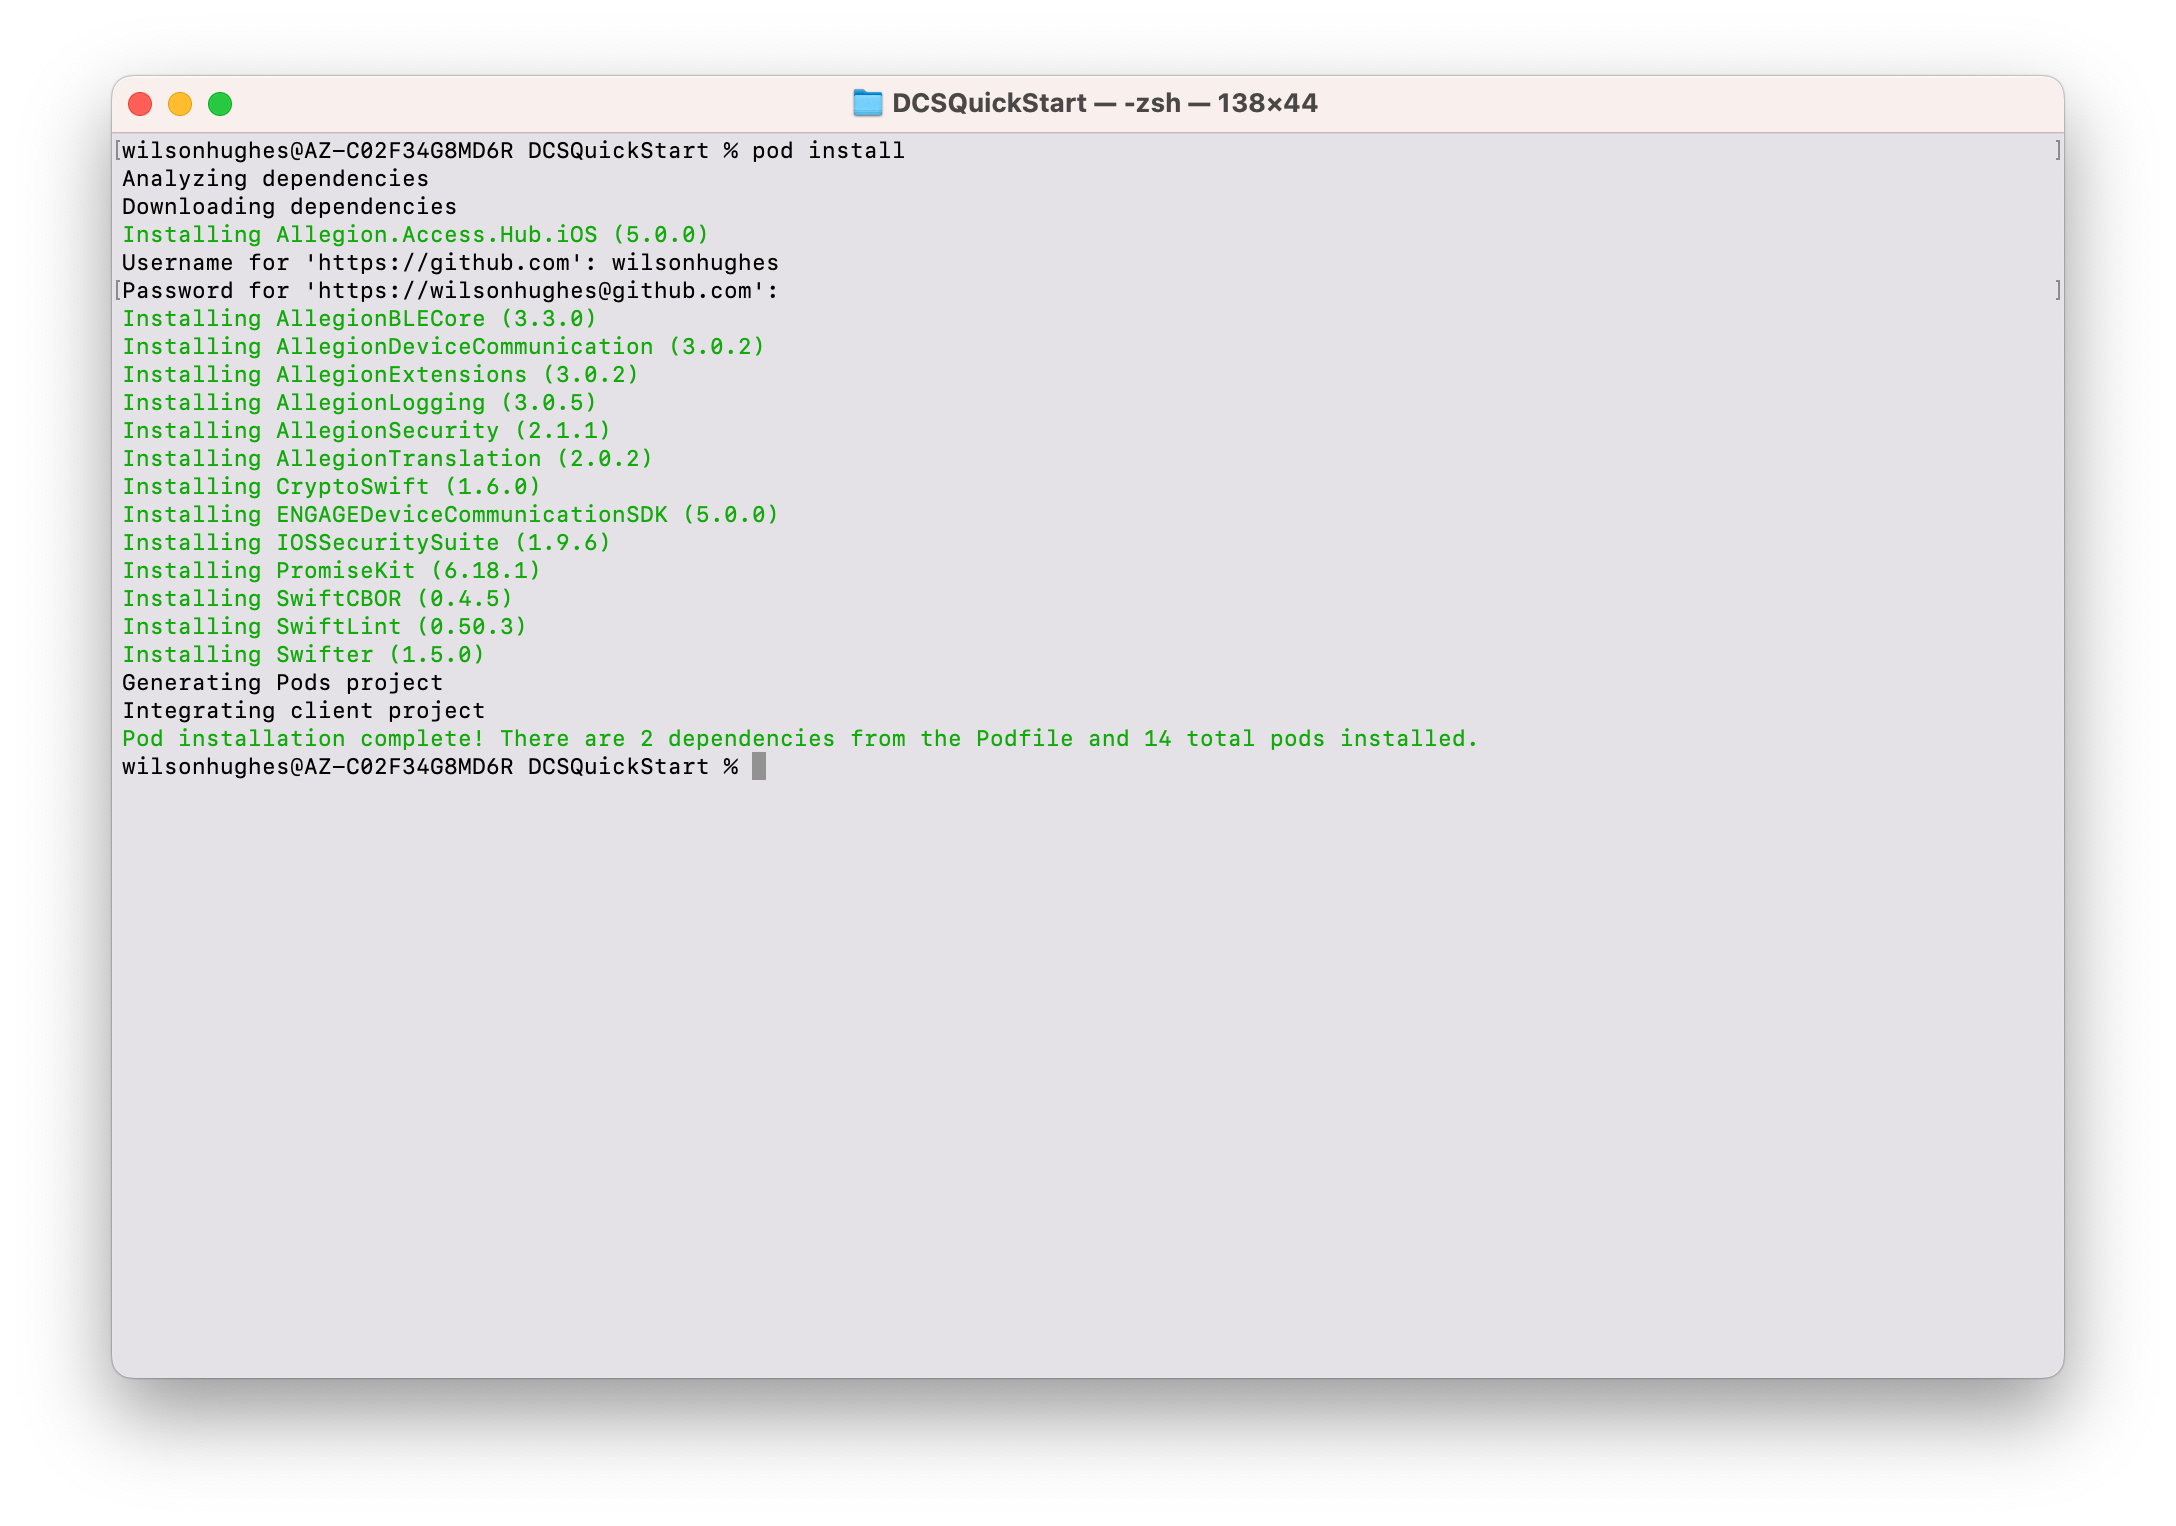
If you have not installed Cocoapods or are not familiar with the CocoaPods dependency manager you can learn more
about it including installation at the CocoaPods home.
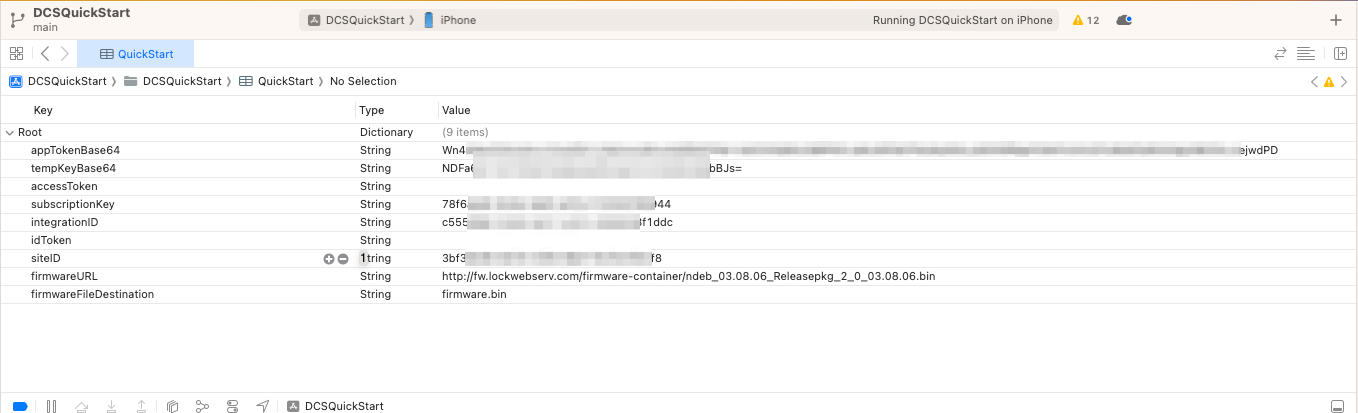
Once cloned and dependencies installed, we can configure the app. Open the cloned project in XCode, then navigate
to and open the QuickStart.plist file. This file contains properties we need to set before we can
run the app.
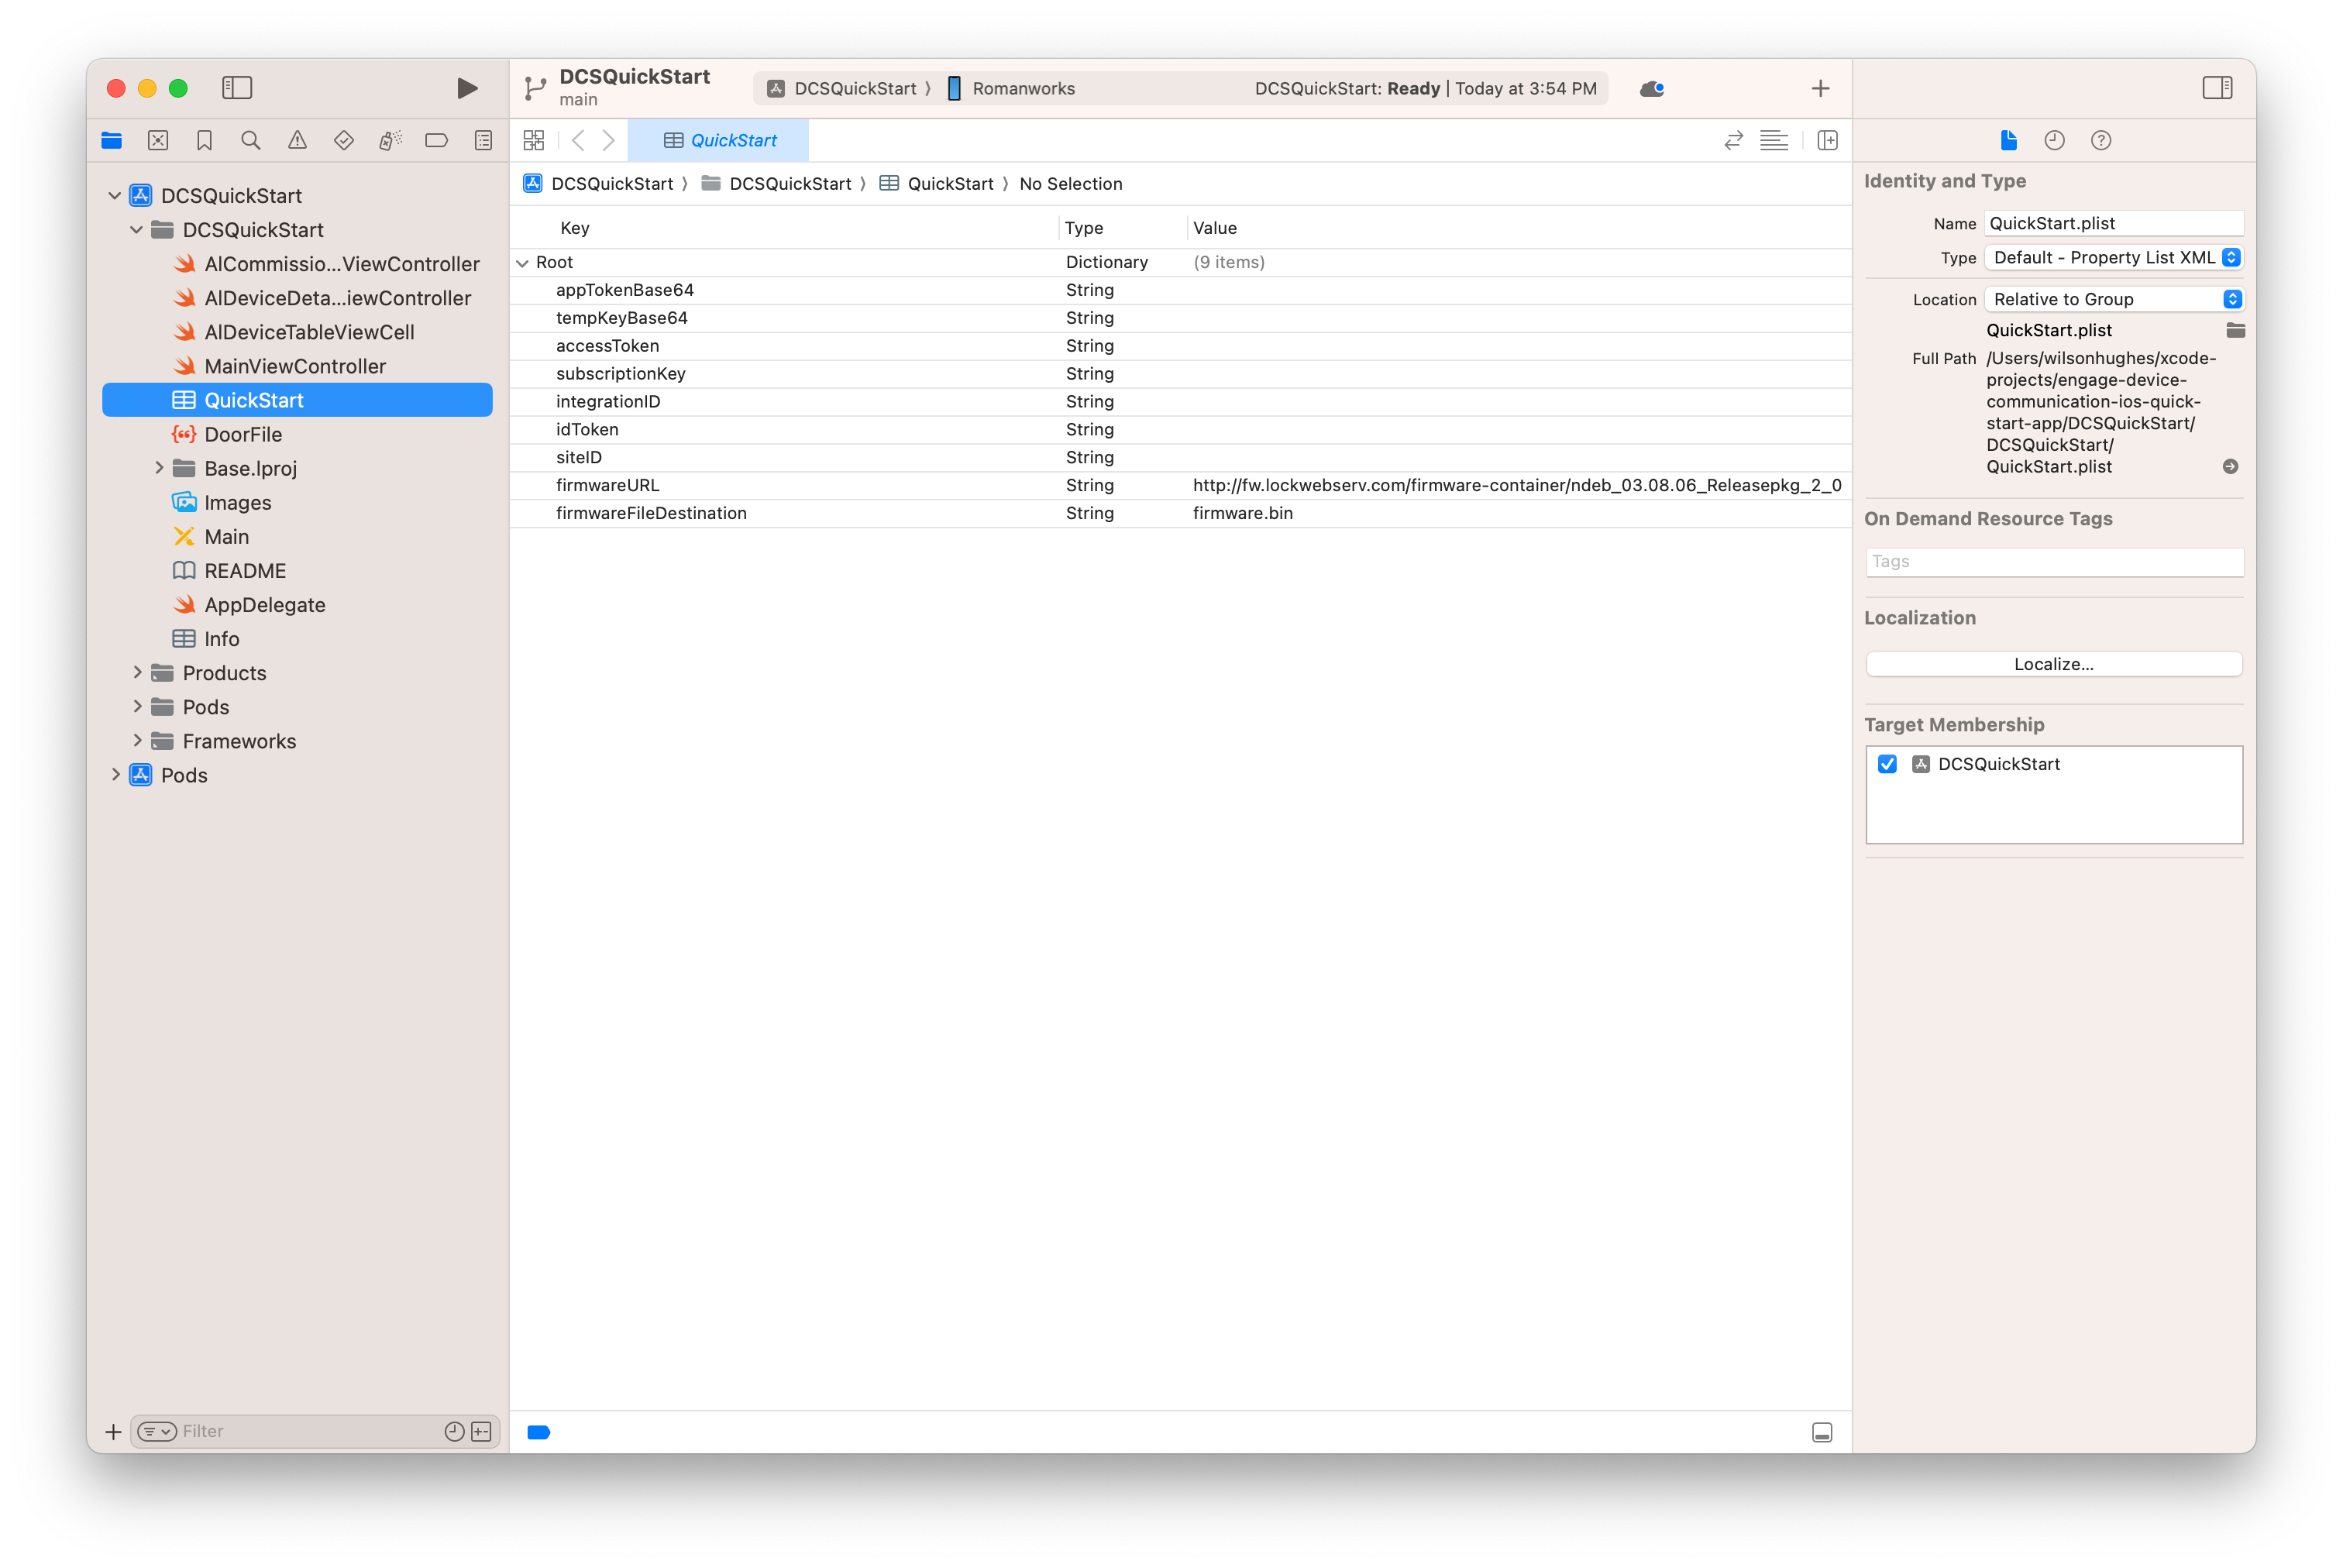
There are three properties you are ready to populate right now:
siteID - This should be set to the value of the Site ID you created in the earlier step where you created a site.integrationId - This should be set to the Integration ID you received from Allegion upon request in
that previous step.subscriptionKey - This should be set to the Subscription Key you created in that earlier step above. This key must be entered as a GUID,
so be sure to include the dashes (XXXXXXXX-XXXX-XXXX-XXXX-XXXXXXXXXXXX).With these properties supplied your app will run with limited functionality, but will not be able to commission a device. To do that we'll need to populate the remaining properties:
appTokenBase64 - The App Token is a token used to allow the app to securely communicate with a
BLE device. From the github home for the Quick Start App, the App Token is "used for both
commissioning and securely communicating with a BLE device. This typically comes from a cloud service that
secures the Site Key (the Site Key is used to encrypt the App Token, and must never be stored on the mobile
device). For security, a lock may require that the App Token be refreshed (i.e., the cloud service needs to
generated a fresh App Token). In this case the Quick Start app needs to be rebuilt and deployed with the new App
Token."tempKeyBase64 - The Temp Key is a key used to encrypt BLE communication between the mobile device
and the lock. From the github home for the Quick Start App, The Temp Key is "tightly associated
with the App Token, and it is generated by the cloud service at the same time an App Token is created. When a
device requires a new App Token, a new Temp Key must also be provided."idToken - The ID Token is a JSON Web Token (JWT) used to identify the user and enroll the mobile
device for use with the Allegion Device Communication Cloud. accessToken - The Access Token is a JSON Web Token (JWT) used to authorize the user for device
commissioning and decommissioning. This token must be scoped to the siteID.You'll use your company's standard method for generating Aacess tokens in production. We'll provide guidance for generating an access token as part of this guide.
Other properties related to firmware management won't be covered in this guide.
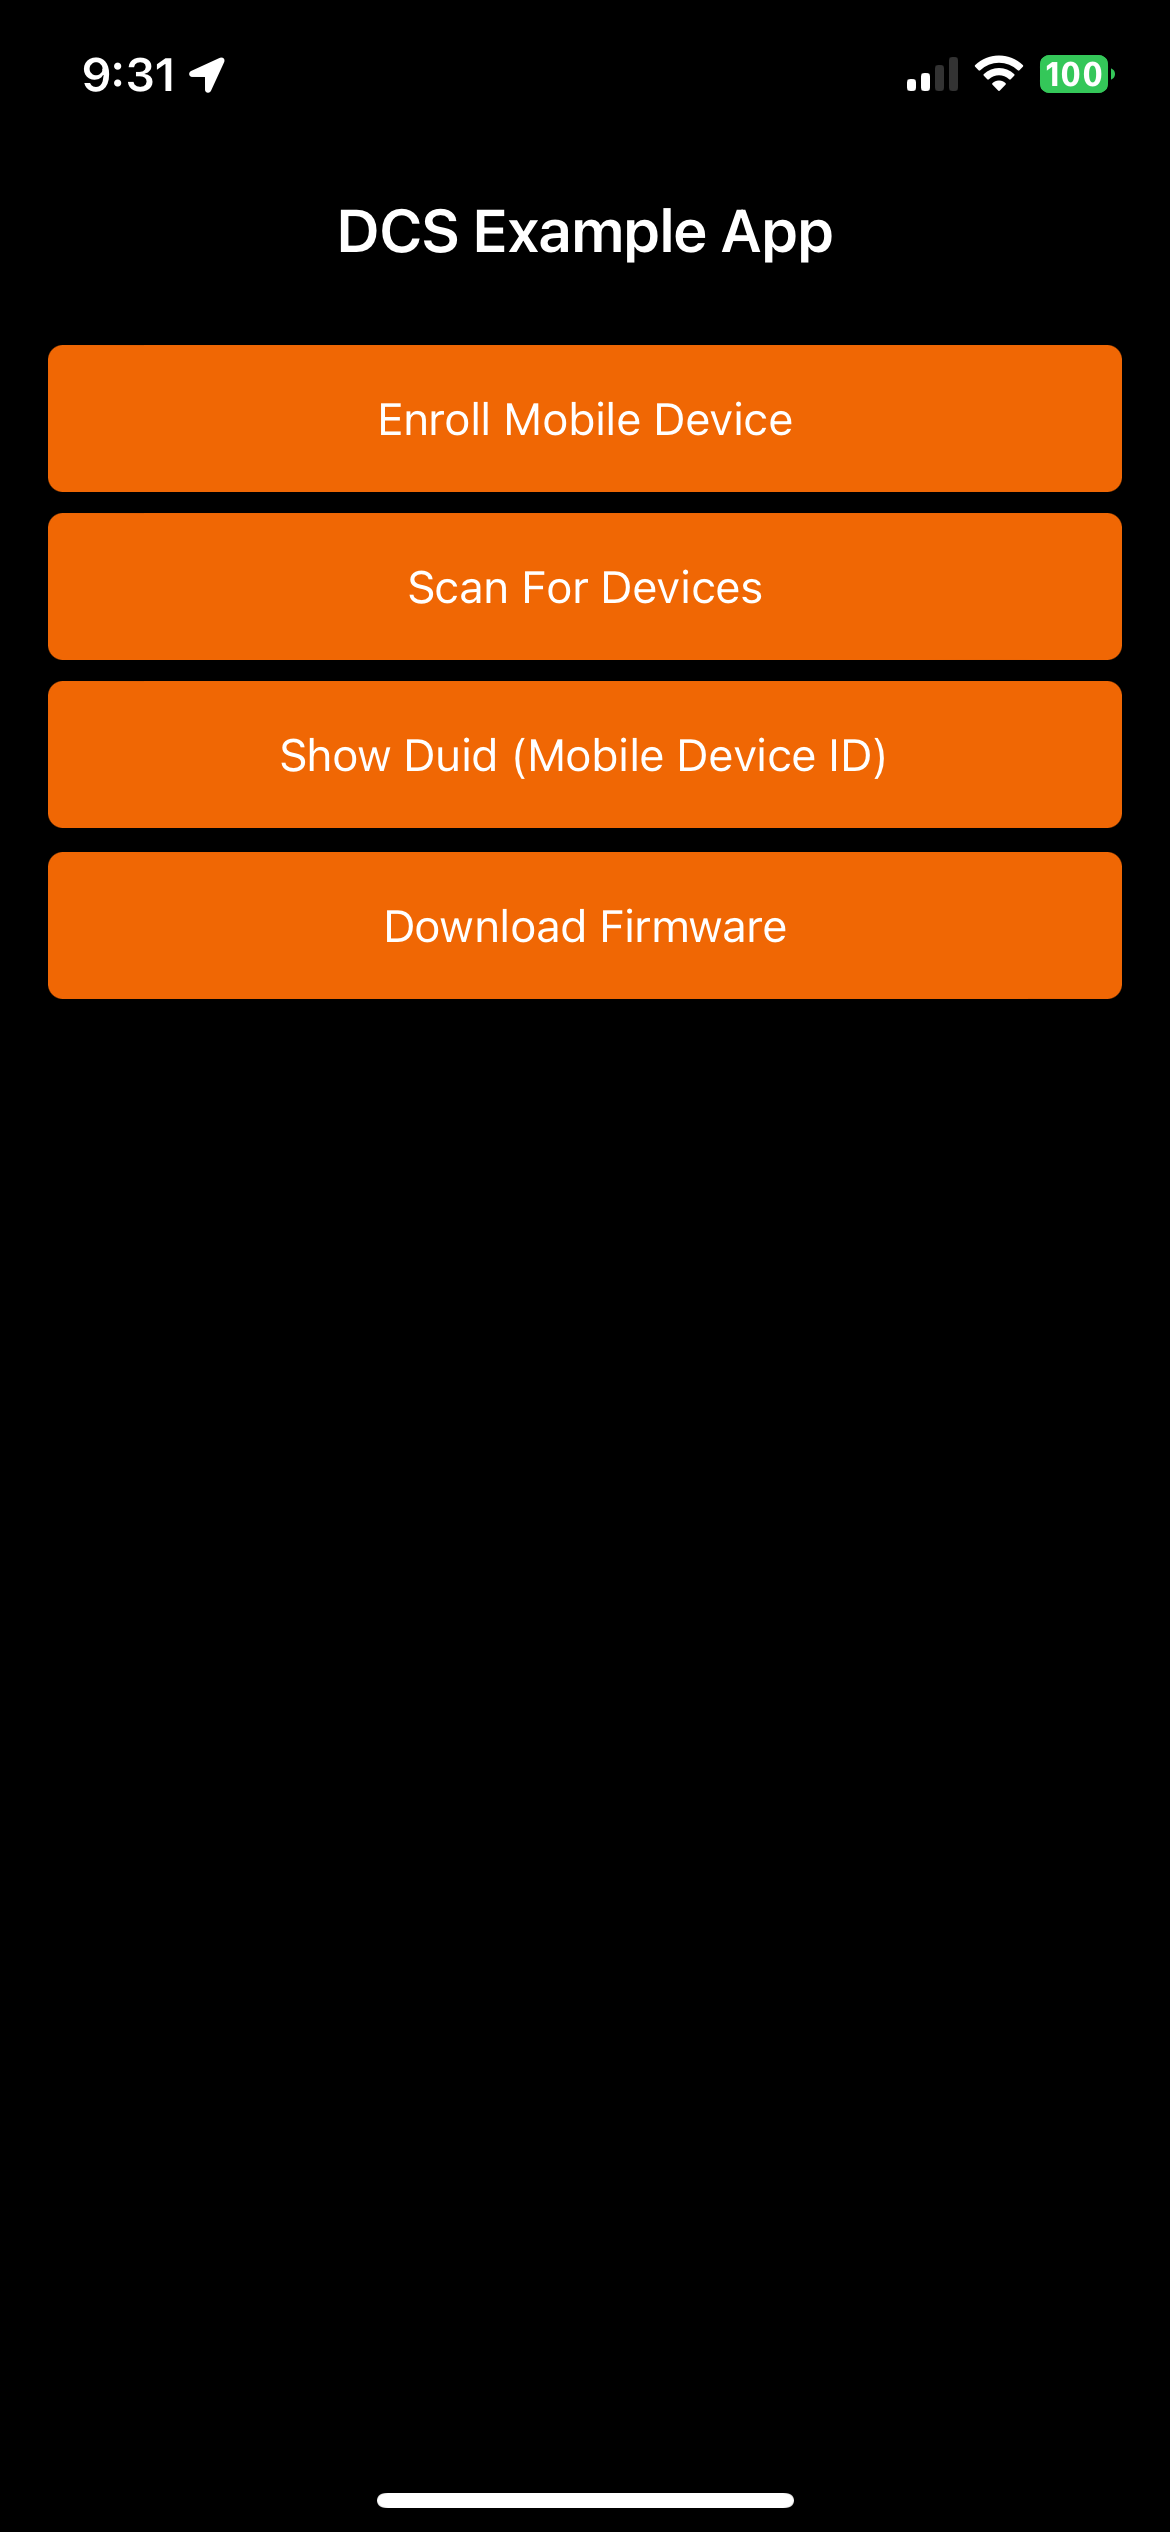
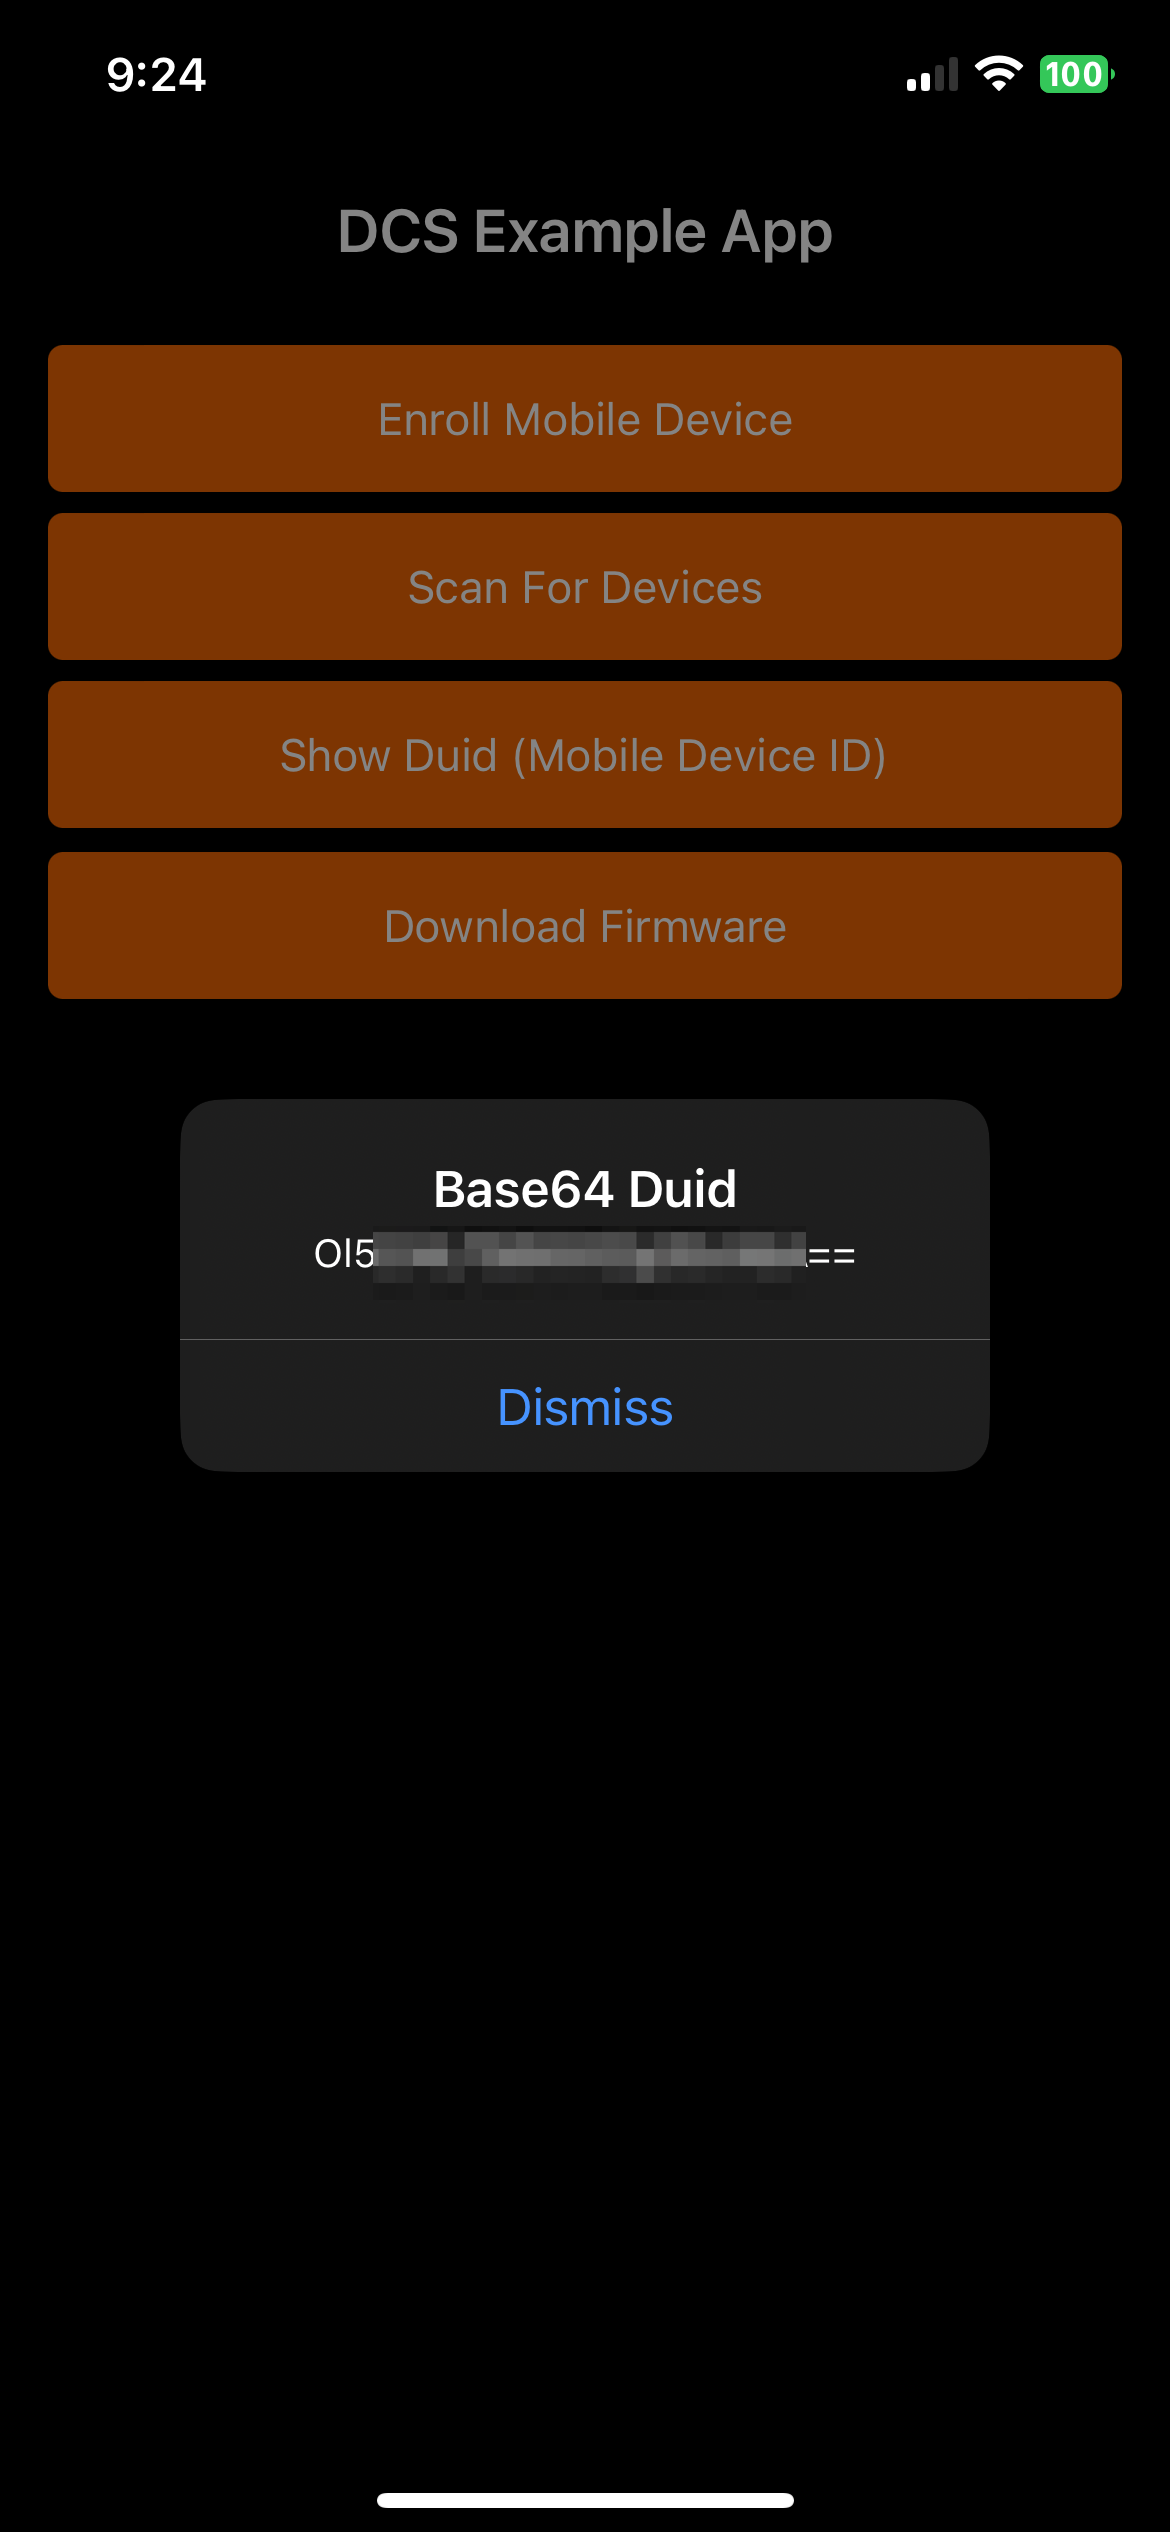
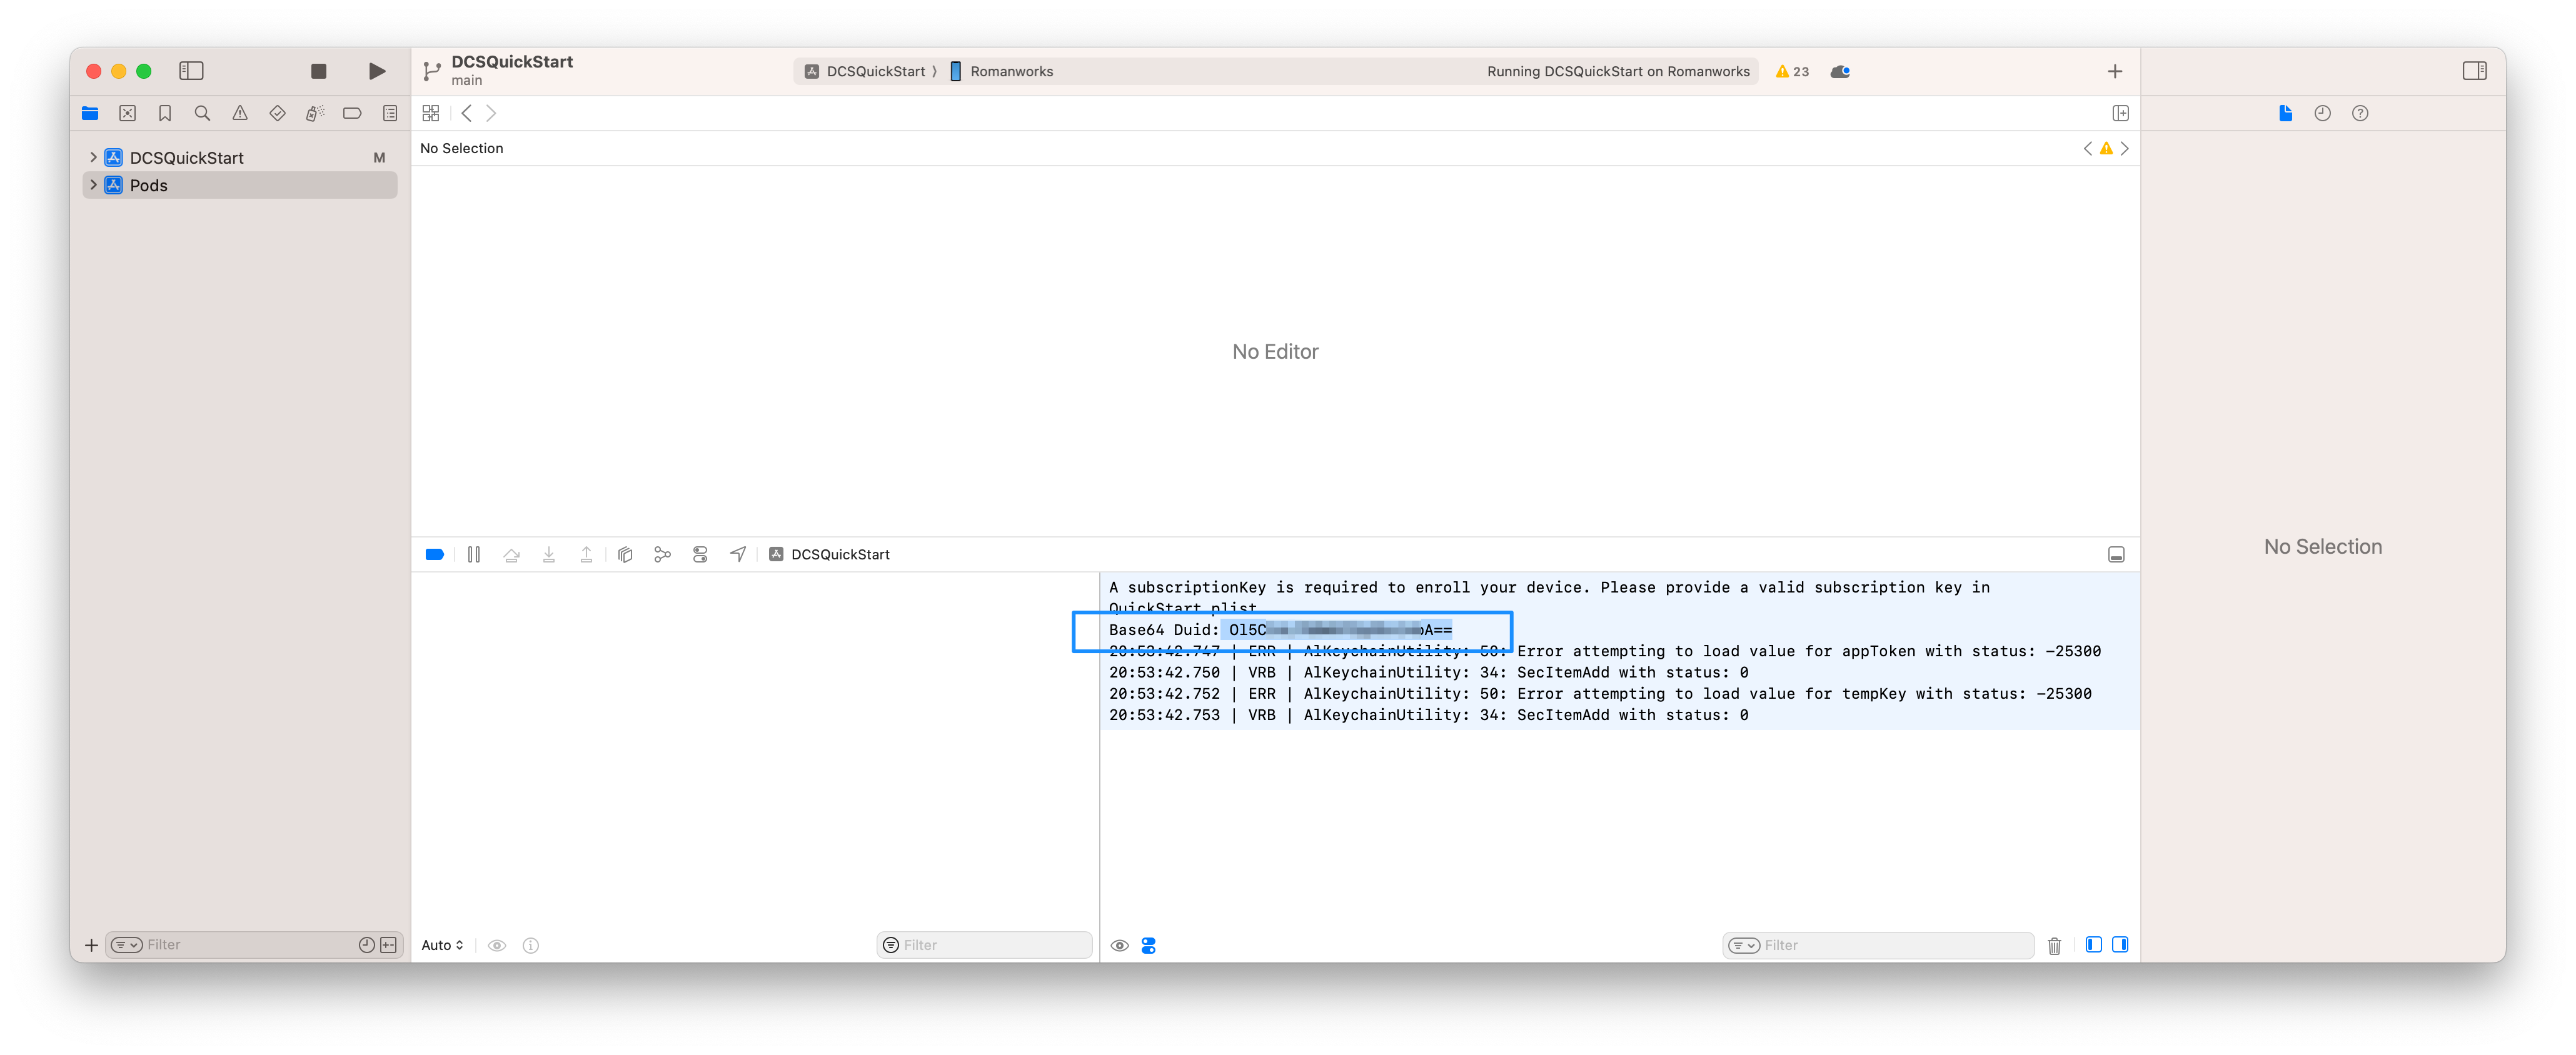
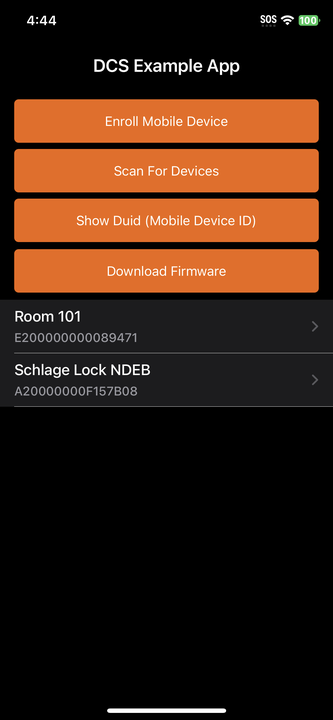
With the 3 properties populated we can now run the app in order to both confirm the app will run and to easily obtain a mobile device UUID. This can be done from a simulated app, but we recommend running from a test mobile device since future steps will use the BLE functions of a device whch are not available on a simulated device.
siteID, integrationID and subscriptionKey populate in the
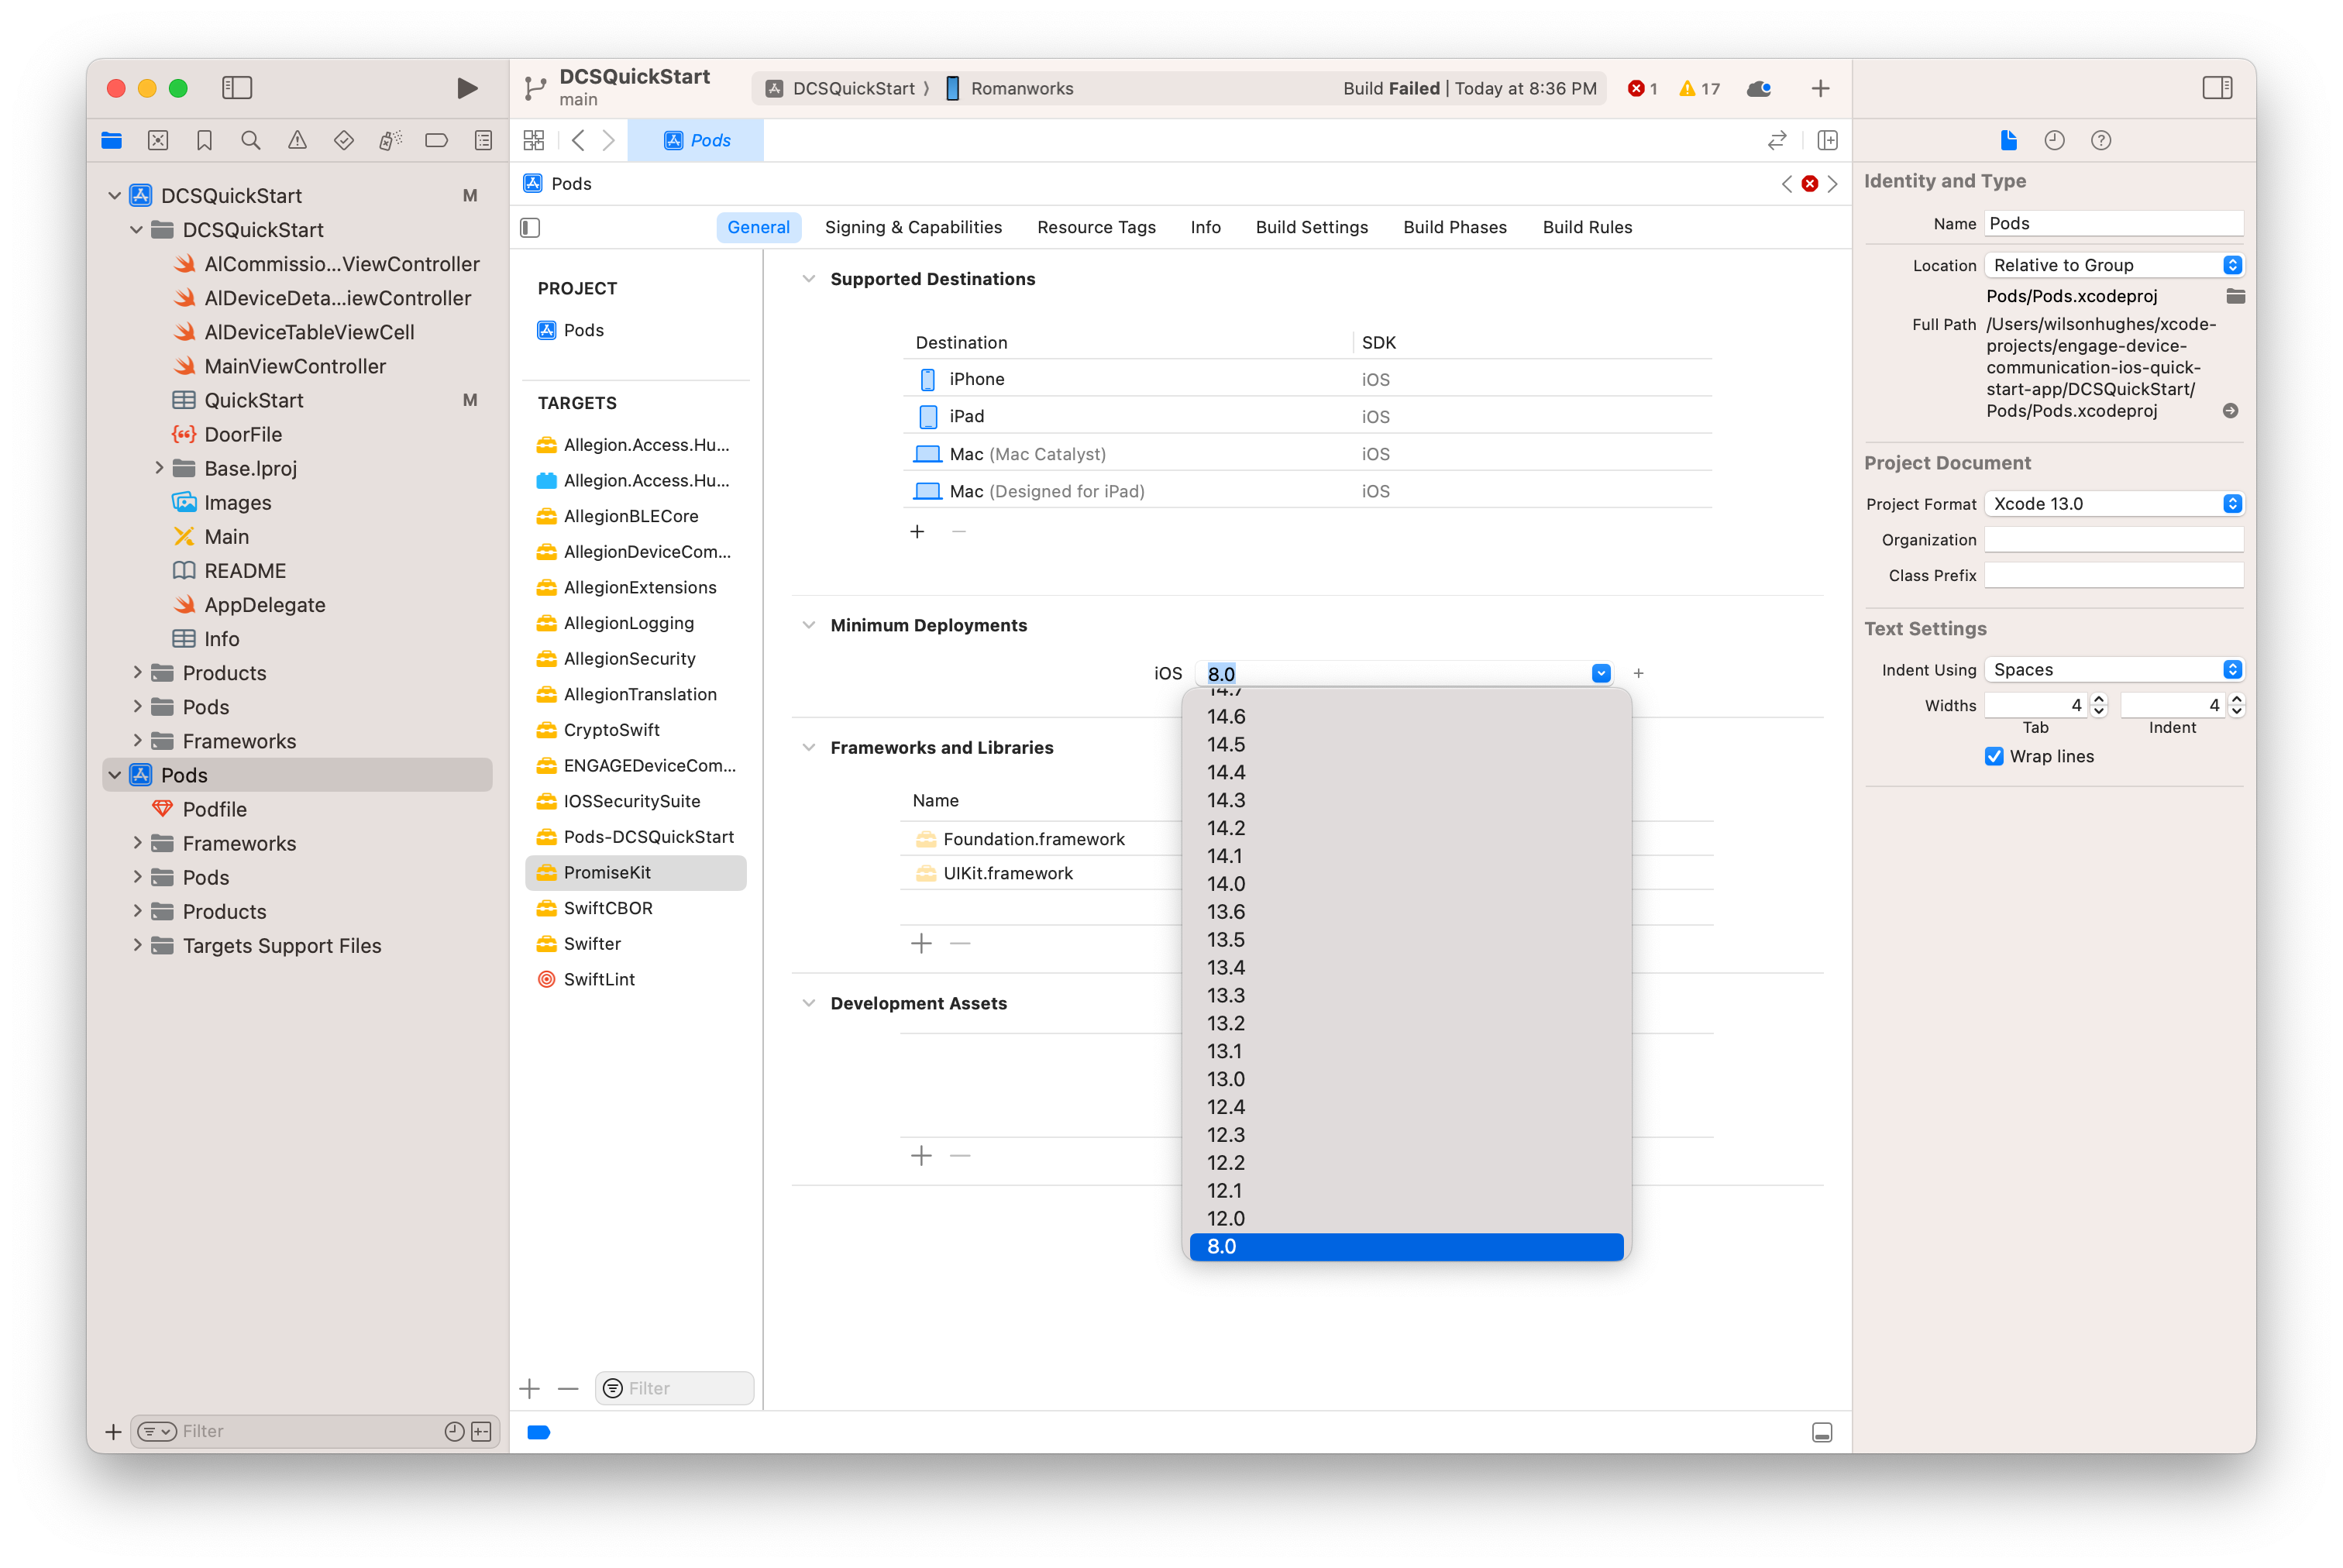
QuickStart.plist file and your device connected/availalble, run the app. Your app should load.ℹ️ If you receive the following build error:
SDK does not contain 'libarclite' at the path '/Applications/Xcode.app/Contents/Developer/Toolchains/XcodeDefault.xctoolchain/usr/lib/arc/libarclite_iphoneos.a'; try increasing the minimum deployment target
The issue may be a deployment target mismatch on the PromiseKit pod library. Try updating the minimum deployment to 13.0:
The app splash screen will appear followed by a menu that will allow you to do several things, including Scan for Devices and Show the DUID of the mobile device.
Now that we've obtained the mobile device UUID we can use it to create an App Token and a Temp Key. An App Token is an encrypted piece of information that contains all of the security protocols needed by the lock to communicate with a mobile device. App Tokens are generated and associated with a specific mobile device by DUID, so they must be created per device. Allegion App Tokens have a defined structure, detailed here. When a device requires a new App Token, a new Temp Key must also be provided.
Allegion makes a Node.js command line tool available to demonstrate how to generate app tokens and temp keys; we'll use that tool here to generate a set for use with our quick start app.
schlage-device-communication-resources/AppToken subfolder in terminal/shell window
and run npm install to install it.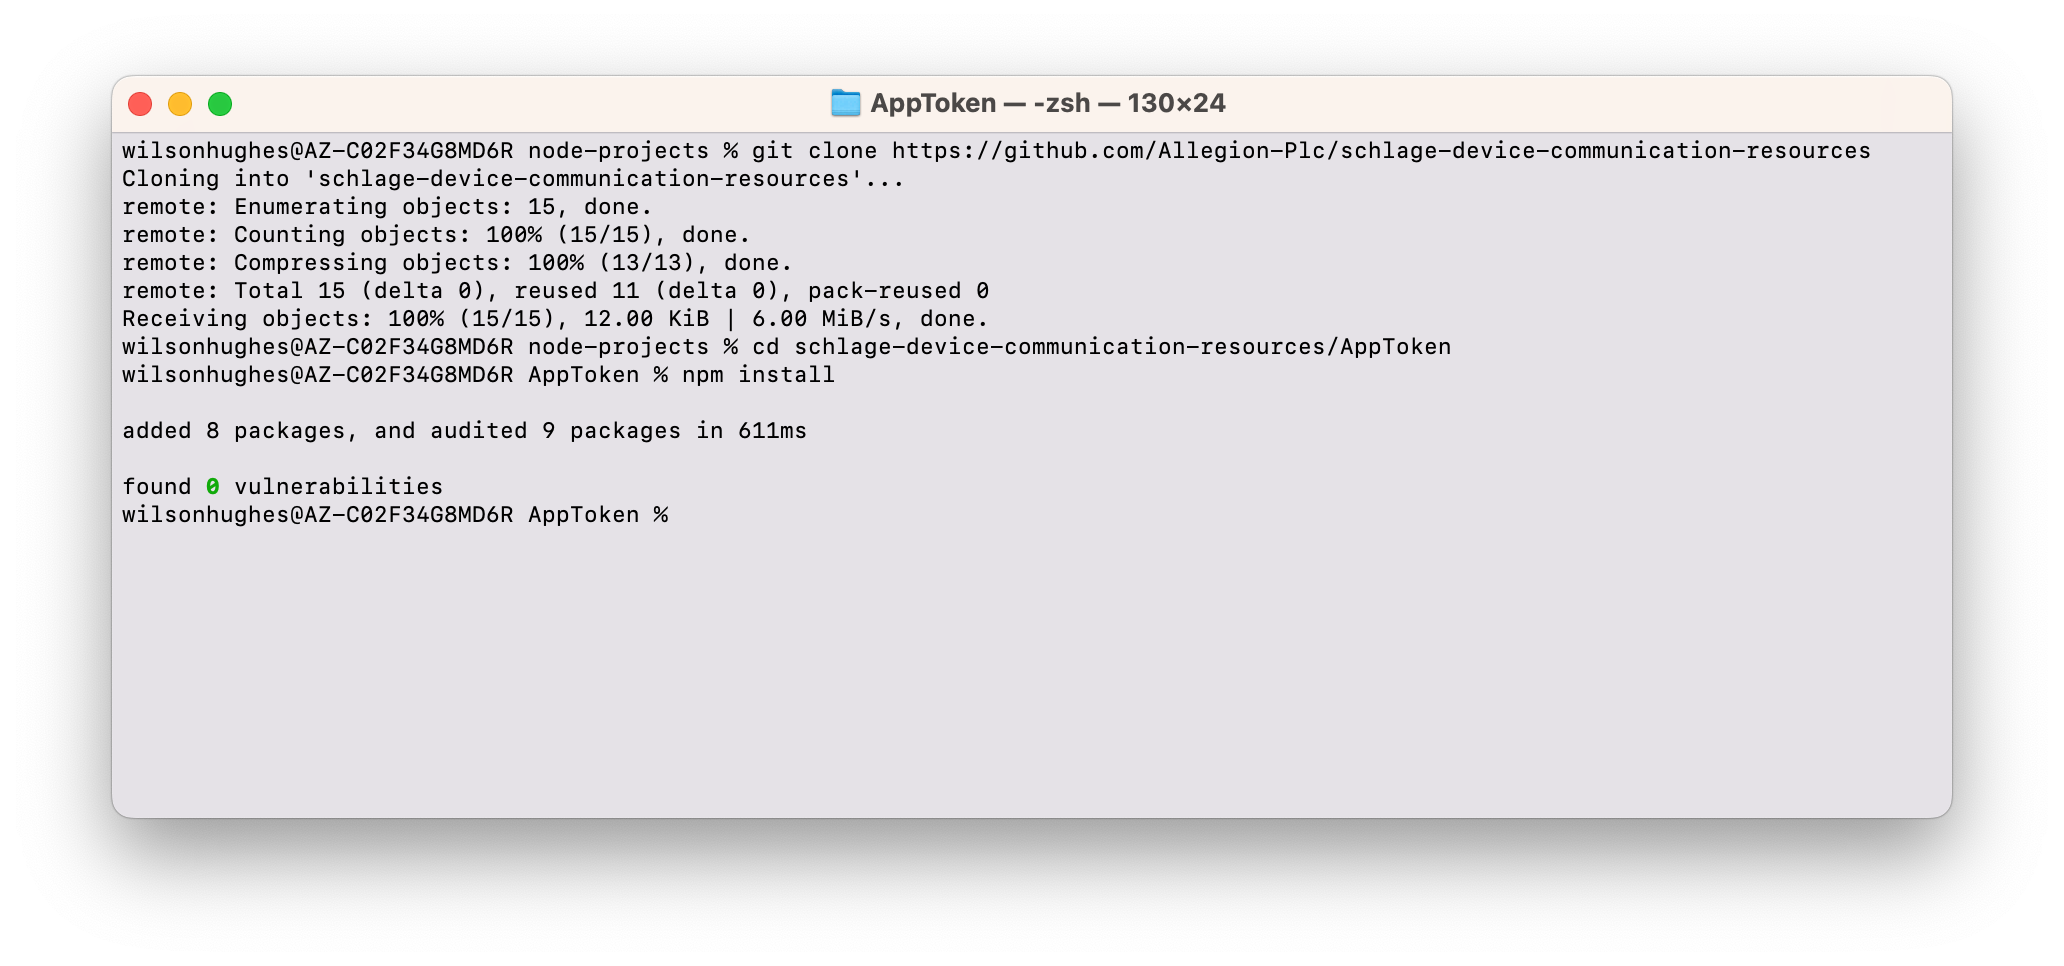
dotenv package is used, so we'll create a
.env file in the application directory to setup these values. .env in the AppToken directory with the following contents:AL_SITE_KEY_BASE64="{Your Base64 site key here}"AL_DUID="{Your phone duid}"AL_USER_ID="{Pacs managed user ID}"
AL_SITE_KEY_BASE64- Populate this value with the Base64-encoded site key you generated in that step above.AL_DUID - Populate this value with the Device UID you obtained from that step above.AL_USER_ID - Populate this value with the email address used to create your Allegion (Engage)
Device Management Portal Account from that step
above. 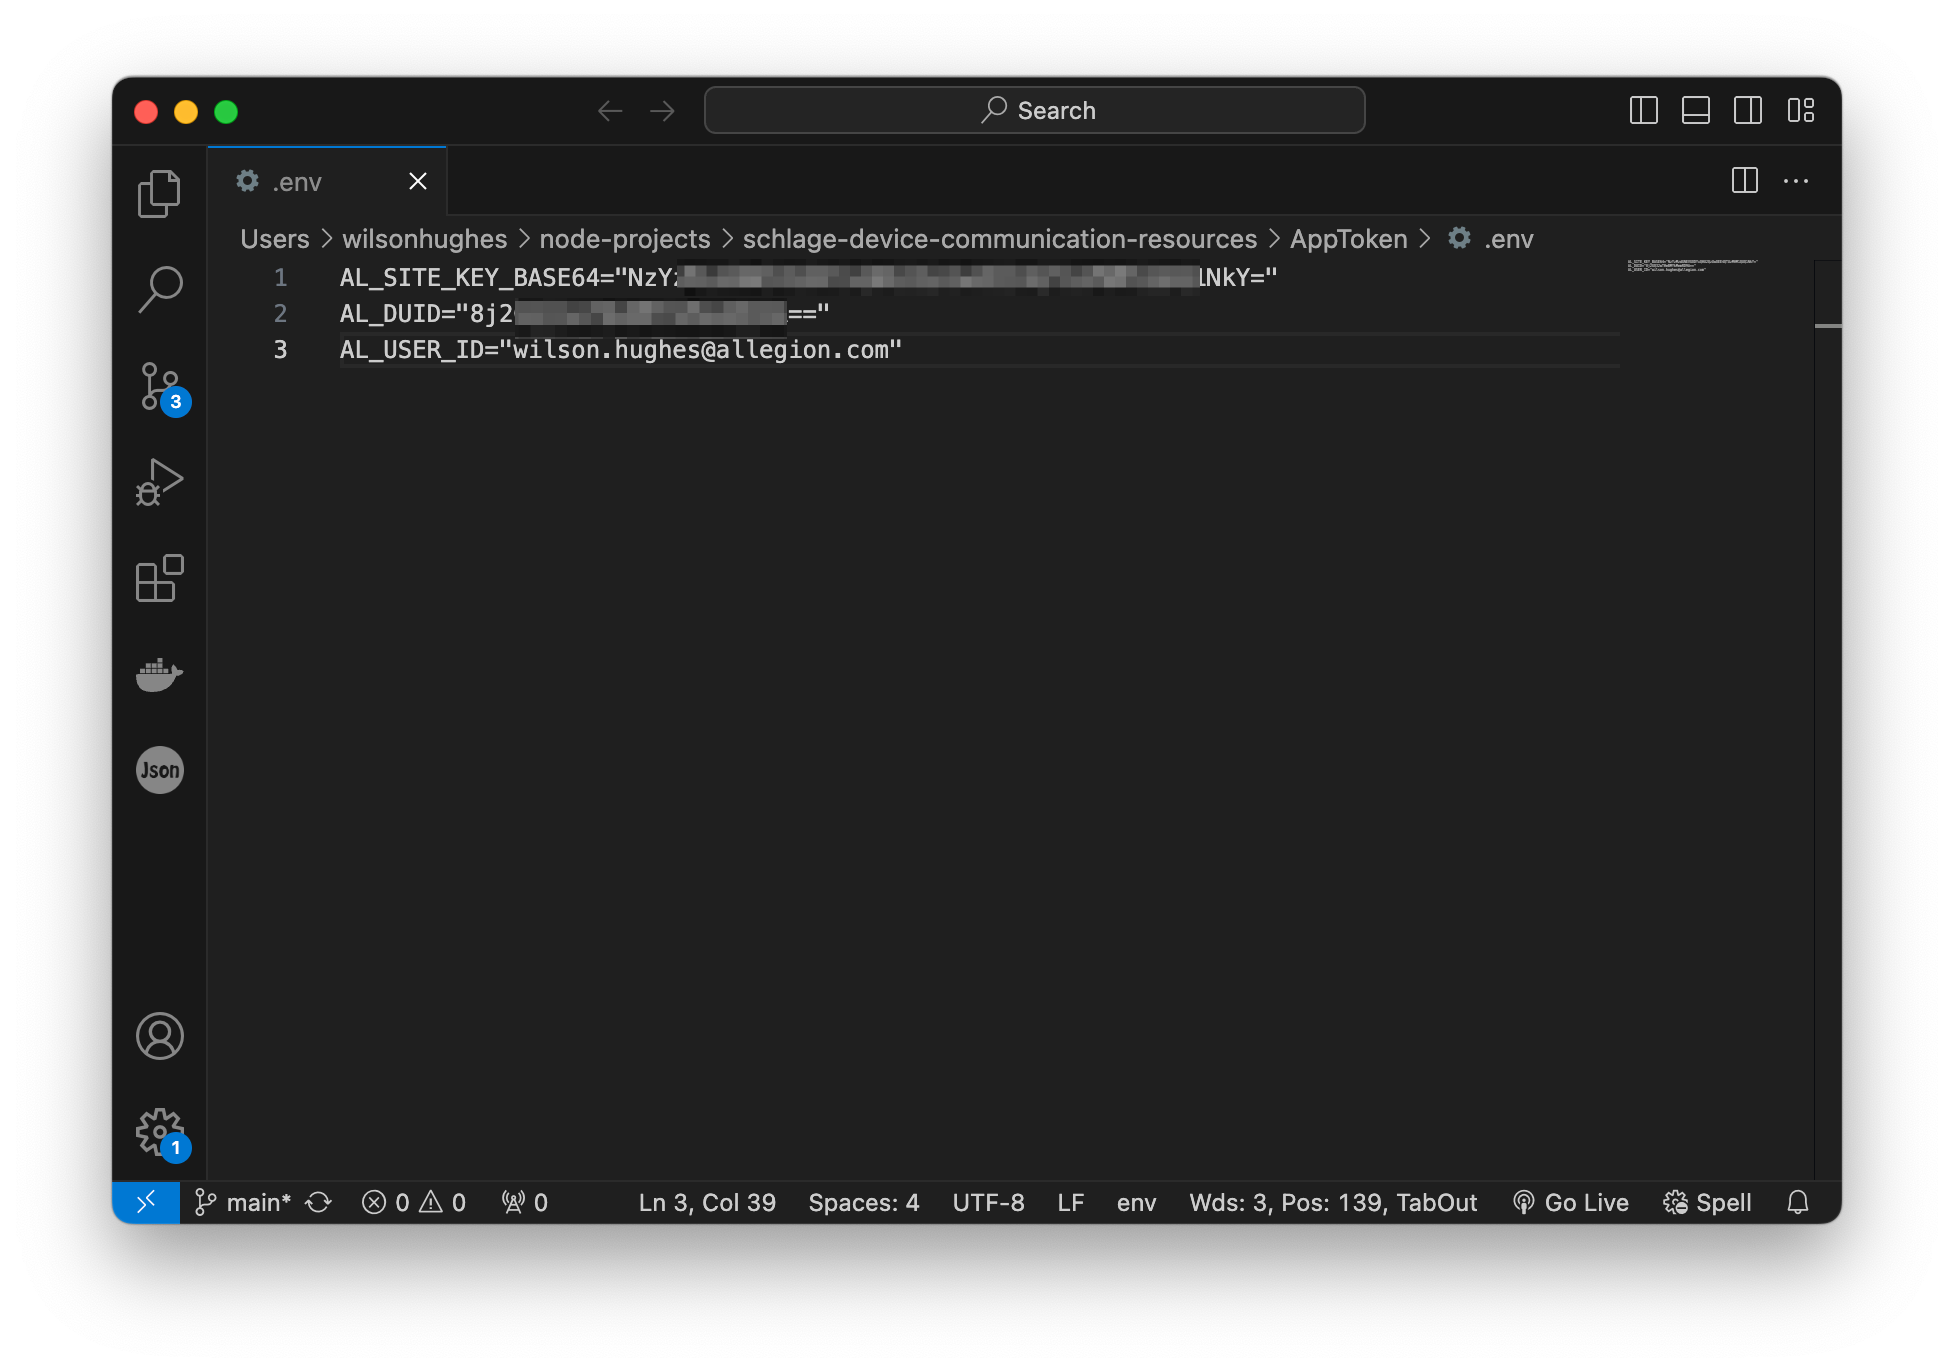
.env file.node index.js to run
the AppToken generator program. The output will include an App Token and a Temp Key. 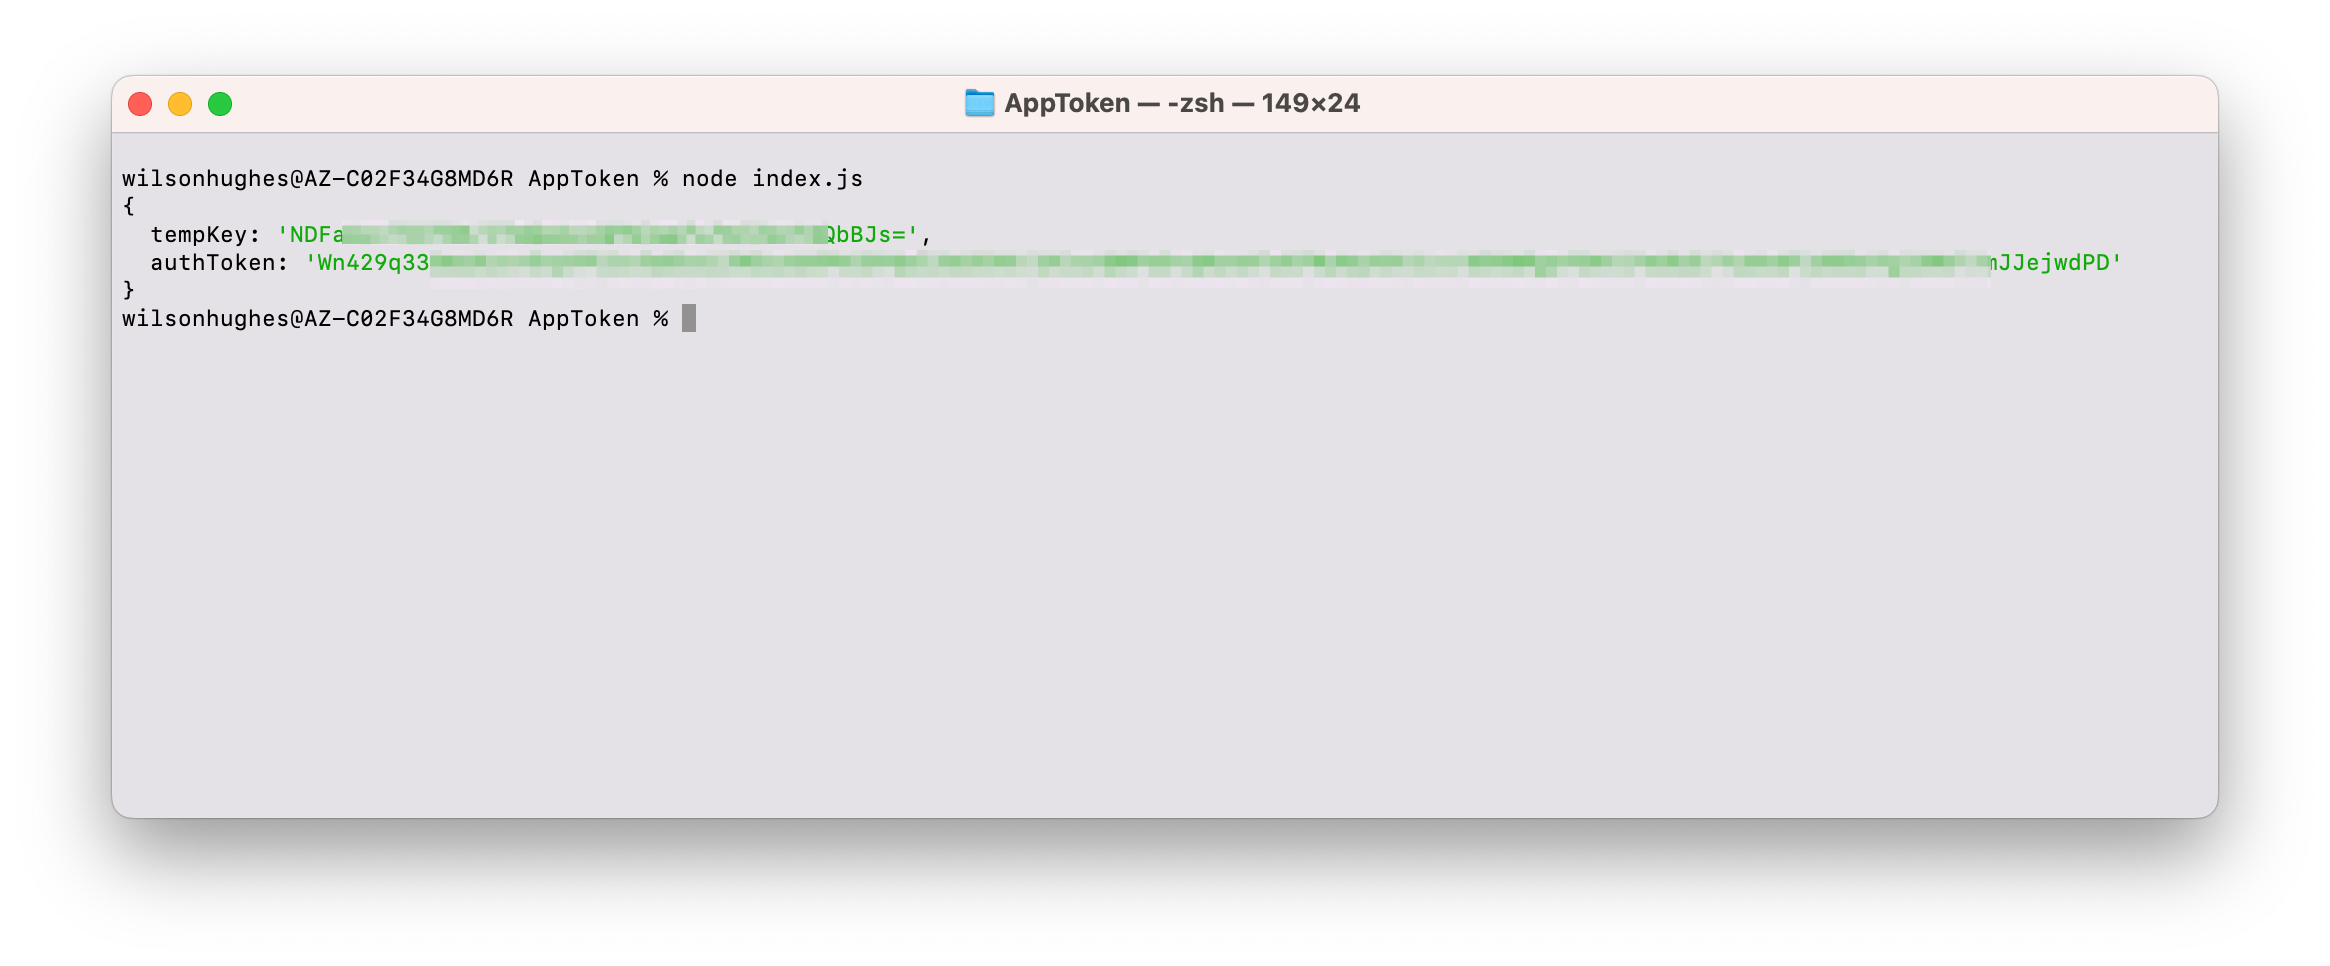
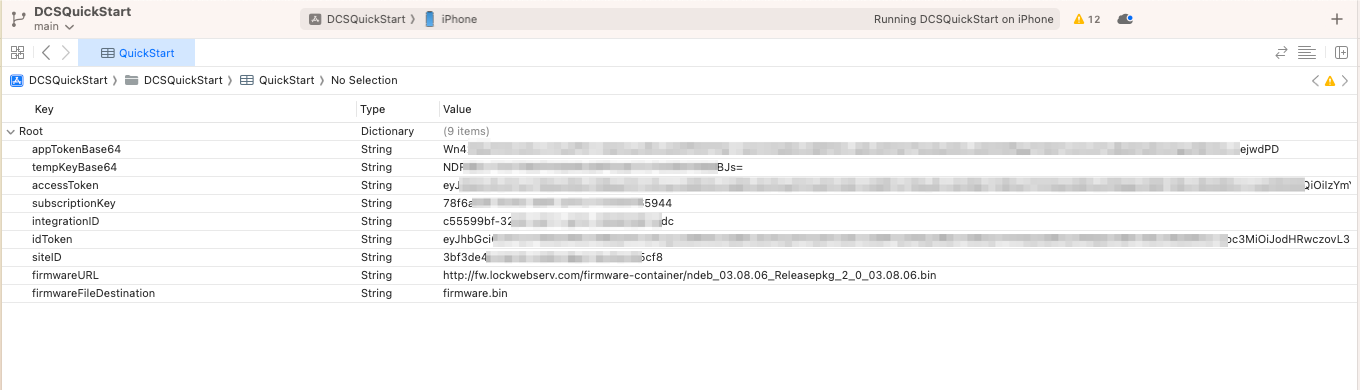
At this point there are two remaining values that need to be populated in order to run the Device Communication
Quick Start app - the idToken and accessToken JWTs must be generated and populated.
We'll tackle these next.
The idToken and accessToken JWTs are used to validate the user using the Device
Communication app has valid authority to use it to interact with Allegion devices.
The idToken is used during mobile device enrollment to confirm the user identified by the ID Token
JWT has authority to enroll the mobile device and then complete the enrollment step. Developer documentation including the required token claims on the ID Token is available here.
The accessToken is used during BLE device commissioning to validate that the user has authority to
perform device commissioning and then allow the user to complete commissioning. Developer documentation including the required token claims on the Access Token is available here.
Your company will have it's own procedures for generating JWTs but you'll be using the keys generated in the Generate ECC Key Pairs step above to
sign your tokens. While generating tokens is not complex, the process requires use of your private key to complete
the task, which must not be shared. There are few command line tools to achieve the task, so Allegion Developer
Support has made a JWT generator Javascript project available via download to help complete the task using a command
line. That tool is available here.
Whether you use your own method for generating JWTs or use the tool above to generate them for testing purposes,
be sure to include all required claims per the ID Token and Access Token documentation. Specifically, be sure to set all required claims including:
audience claim in both ID Token and Access Token. The value of this claim
should have been supplied by Allegion Developer SupportsiteId claim which, must be included in the access tokenpermissions claim, an array of values which must be included in the access tokenFollow the instructions in that tool (or given to you by your company) to generate ID and Access Token JWTs and then populate them into the Allegion Device Communication App Quickstart properties file in XCode.
We're now ready to run the Device Communication Quick Start App and commission a device.
A Doorfile is a JSON object containing configuration settings, instructions to modify the database of credentials, as well as the credentials themselves for a lock
For the purpose of this guide we will be using a simple example of a doorfile (shown below), containing a new
credential within the "add" array, a schedule for that credential, and a config value
"invCrdAudEn": "T" denoting that invalid credential attemps will leave audits.
Within the example credential we have a field, primeCr - this value is the encrypted key that
authorizes access to the lock. For the details of how this value is created, reach out to us here: Go to Contact Us
{
   "db":{
      "usrRcrd":{
         "deleteAll":0,
         "delete":[

         ],
         "update":[

         ],
         "add":[
            {
               "usrID":1,
               "adaEn":0,
               "actDtTm":"20150303000000",
               "expDtTm":"20350101000000",
               "fnctn":"norm",
               "crSch":[
                  1
               ],
               "primeCr":"2*******************************",
               "prCrTyp":"card"
            }
         ]
      },
      "schedules":[
         {
            "days":[
               "Mo",
               "Tu",
               "We",
               "Th",
               "Fr",
               "Sa",
               "Su"
            ],
            "lngth":1440,
            "strtHr":0,
            "strtMn":0
         }
      ]
   },
   "config":{
      "invCrdAudEn":"T"
   }
}
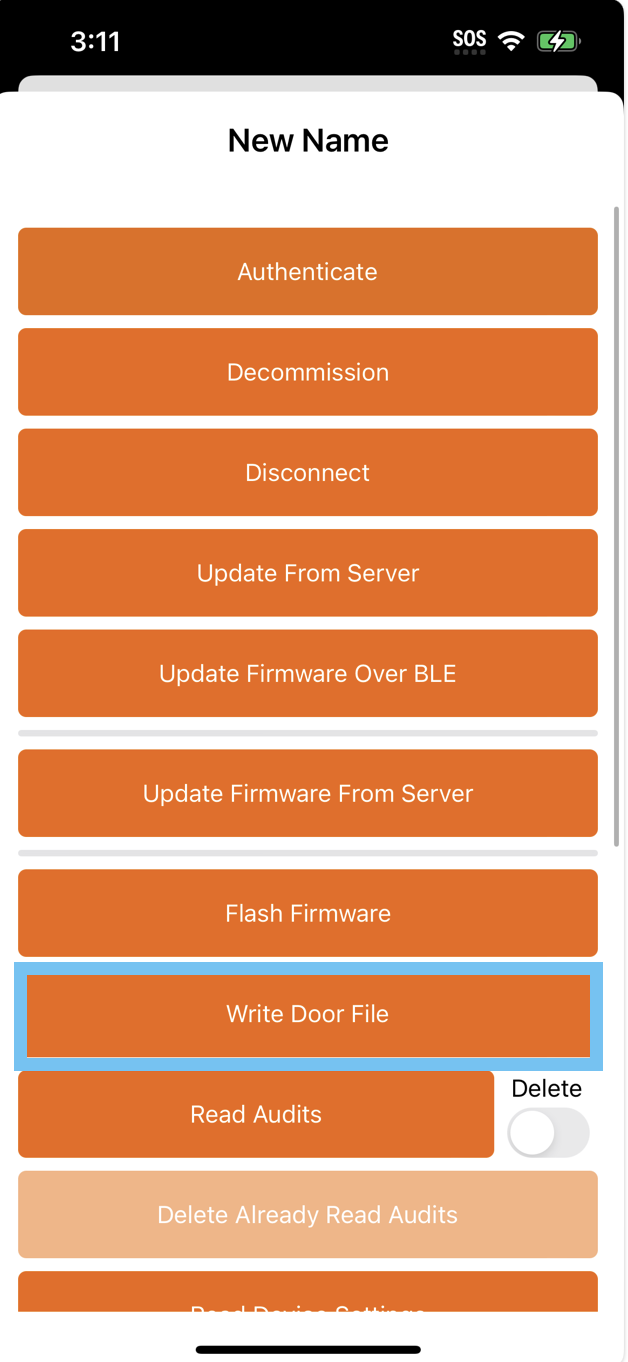
To use this doorfile in the quickstart app, replace the default doorfile in the SDK with your desired JSON file, or alternatively replace the content of the example file with your desired configuration.
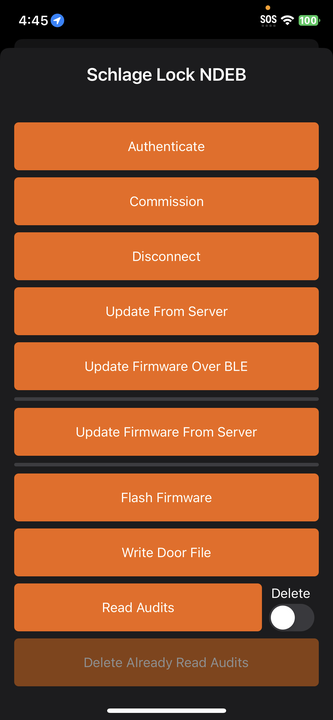
The Device Communication Quick Start app should now be fully configured and ready for use. We'll use it to
commission a device.
Similarly to building the Device Communication quickstart app, fill the integration and subscription key fields
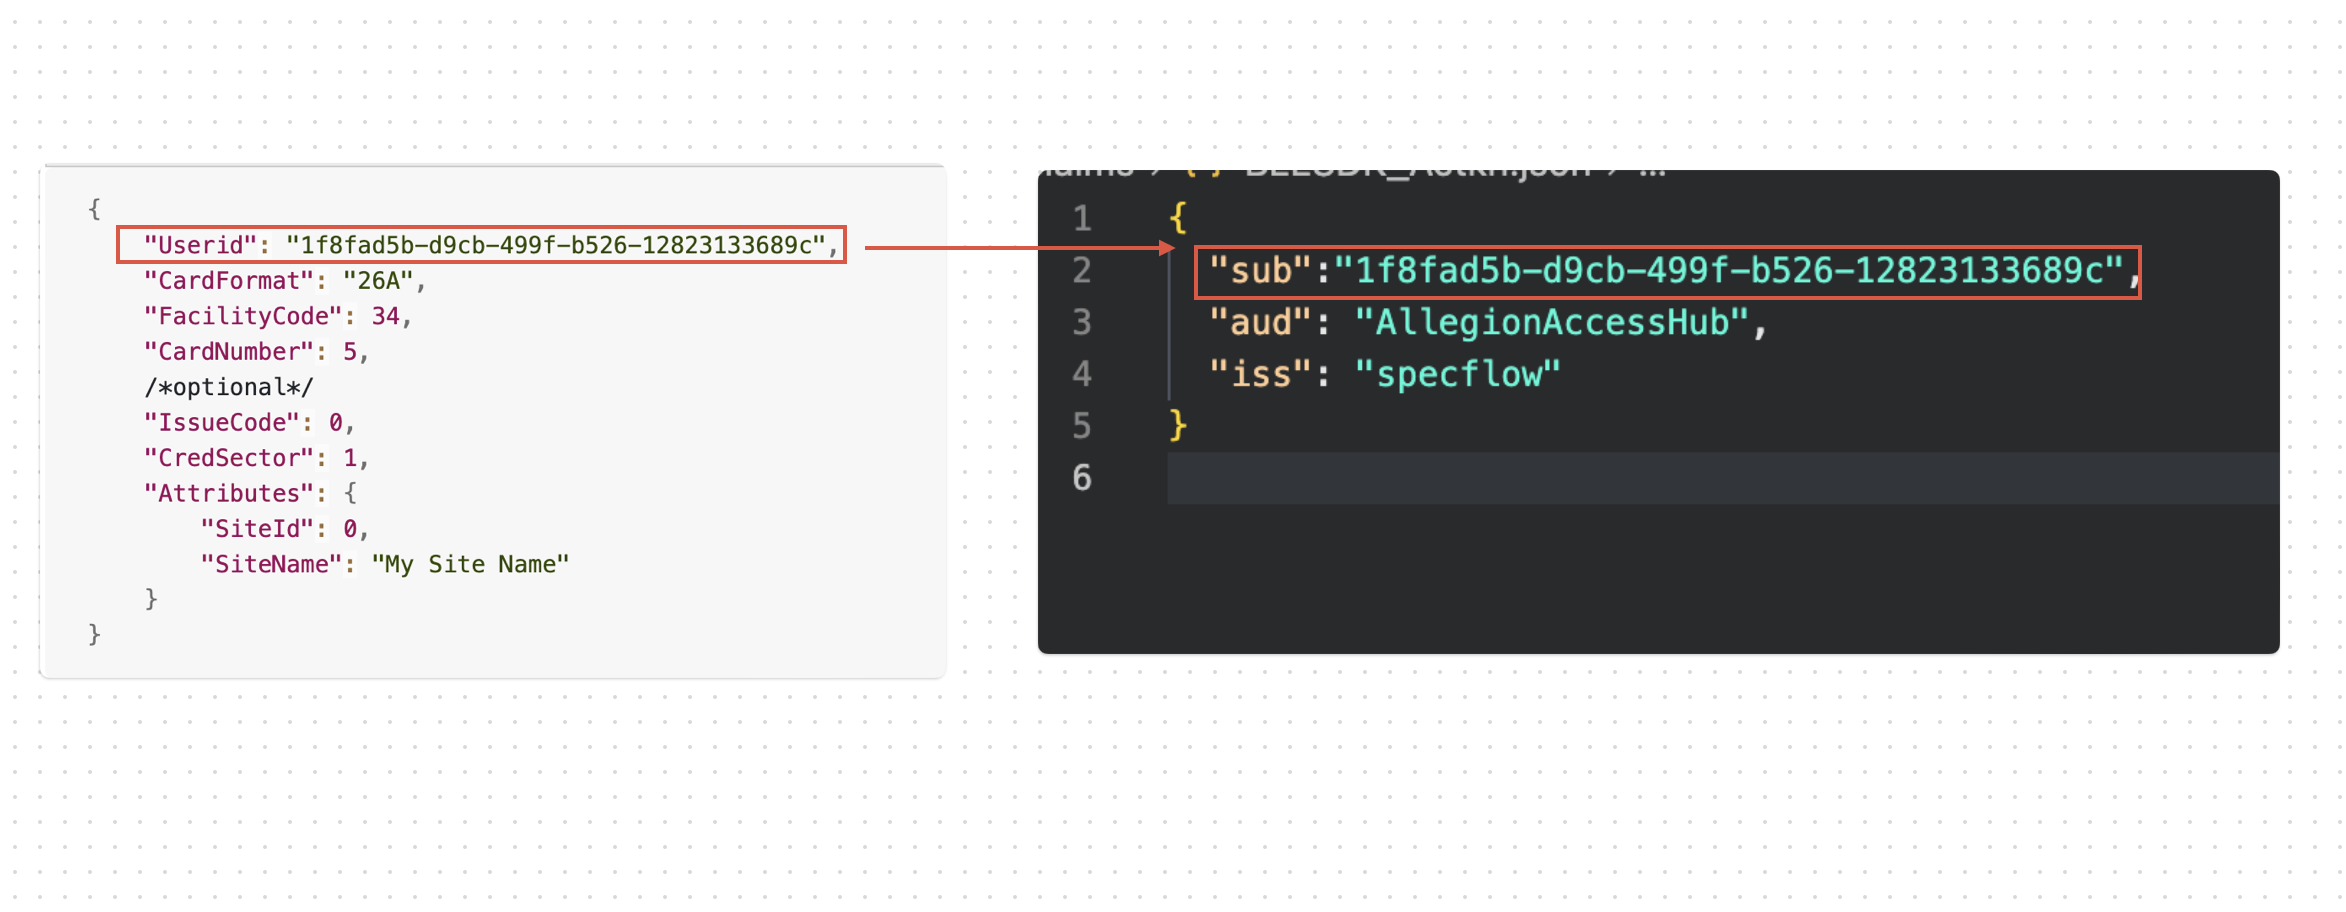
with their corresponding values, and the JWT and JWT-access token fields in the
properties file of the app. In this token, the sub will represent the user ID passed to the API to create a
credential, and will pull the credential associated with it.
Example JWT :
{
  "sub":"CDD4C06B-8C8B-49D1-B919-D76C20E0CCFF",
  "aud": "AllegionAccessHub",
  "iss": "YourIssuer"
}
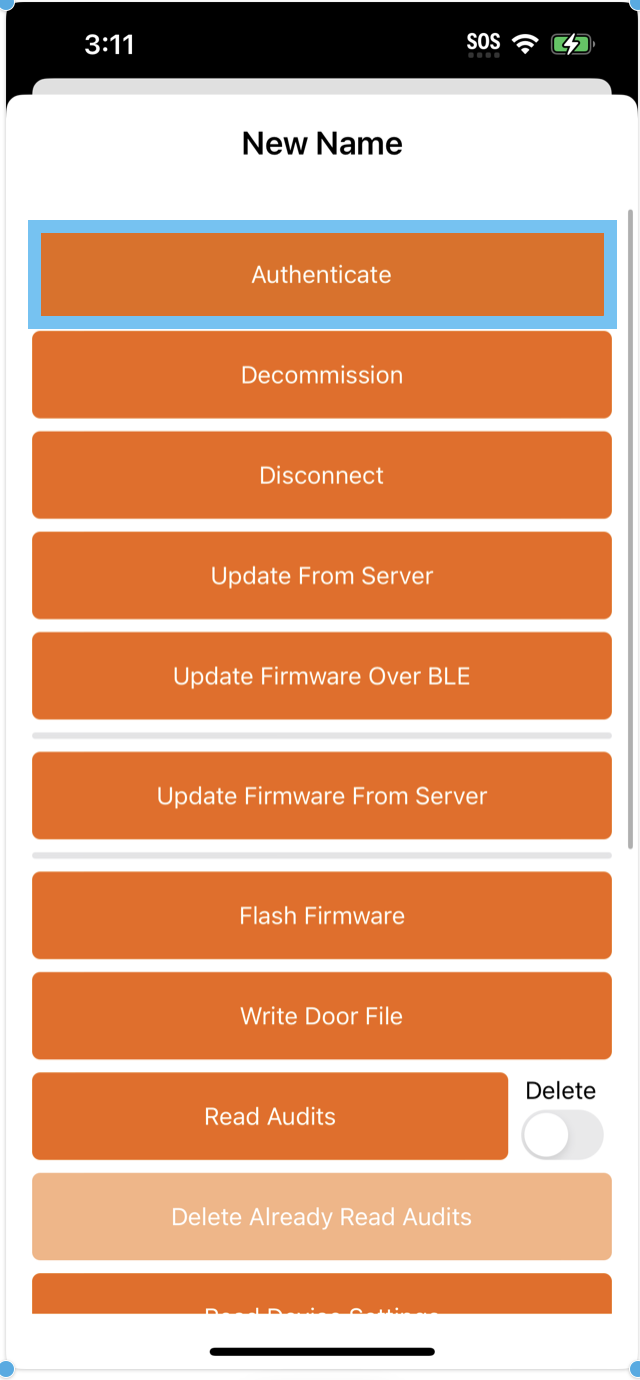
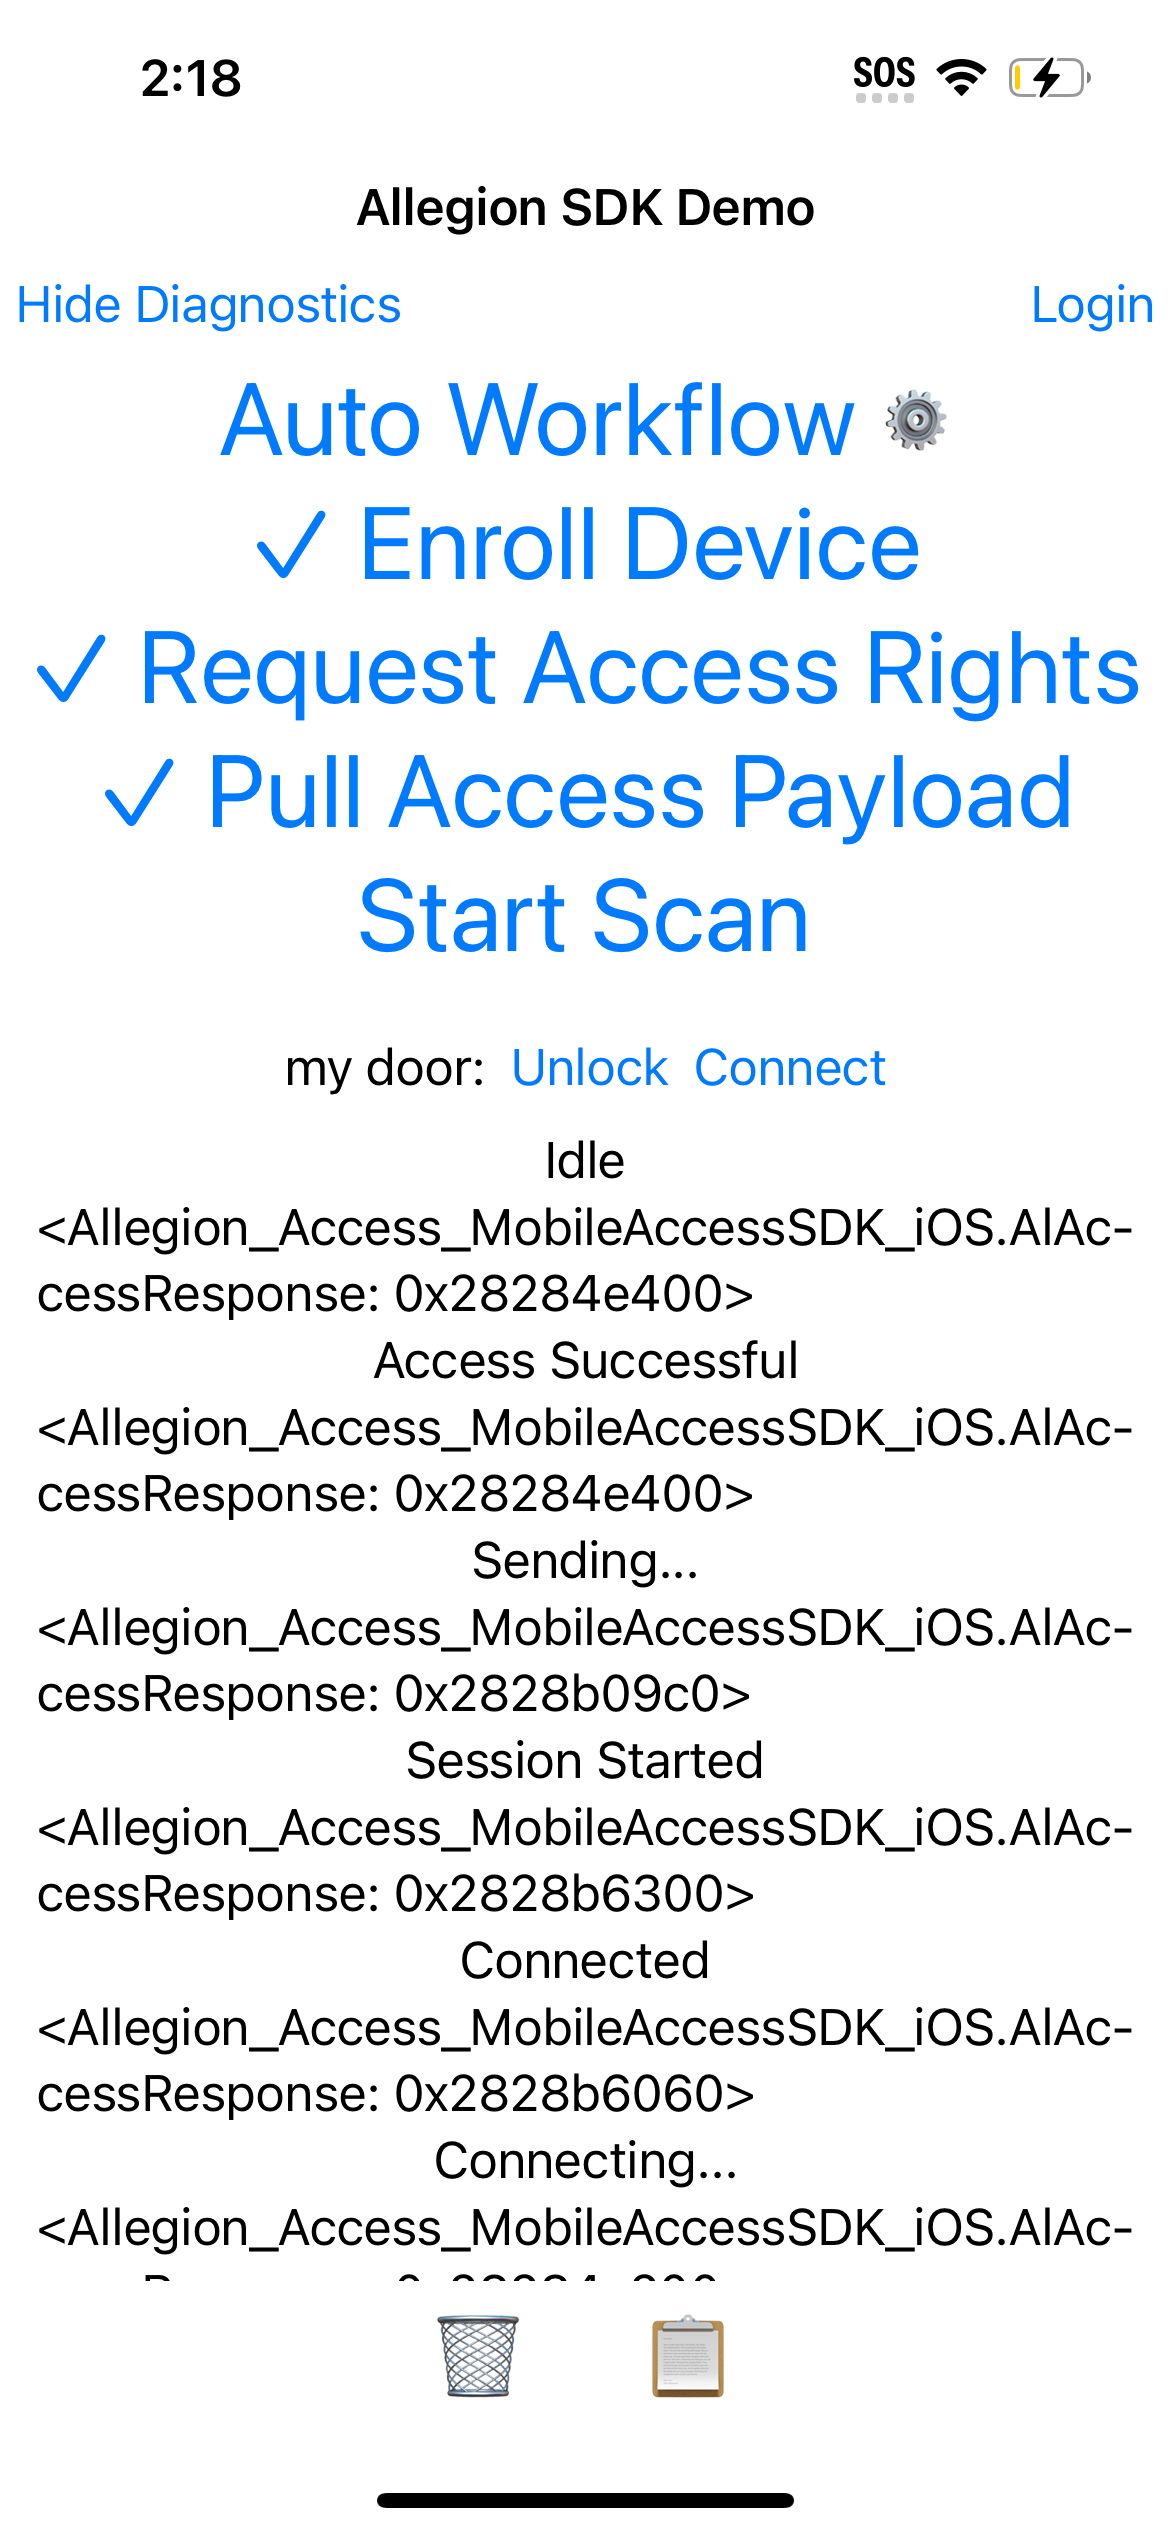
With the app configured, build and run it following the steps presented from top to bottom.
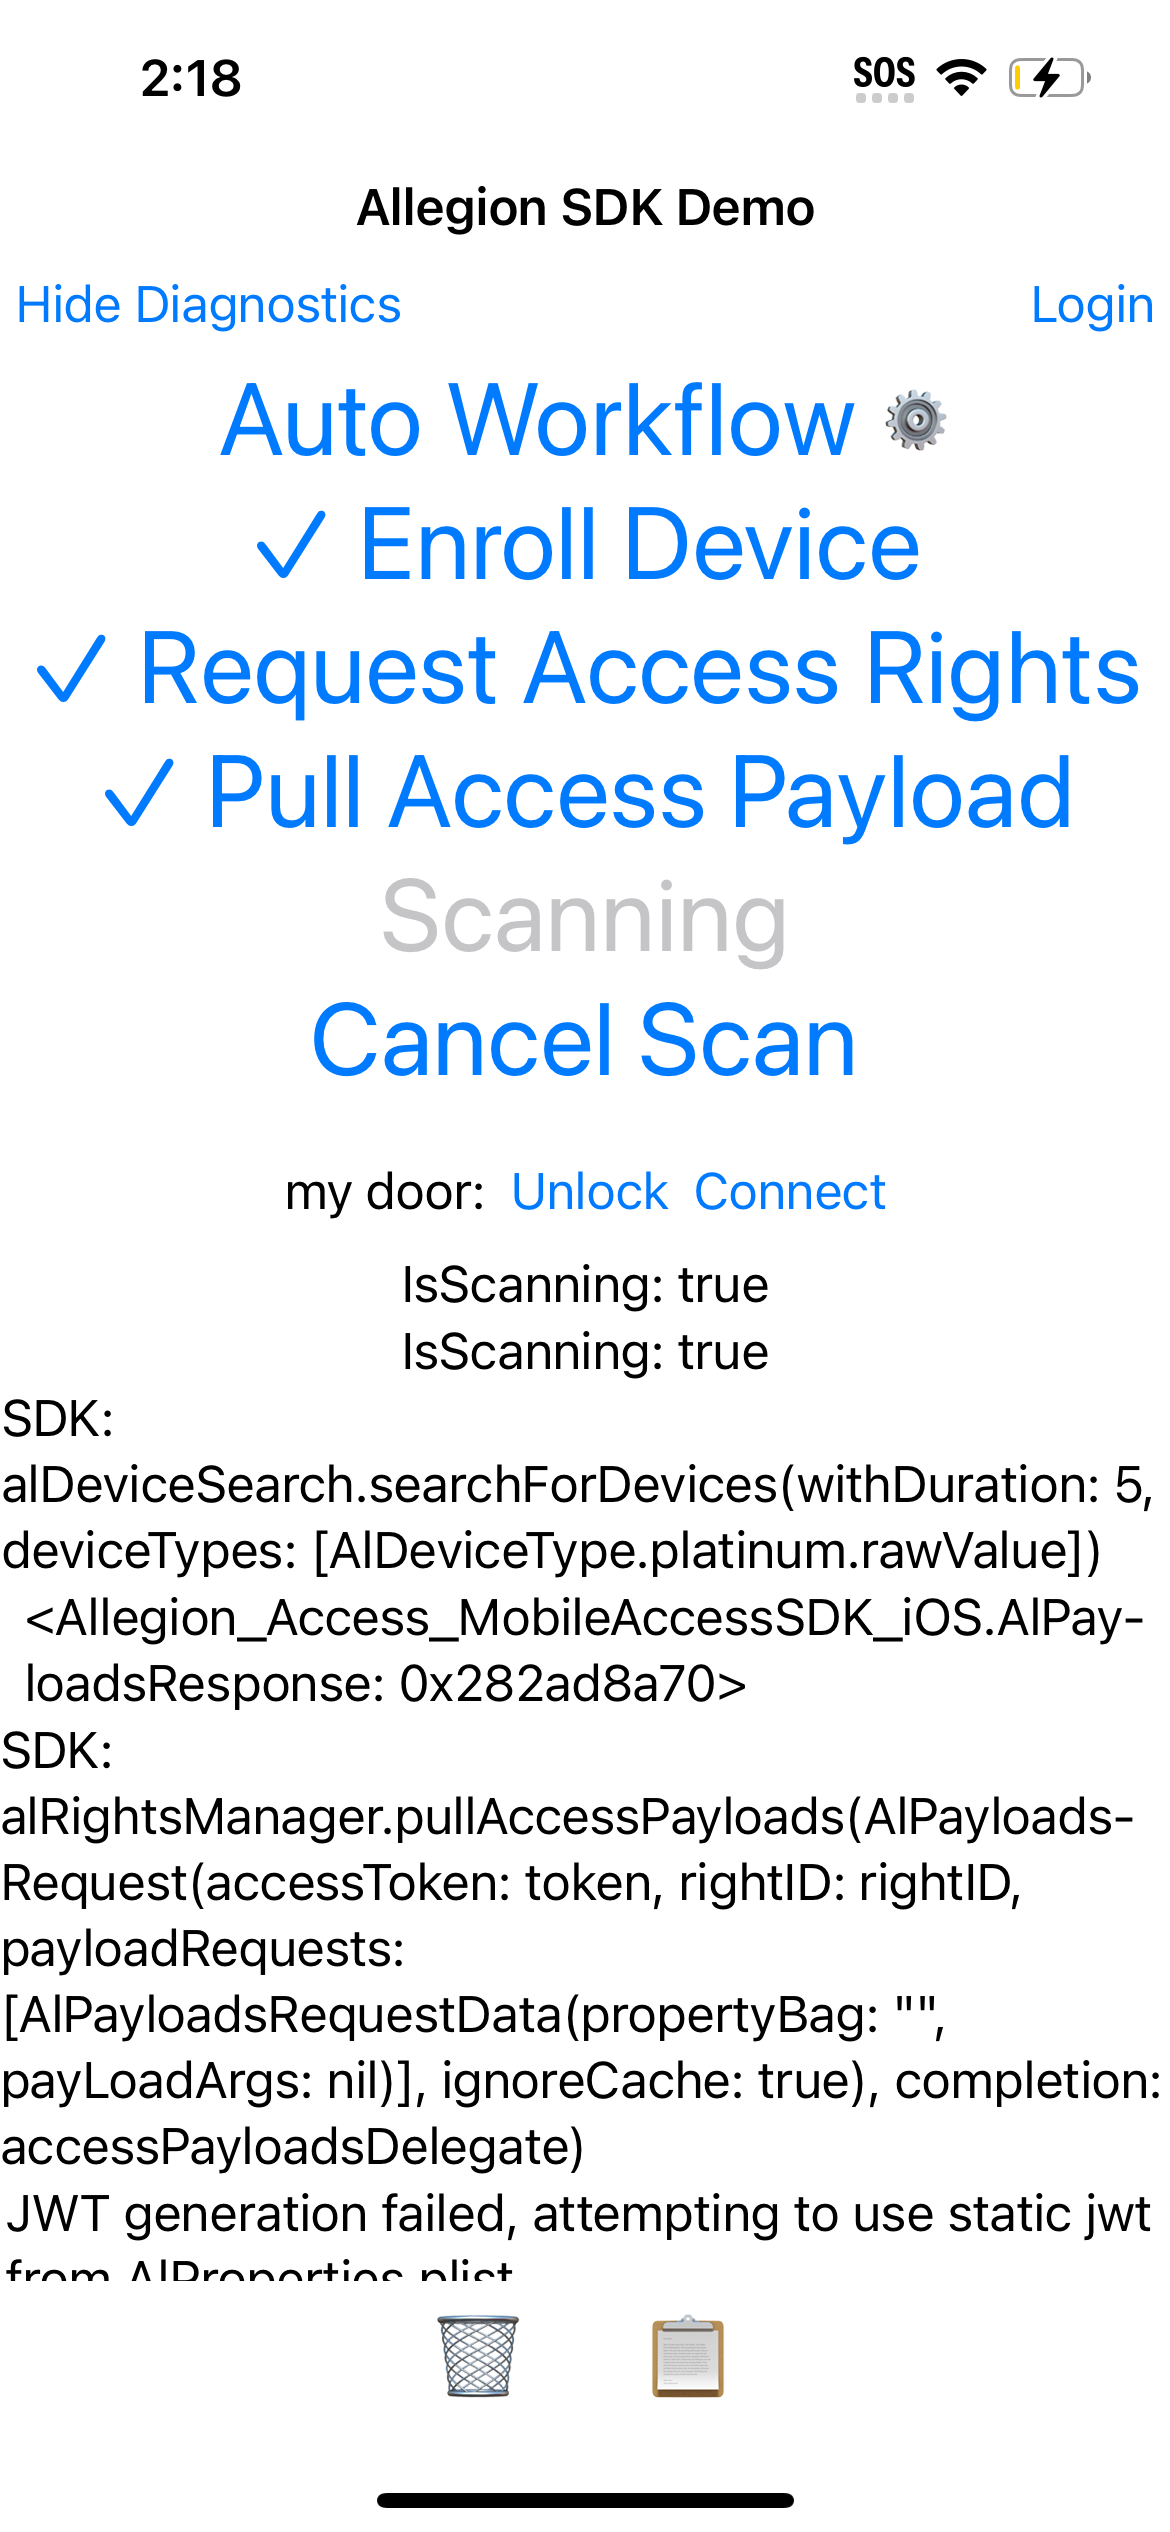
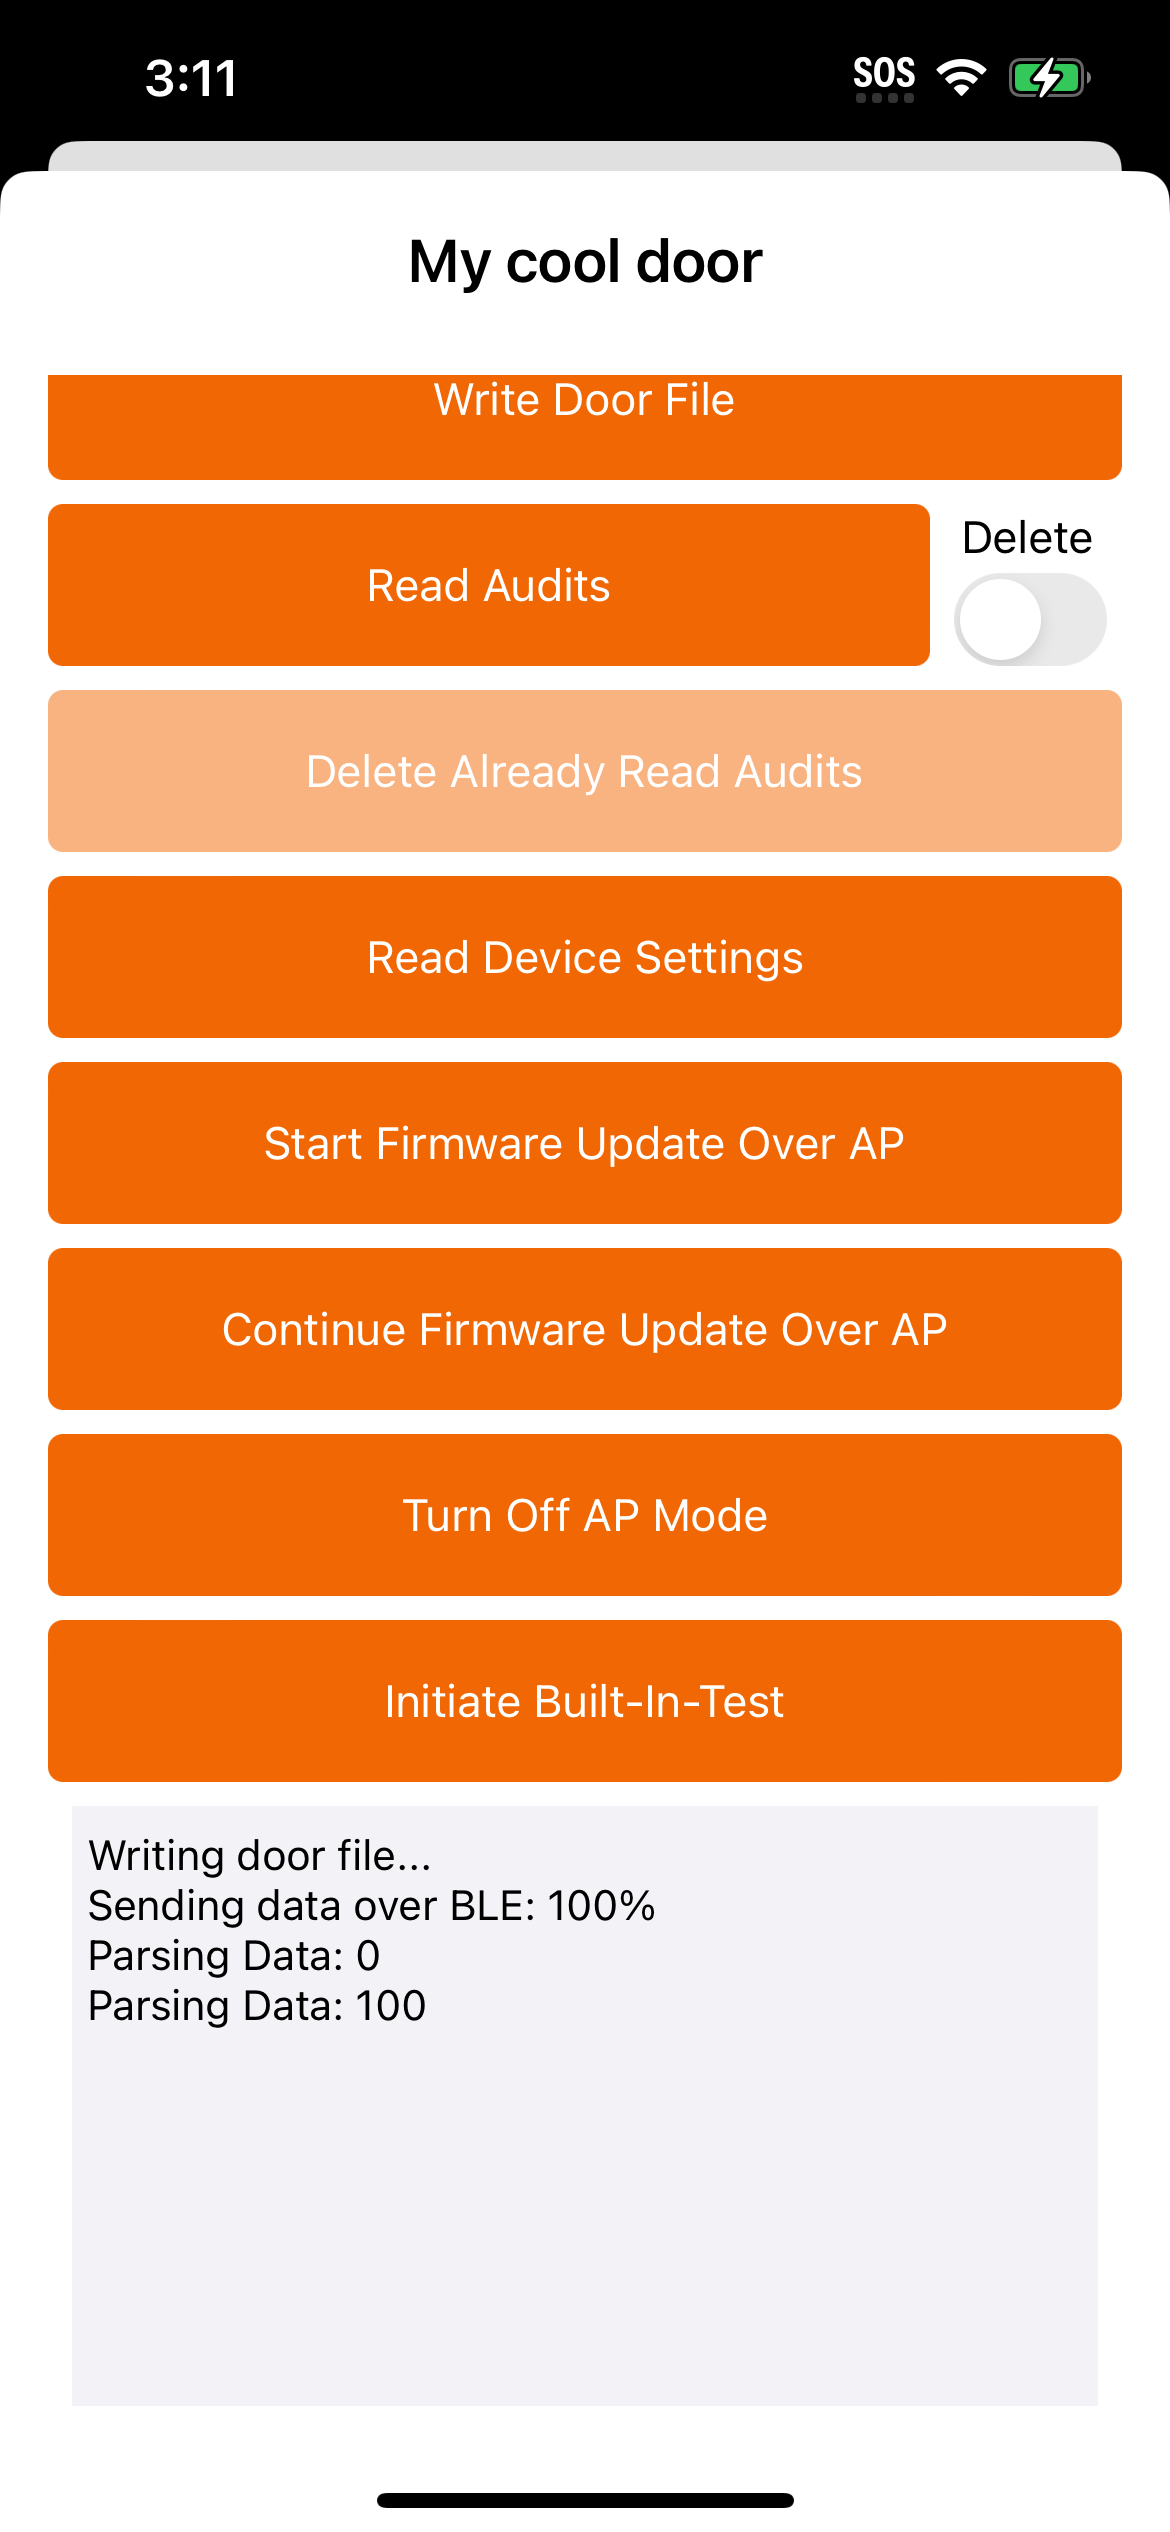
Once the credental has been pulled, scan for the lock, then tap connect followed by unlock to present it.
In following the steps presented throughout this guide, one will have been able to :