Allegion Developer Portal
Allegion Developer Portal

| REVISION CONTROL RECORD | |||
|---|---|---|---|
| VER | DATE | DESCRIPTION OF CHANGE | AUTHOR |
| 0.1 | 2/23/2017 | Initial draft | J. Everson |
| 0.2 | 4/17/2017 | Added Group ID example and Appendix B describing device schedules | J. Everson |
| 1.0 | 5/3/2017 | Inclusion of End to End Security Model Formatting Update Initial Release | T. Holt |
| 1.1 | 5/4/2017 | Included Comments regarding E5.0 pre-populating lock ID | T. Holt |
| 1.2 | 6/5/2017 | Updated Comments regarding jagSectors as a bitmap, therefore “jagSectors”:4 is the default for sector 2 | T. Holt |
| 1.3 | 6/13/2017 | Added details to the introduction | R. Verde |
| 1.4 | 6/14/2017 | Added notes regarding lockId being sent during commissioning and it’s change from before ENGAGE 5.2 release to after | T. Holt |
| 1.5 | 6/20/2017 | Added notes regarding the directory sector must be sector 2 Added notes regarding the deleteAll tag = 1 on the first db transfer and how “schedules” corresponds to “crSch” | T. Holt |
| 1.6 | 8/17/2017 | Added notes regarding support for NDE No Tour Added notes regarding support for MiFare Plus cards in NDE and LE | R. Verde |
| 1.7 | 9/19/2017 | Changed Credential Attribute section to show NDE support of credentials Added notes to the Credential Attribute section regarding ADA credentials and how the credential attribute tag varies from the JSON designation of an ADA credential | T. Holt |
| 1.8 | 9/22/2017 | Added CTE and new credential Attributes to Appendix A for CTE | J. Everson |
| 1.9 | 11/21/2017 | Added Appendix C for Additional No Tour Information | R. Verde |
| 2.0 | 11/28/2017 | Added notes on unblocking a blocked credential | T. Holt |
| 2.1 | 12/20/2017 | Added notes on removing blocked No Tour credential from database | R. Verde |
Table of Contents
Introduction 4
Integration 4
2.1 No Tour JSON 5
2.2 Door File 5
2.3 No Tour card data 6
2.3.1 Jaguar sector 6
2.3.2 No Tour Commands: 7
2.3.2.1 Add Credential: 7
2.3.2.2 Add Credential Example: 8
2.3.2.3 Delete Credential: 9
2.3.2.4 Repurpose credential: 11
2.3.2.5 Replace credential: 12
2.3.2.6 Unblock Credential for Reuse: 14
2.3.2.7 Remove Blocked Credential from Door File 14
2.3.2.8 Using Group ID: 15
3.1 No Tour End-to-End Encryption 16
3.2 No Tour Data Encryption Example 17
MT20W 17
Credential ID Inputs 17
No tour databases (when touring) 18
Appendix A: Credential Attribute 19
Appendix B: Device Schedules 20
Appendix C: Additional Information 21
Abbreviations Used In This Document
| Abbreviation | Description |
|---|---|
| BLE | Bluetooth Low Energy |
| ENGAGE™ | Schlage Connectivity Platform Technology |
| GATT | Generic Attribute Profile |
| JSON | JavaScript Object Notation |
| LE | Schlage LE mortise lock with ENGAGE |
| No Tour | Non-touring feature not requiring door to be toured to add user |
| SAM | Software Alliance Member |
| SC | Schlage Control deadbolt lock with ENGAGE |
| CTE | Schlage Controller with ENGAGE |
No Tour provides the ability to use a cardholder’s smartcard to change an ENGAGE lock’s cardholder database and certain configurations. The lock does not have to be physically visited by the property manager in order to perform administrative actions such as:
Adding a credential
Deleting a credential
Replacing a lost credential
Changing certain configurations
The cardholder’s smartcard will be programmed by the property manager and it is the cardholder who carries the programmed card with the commands to the lock. No Tour should be used when the architecture is described as “offline” or not actively communicating with a host. It is the responsibility of the Software Alliance Member (SAM) to develop a mobile application to connect via Bluetooth Low Energy to the ENGAGE device and deliver the payload necessary to set up the device for No Tour operation.
This document describes the steps necessary for No Tour SAM integration.
To integrate No Tour, a SAM will need to create their own mobile application. This is necessary for the edge device to be provided with the lock ID, schedule, and Group IDs over BLE (Details of these tags below).
For Engage Devices commissioned before the release of ENGAGE 5.2 (Q3 2017):
For SAM managed sites with either an MT20W or Schlage Control device commissioned to the site, locks that are commissioned with the ENGAGE mobile application will pre-populate the lock ID during the commissioning process therefore enabling No Tour for all No Tour capable devices. Lock ID’s will be assigned sequentially starting with number 1. It is recommended that all of the No Tour configuration data be overwritten by the SAM provided mobile application (including the lock ID) in order to prevent multiple edge devices with the same lock ID being assigned.
For Engage Devices commissioned after the release of ENGAGE 5.2 (Q3 2017)
The ENGAGE mobile application will no longer pre-populate the lock ID during commissioning. Therefore, the SAM mobile application is required to send the requisite configurations to the lock in order to allow No Tour to work properly. This prevents the possibility of multiple edge devices with the same lock ID being assigned.
NDE Units manufactured before March 2016 currently do not have support for NDE No Tour. NDE and LE Units manufactured before March 14 2017 currently do not have support for MiFare Plus cards Please contact the Allegion Technical Services team for No Tour support of NDE units manufactured before this date and MiFare Plus support of NDE and LE units.
The JSON configurations that need to be provided to the ENGAGE device for No Tour are:
Lock ID (lockId)
Jaguar Sectors (jagSectors)
Group IDs (groupIds)
The definition of the JSON configurations can be found in the Schlage Engage JSON Data Structures document.
These JSON commands are in addition to the commands required to setup the device.
NOTE: For NDE and LE locks, a Lock ID of 0xFFFF (65535) will disable No Tour.
Before a No Tour enabled edge device can allow passage to any No Tour credential the device must first be provided with at least one credential schedule through the JSON tag “schedules”. Please see Appendix B: Device Schedules, for information on how the No Tour credential information on the card corresponds to the “crSch” and “schedules” JSON tags. The edge device must also be provided with the JSON “db” tag and “deleteAll” must be set to true (1) at least for the first door file that is provided to the edge device. This door file JSON is in addition to the No Tour JSON from above which comes as part of the “config” JSON tag. For more information please see the Schlage ENGAGE – JSON Data Structures document. An example door file with the “db”, “deleteAll”, and “schedules” tags is included below for ease of reference.
{"db":{"usrRcrd":{"deleteAll":1,"delete":[],"update":[],"add":[]},"schedules":
[{"days":["Mo","Tu","We","Th","Fr","Sa","Su"],"lngth":1439,"strtHr":0,"strtMn":0}],
"autoUnlock":[],"holidays":[]}}
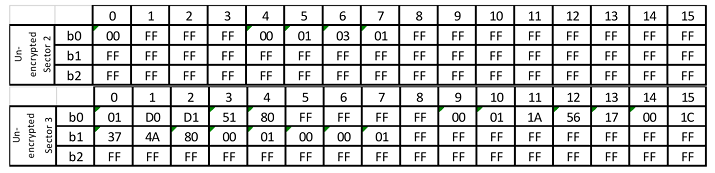
No Tour card data is designed to go into sectors 2-14 of the Smart card. The following section describes how the No Tour card data needs to be formatted.
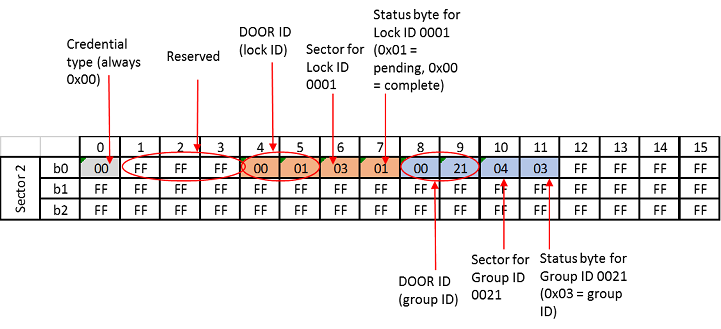
A ‘Jaguar’ sector works as a directory that contains a list of doors and pertinent information for each door.
Within this directory sector, the first four bytes are allocated for the credential type and reserved bytes. The following bytes are in 4 byte increments containing the door ID which could be a group ID or lock ID followed by the sector location of the card data and the pending bit. The lock ID is unique for each device in the site, the same group ID can be assigned to multiple devices in the site.
The table below show’s an example of the Jaguar sector in Sector 2 (default) of a SMART credential. Note this is 0 based, thus default sector 2 in jagSectors bitmask form 00000100 = “jagSectors”: 4
Currently this is the only supported sector therefore “jagSectors” must always be set to 4.
| SECTOR 2 | |
|---|---|
| credentialType | 0x00 = credential type no tour card |
| reserved | 0xFFFFFF reserved bytes |
| id (door ID) | 0x0001 sample as lockID JSON tag |
| sectorRef (sector pointer) | 0x03 = Card data in Sector 3 |
| status | 0x01 (pending bit set for lockID) |
| id (door ID) | 0x0021 sample as groupId JSON tag |
| sectorRef (sector pointer) | 0x04 = Card data in Sector 4 |
| status | 0x03 (Group ID bit set) |
The status byte has the following format:
Bit 0 – Pending command (1-Command pending, 0-No pending commands).
Bit 1 – Door or Group ID (0-Door ID, 1-Group ID)
Bit 2-7 – Reserved (set to 0s)
When using a lock ID, the device will reset the pending command bit. When using a group ID, the pending command bit will not reset due to its ability to be assigned to multiple devices in the site.
Table 1 displays how the data is on the SMART credential for a Jaguar (directory) Sector. Due to the size of the sector, eleven DOOR IDs is the max that a No Tour credential can support.
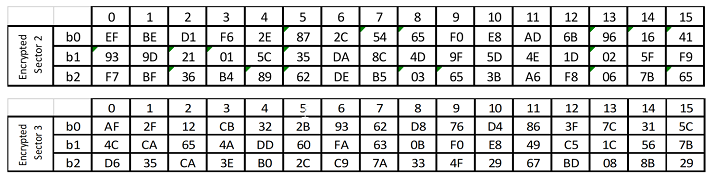
The data in the command sectors and jaguar sector will be encrypted with the site key. This is in addition to the encryption provided by MIFARE protocol. The examples provided below are illustrated with the additional encryption with the site key disabled in order to help understand the actual content and structure of the data.
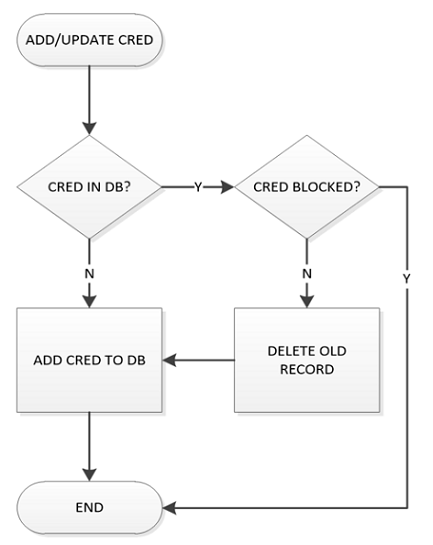
When an add credential is presented to the device, even the first time when the credential is added to the device’s database, the device will grant access.
The flow diagram in Figure 1 represents how the device will process the No Tour data for an add or update of a credential.
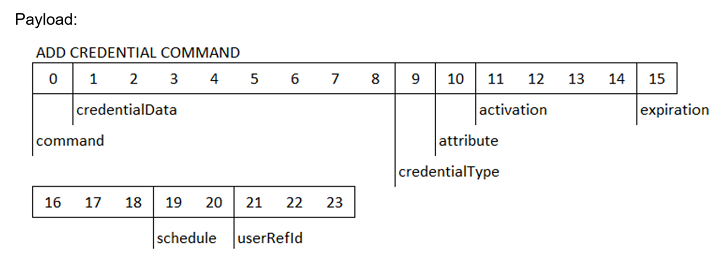
| Field | Byte(s) | Description |
|---|---|---|
| command | 1 | NTM command. For Add User, this is 0x01 |
| credentialData | 8 | The primary credential data for the user record |
| credentialType | 1 | Credential Type Card = 0x00 |
| attribute | 1 | See Appendix A for attribute values |
| activation1 | 4 | Number of seconds since 1/1/2000. 1/1/2014 = 0x1A561700 |
| expiration2 | 4 | Number of seconds since 1/1/2000. 1/1/2015 = 0x1C374A80 |
| schedule | 2 | Bitmask defining which schedules are used with this user. See Appendix B |
| userRefId | 3 | user reference identifier |
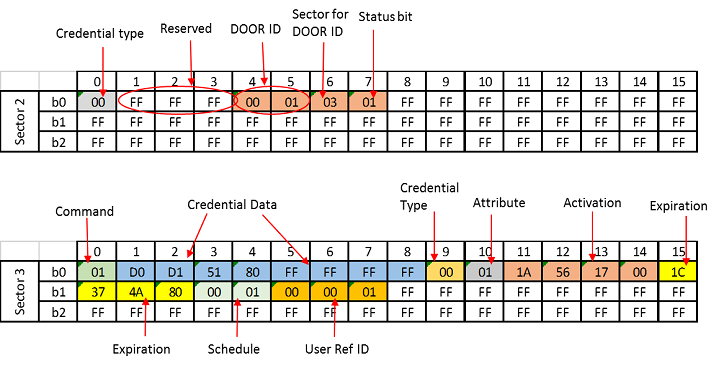
| SECTOR 1 | |
|---|---|
| sectorInfo | 0x1004 |
| credentialData (right shift w/ sentinel) | 0x07434546 |
| SECTOR 2 | |
| credentialType | 0x00 |
| id (door ID) | 0x0001 = lockId JSON tag |
| sectorRef (sector pointer) | 0x03 |
| status | 0x01 (pending bit set) |
| SECTOR 3 | |
| command | 0x01 NT_CMD_ADD_CREDENTIAL |
| credentialData (left shift w/o sentinel) | 0xD0D15180FFFFFFFF |
| credentialType | 0x00 CRED_TYPE_CARD |
| attribute | 0x01 APPLSM_USER_NORM |
| activation | 0x1A561700 (01/01/2014) |
| expiration | 0x1C374A80 (01/01/2015) |
| schedule | 0x0001 (schedule bitmask) (24-7 schedule) |
| userRefId | 0x000001 |
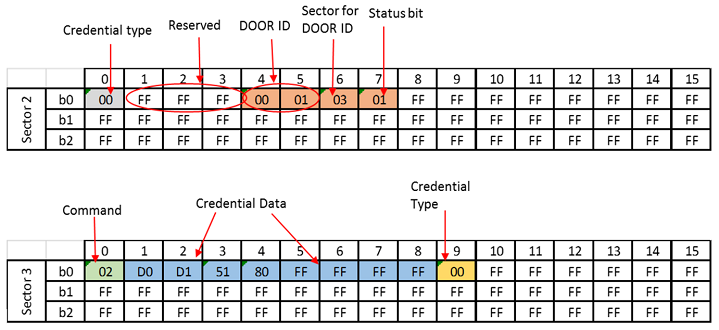
This command will actually block a user in the database. If a user is just deleted from the database, a card with a pending bit can come by and add itself even if it was deleted previously. Therefore, the user record needs to stay in the database so that when the card comes by and tries to add itself, it won’t allow access.
The flow diagram represents how the device database will process the No Tour data for a delete credential.

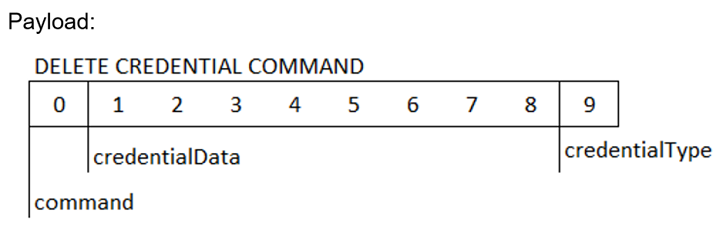
| Field | Byte(s) | Description |
|---|---|---|
| command | 1 | NTM command. For Remove User, this is 0x02 |
| credentialData | 8 | the credential to be removed |
| credentialType | 1 | Credential Type Card = 0x00 |
In this example the card is blocking itself in the database.
| SECTOR 1 | |
|---|---|
| sectorInfo | 0x1004 |
| credentialData (right shift w/ sentinel) | 0x07434546 |
| SECTOR 2 | |
| credentialType | 0x00 |
| id (door ID) | 0x0001 = lockId JSON tag |
| sectorRef (sector pointer) | 0x03 |
| status | 0x01 (pending bit set) |
| SECTOR 3 | |
| command | 0x02 NT_CMD_DELETE_CREDENTIAL |
| credentialData (left shift w/o sentinel) | 0xD0D15180FFFFFFFF |
| credentialType | 0x00 CRED_TYPE_CARD |
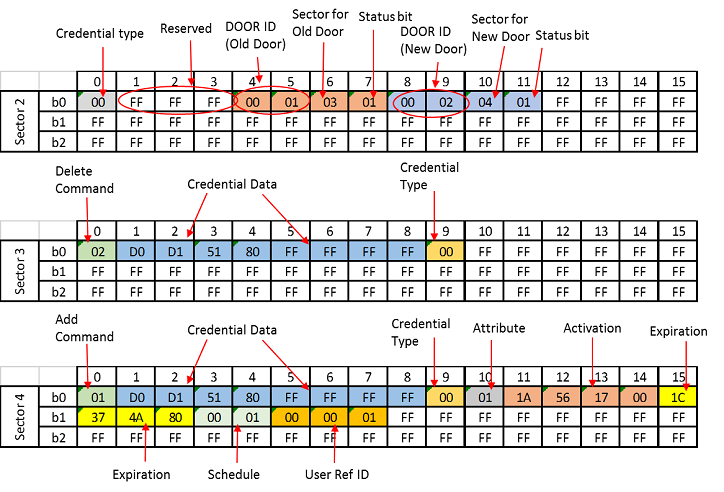
To repurpose a credential, the method uses a combination of add and delete commands. The add command for the new door that is needing access and a delete (block) command of the previous access.
| SECTOR 1 | |
|---|---|
| sectorInfo | 0x1004 |
| credentialData (right shift w/ sentinel) | 0x07434546 |
| SECTOR 2 | |
| credentialType | 0x00 |
| id (door ID) | 0x0001 = lockId JSON tag (OLD DOOR) |
| sectorRef (sector pointer) | 0x03 |
| status | 0x01 (pending bit set) |
| id (door ID) | 0x0002 = lockId JSON tag (NEW DOOR) |
| sectorRef (sector pointer) | 0x04 |
| status | 0x01 (pending bit set) |
| SECTOR 3 | |
| command | 0x02 NT_CMD_DELETE_CREDENTIAL |
| credentialData (left shift w/o sentinel) | 0xD0D15180FFFFFFFF |
| credentialType | 0x00 CRED_TYPE_CARD |
| SECTOR 4 | |
| command | 0x01 NT_CMD_ADD_CREDENTIAL |
| credentialData (left shift w/o sentinel) | 0xD0D15180FFFFFFFF |
| credentialType | 0x00 CRED_TYPE_CARD |
| attribute | 0x01 APPLSM_USER_NORM |
| activation | 01/01/2014 |
| expiration | 01/01/2015 |
| schedule | 0x0001 (24/7 schedule active) |
| userRefId | 0x000001 |
In the case that a credential is lost, a replacement credential can be created the deletes (blocks) the lost credential and add the new credential.
| SECTOR 1 | |
|---|---|
| sectorInfo | 0x1004 |
| credentialData (right shift w/ sentinel) | 0x054A0002 (new credential) |
| SECTOR 2 | |
| credentialType | 0x00 |
| id (door ID) | 0xFACE |
| sectorRef (sector pointer) | 0x03 |
| status | 0x01 (pending bit set) |
| id (door ID) | 0xFACE |
| sectorRef (sector pointer) | 0x04 |
| status | 0x01 (pending bit set) |
| SECTOR 3 | |
| command | 0x02 NT_CMD_DELETE_CREDENTIAL |
| credentialData (left shift w/o sentinel) | 0xD0D15180FFFFFFFF (lost credential) |
| credentialType | 0x00 CRED_TYPE_CARD |
| SECTOR 4 | |
| command | 0x01 NT_CMD_ADD_CREDENTIAL |
| credentialData (left shift w/o sentinel) | 0x52800080FFFFFFFF (replacement credential) |
| credentialType | 0x00 CRED_TYPE_CARD |
| attribute | 0x01 APPLSM_USER_NORM |
| activation | 01/01/2014 |
| expiration | 01/01/2015 |
| schedule | 0x0001 (24/7 schedule active) |
| userRefId | 0x000001 |

When a credential is deleted via No Tour, the credential information still resides in the door file database with a credential type of blocked. Creating a No Tour Add command to re-enable the credential via No Tour will be rejected by the device. In order to unblock a credential, the device must receive a new door file either via touring with a mobile app, or a WiFi call in for WiFi enabled devices.
For NDE and LE Devices there are two methods to unblock the credential.
For Control, the credential needs to be part of the “add” array, regardless of the Boolean status of deleteAll.
When a credential is deleted via No Tour, the credential information still resides in the door file database with a credential type of blocked. In order to remove an unblocked credential, the device must receive a new door file either via touring with a mobile app, or a WiFi call in for WiFi enabled devices.
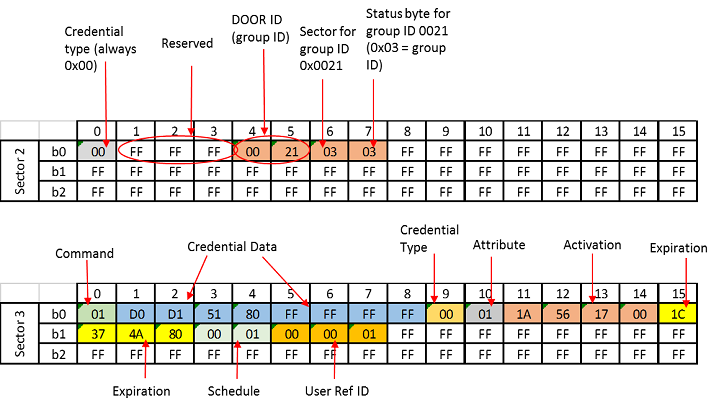
When using a group ID instead of a lock ID, the status byte needs to be 0x03. The No Tour device will not write back the pending status bit 0 to 0 when group IDs are used because the same group ID can be assigned to multiple doors in a Site.
| SECTOR 1 | |
|---|---|
| sectorInfo | 0x1004 |
| credentialData (right shift w/ sentinel) | 0x07434546 |
| SECTOR 2 | |
| credentialType | 0x00 |
| id (door ID) | 0x0021 = groupId JSON tag |
| sectorRef (sector pointer) | 0x03 |
| status | 0x03 (defines using group ID) |
| SECTOR 3 | |
| command | 0x01 NT_CMD_ADD_CREDENTIAL |
| credentialData (left shift w/o sentinel) | 0xD0D15180FFFFFFFF |
| credentialType | 0x00 CRED_TYPE_CARD |
| attribute | 0x01 APPLSM_USER_NORM |
| activation | 0x1A561700 (01/01/2014) |
| expiration | 0x1C374A80 (01/01/2015) |
| schedule | 0x0001 (schedule bitmask) (24-7 schedule) |
| userRefId | 0x000001 |
The No Tour data is in the secure sectors of the credential secured by a different key from the credential’s key. All No Tour data is encrypted by the site key.
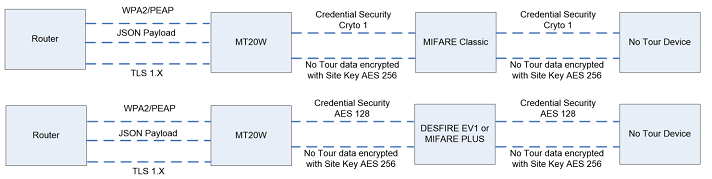
The steps on how to encrypt the data are found in the Schlage Engage AptiQ MT20W API document.
The example created is of a No Tour add credential before encryption and after encrypted with the Site Key.
The un-encrypted data for sectors 2 and 3 is as follows:
The sectors need to be encrypted individually. For the example below, the site key was: [0x1234 5678 90AB CDEF 1234 5678 90AB CDEF 1234 5678 90AB CDEF 1234 5678 90AB CDEF]. The online tool at aes.online-domain-tools.com was used to generate the encrypted values – this tool was set to do CBC with an initialization vector (IV) of 0 per Schlage Engage AptiQ MT20W API documentation.
The encrypted data for sectors 2 and 3 is as follows:
The reader/writer used to write No Tour data onto smart cards is the MT20W.
The steps on how to integrate the MT20W can be found in the Schlage Engage AptiQ MT20W API-X.XX document.
All references to credential ID for the No Tour module need to be ‘left aligned, no sentinel’ structure in order to operate properly. Credential information is usually in right shift with sentinel. This section covers how to convert to the left aligned, no sentinel structure required, for No Tour to work.
The credential information for 26A format is as follows:
FFFF FFFF BBBB BBBB BBBB BBBB
Where:
F = Facility Code
B = Badge ID
There is an even parity bit before the data structure (for the first 12 bits) and an odd parity bit after the structure (for the last 12 bits). 24 + 2 parity = 26 bits.
There is also a ‘sentinel’ bit that starts the data. The data that gets stored in sector 1, block 1 of the card is right aligned, with sentinel byte.
For example, Facility Code = 0x12, Badge ID = 0xABCD
0000 0100 0010 0101 0101 0111 1001 1011 = 0x0425579B
Sentinel
Even Parity
Facility Code
Badge ID
Odd Parity
However, the data that would get loaded into the database is left aligned, without the sentinel bit.
0000 1001 0101 0101 1110 0110 1100 0000 = 0x0955E6C0
Even Parity
Facility Code
Badge ID
Odd Parity
No Sentinel
As another example, Facility Code = A5, Badge ID = 0x0001.
Right Aligned w/ Sentinel:
0x054A0002 0000010 1010 0101 0000 0000 0000 0001 0
Left Aligned w/o Sentinel:
0x52800080 0 1010 0101 0000 0000 0000 0001 0000000
It is recommended to always provide a “full” database every time when updating No Tour devices. This keeps the database from getting out of sync and ensures the door has the correct access.
Table 9 defines the values for credential attribute. ADA attributes are not supported on Schlage Control locks.
NOTE: Table 9 varies from the credential tag table and credential tag name definitions that are part of the Schlage ENGAGE – JSON Data Structures document. The structure of JSON allows the ADA designation as a different JSON tag in addition to the credential type, whereas this designation is applied with a different attribute tag for No Tour.
Table 9: Credential Attribute Values
| Attribute | Value | Support |
|---|---|---|
| Blocked | 0x00 | NDE, LE, SC, CTE |
| Normal without ADA | 0x01 | NDE, LE, SC, CTE |
| Normal with ADA | 0x81 | NDE, LE, CTE |
| Toggle | 0x02 | NDE, LE, SC, CTE |
| Freeze | 0x03 | NDE, LE, SC, CTE |
| Lockdown | 0x04 | NDE, LE, CTE |
| Pass Through without ADA | 0x05 | NDE, LE, SC, CTE |
| Pass Through with ADA | 0x85 | NDE, LE, CTE |
| One time use without ADA | 0x06 | NDE, LE, CTE |
| One time use with ADA | 0x86 | NDE, LE, CTE |
| Deleted User with Audit | 0x07 | NDE, LE, SC, CTE |
| Main + Aux Normal without ADA | 0x0E | CTE |
| Main + Aux Normal with ADA | 0x8E | CTE |
| Main + Aux Toggle | 0x0F | CTE |
| Main + Aux Pass Through without ADA | 0x10 | CTE |
| Main + Aux Pass Through with ADA | 0x90 | CTE |
This section defines the device schedule bitmask and how it connects to the JSON device schedules created in the user database.
No Tour can support up to 16 credential schedules simply by or-ing bits with each bit correlating to the “crSch” that is assigned to each credential in the User Record section of “Engage JSON Data Structures” document. Each “crSch” is on a per user basis and should correspond to the JSON tag array “schedules” which is on a per edge device basis.
At a minimum, the No Tour device has one credential schedule which is schedule 1 and correlates to the first bit of the bit mask. The No Tour data written to the card for schedule 1 would be 0x0001.
Figure 6 shows a mapping of the No Tour schedule bitmask to the JSON value provided with the “crSch” tag.
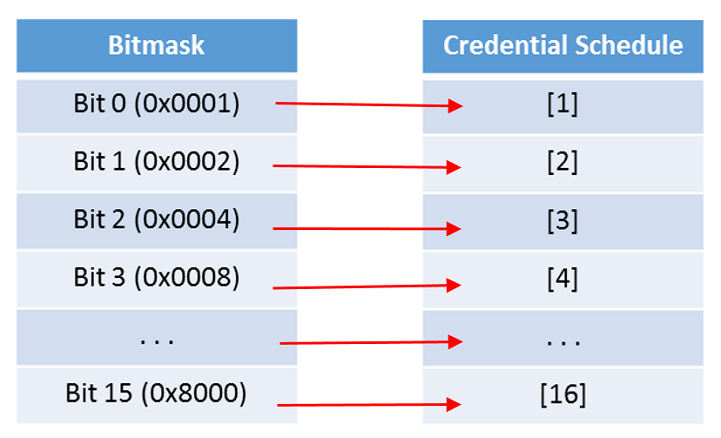
NOTE: Credential Schedules cannot be programmed into the device via No Tour. In order for a credential to have access to a device, at least one credential schedule must be programmed into the device. Creating a new credential schedule via No Tour without updating the device before will result in an out of time zone denied access.
When a smart card is presented to an Engage device with No Tour enabled, the reader will read the directory sector (Sector 2) and send this information to the main lock controller along with card data (PACS). Based on the information from the pending command bit in the directory sector, the device may request the reader to read data from other sectors.
No Tour card data is added to an area of the database of the device that is unsorted. The device will send an audit if this unsorted area begins to get full. Performing a card search of the database may take longer, as the unsorted area is not optimized for searching but should not take longer than one second.
A smart card with No Tour commands will need approximately 1 second to process the card after the beep is heard.
The battery life may be minimally affected by No Tour cards as the device needs to read more data from the smart card.
Group IDs are used to assign multiple devices to a group. Removing the device from the group ID will not remove credentials that were added via the group ID. To remove the group ID from a device, the MAPP will need to send a JSON config with the group ID set to an empty array.
As described above, all SAM mobile apps should provide a door file with deleteAll set to 1 to complete the lock configuration process even though this might not be required with all versions of Schlage Control.