Allegion Developer Portal
Allegion Developer Portal

Welcome to the Schlage Home API developer portal. Our APIs are designed for business and commercial integrations that scale across residential deployments — for example, partner apps and smart home automation platforms. Individual or hobbyist projects are not supported through these APIs. If you represent a company or commercial product and would like to integrate with Schlage Home, please follow our onboarding steps below or contact our developer success team for further guidance.
NOTE - Before getting started, please contact a Schlage Home Representative to ensure that your application will be supported. If you already are in contact with one of our representatives, please reach out to them for further guidance. This API platform currently supports the following Wifi-enabled devices: Schlage Encode Deadbolt, Encode Plus, and Encode Levers.
Create an account using an email address for your organization to create a account in Allegion Developer Portal. You will receive an email to confirm the registration and fill out a few questions to complete the registration.

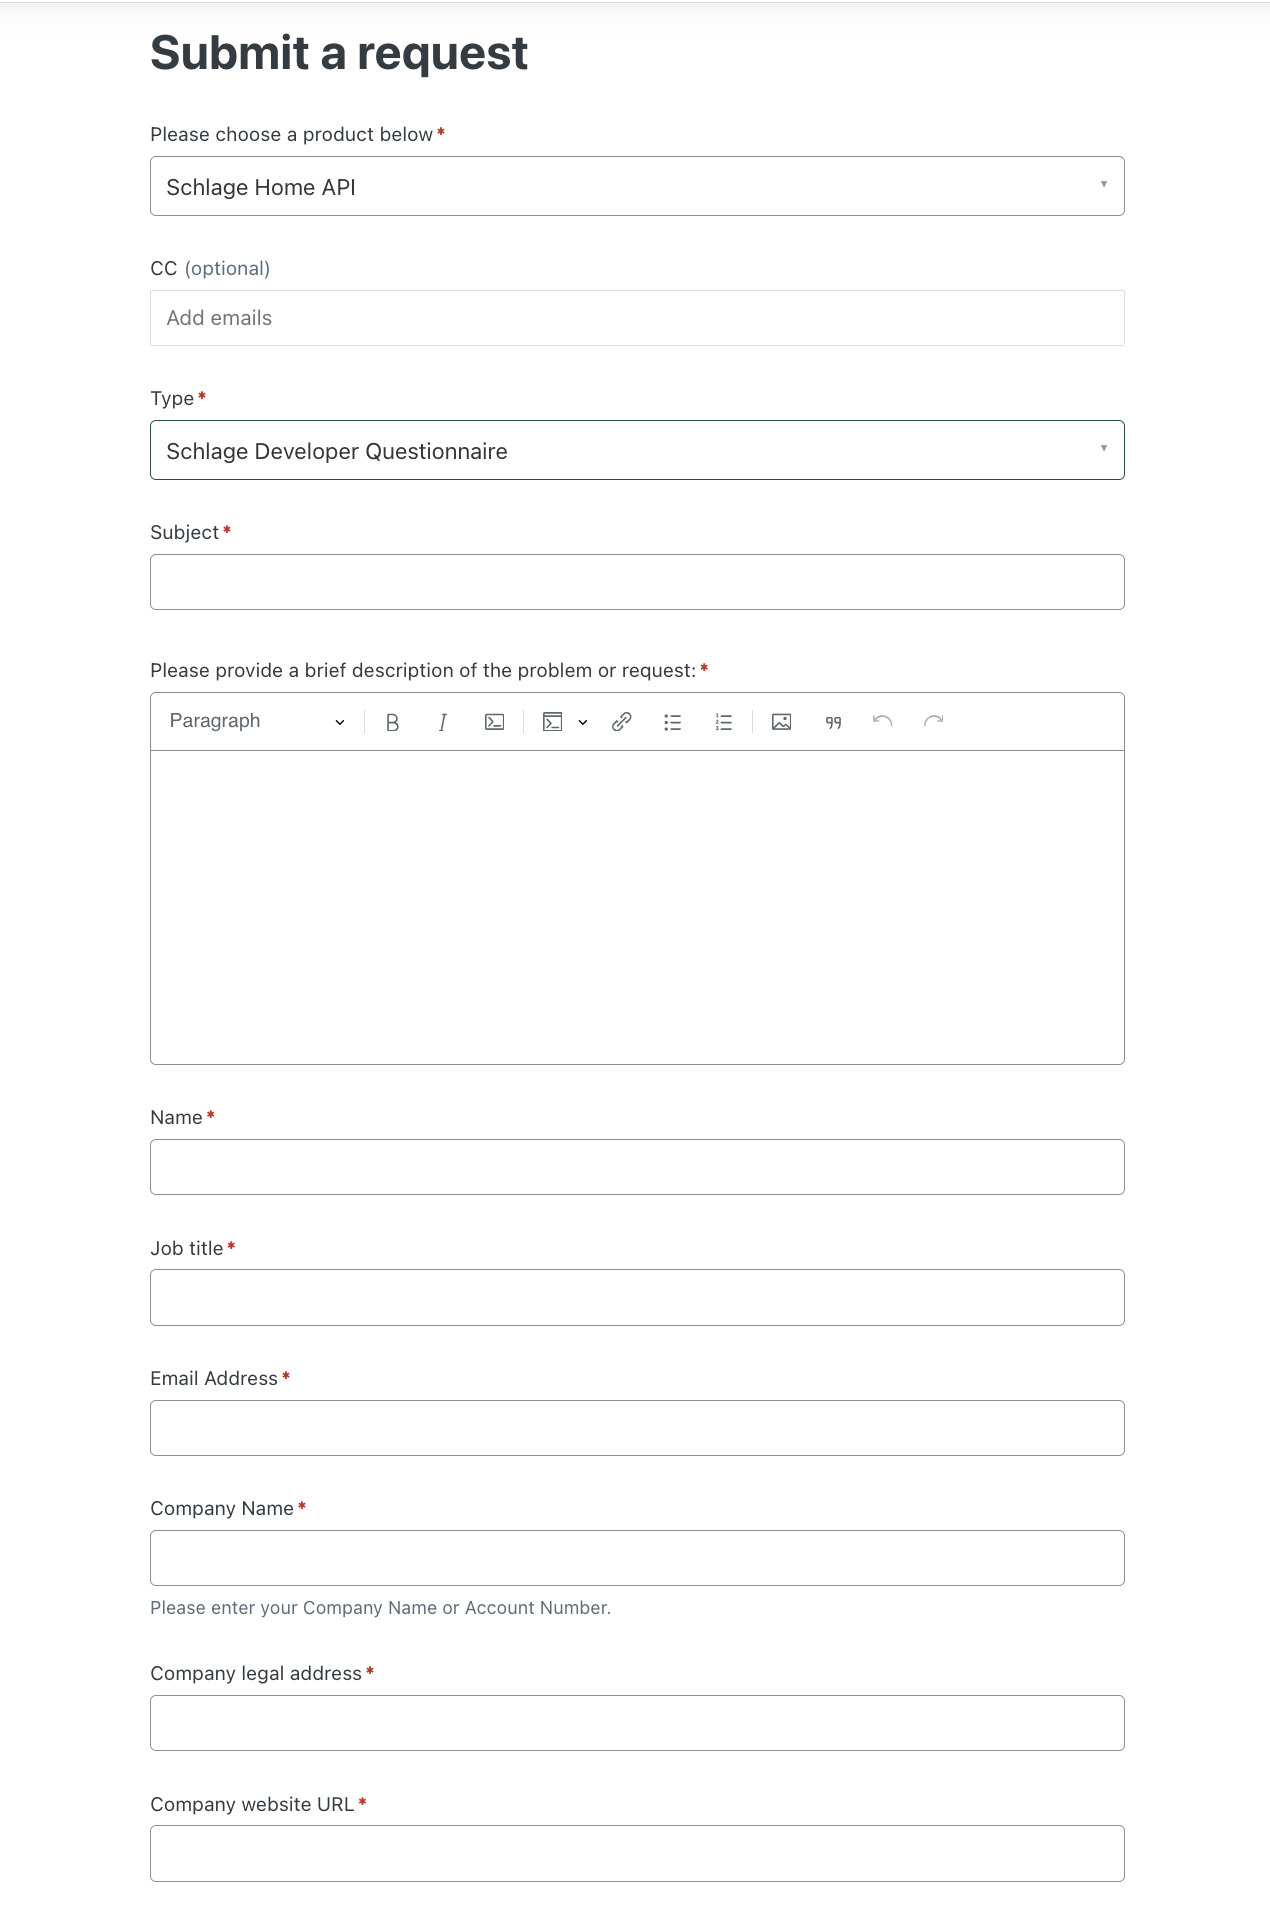
After creating your account, please complete our Developer questionnaire hosted on Zendesk. This helps us understand your intended use and your business proposition so we can determine eligibility and the appropriate next steps. Submitting the questionnaire does not guarantee immediate credentials. Our team will review your submission and will contact you to discuss your business proposition. Credentials and subscription keys will be issued only after approval and a direct conversation with you. You will be notified of the decision before proceeding to the remaining steps.
After your questionnaire has been reviewed you will receive a notification if a direct integration is approved. Once you receive a notification, navigate to the Products tab and subscribe to the Schlage Home - API product by typing in your company's name ie. MyCompany.
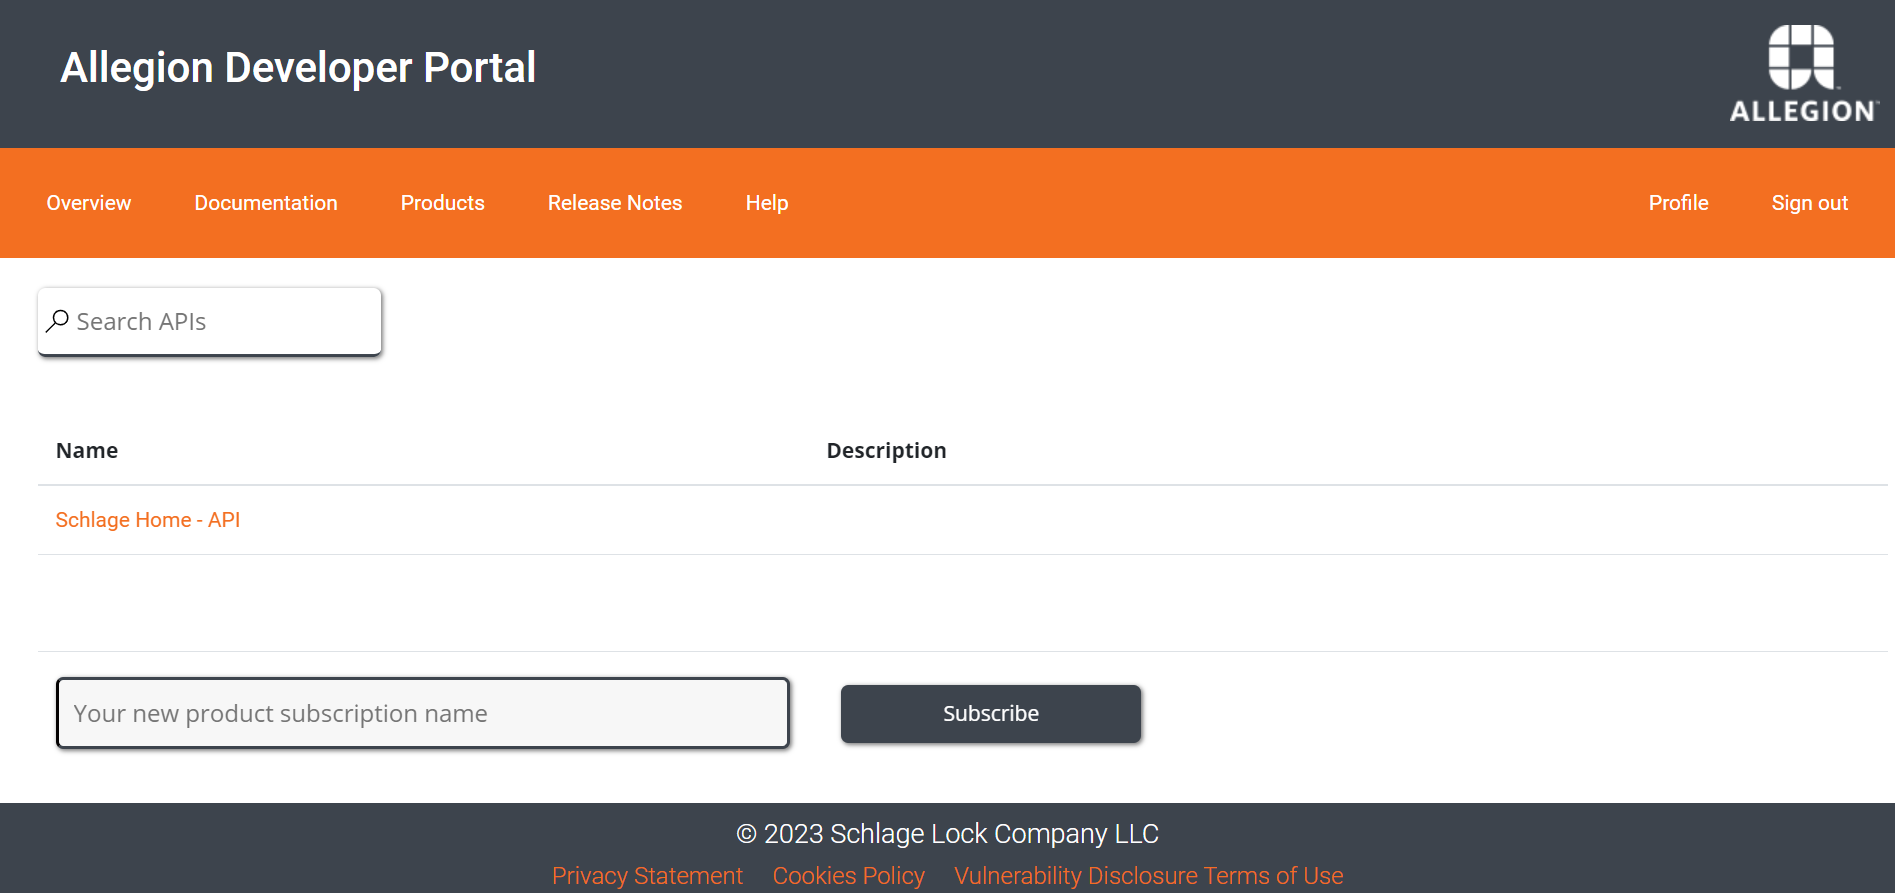
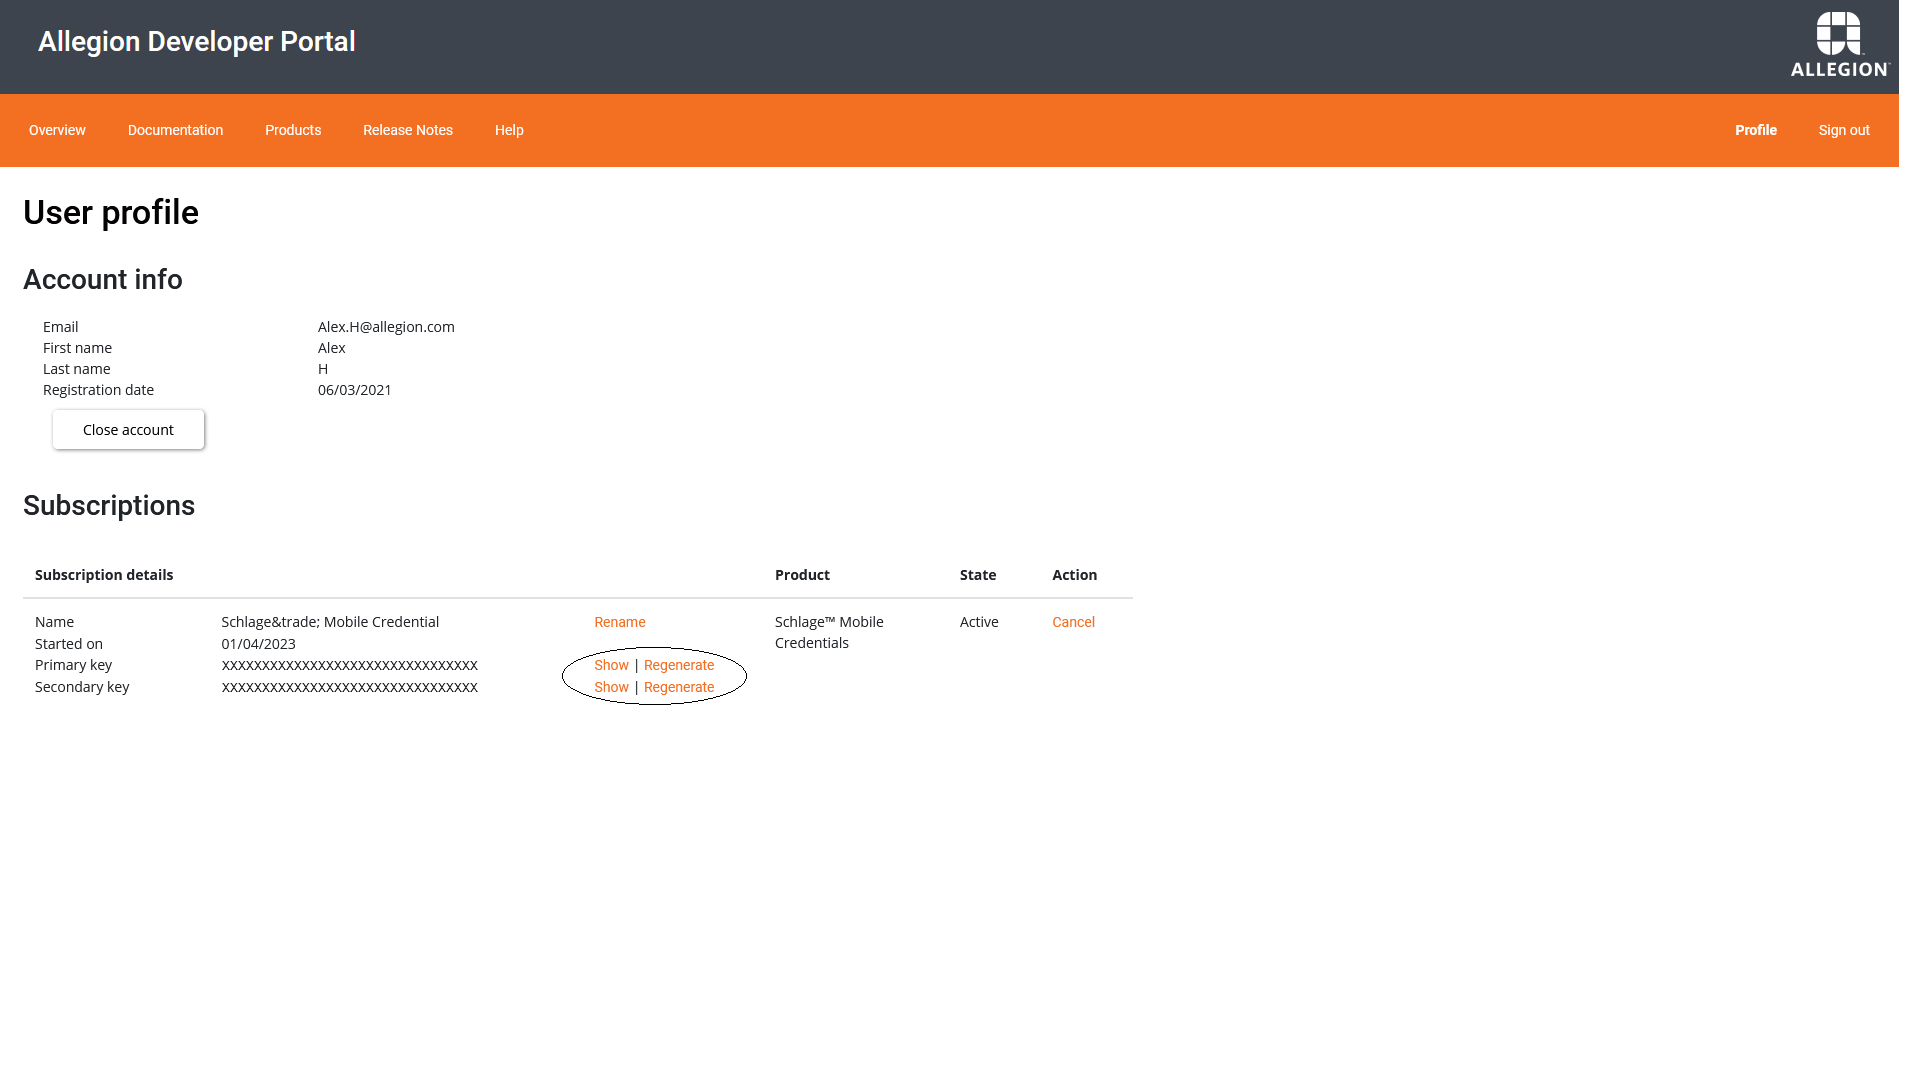
Click subscribe and you will receive an email confirming your subscription request. Once your subscription is approved, you can find your API keys in your Profile under the section called Subscriptions.
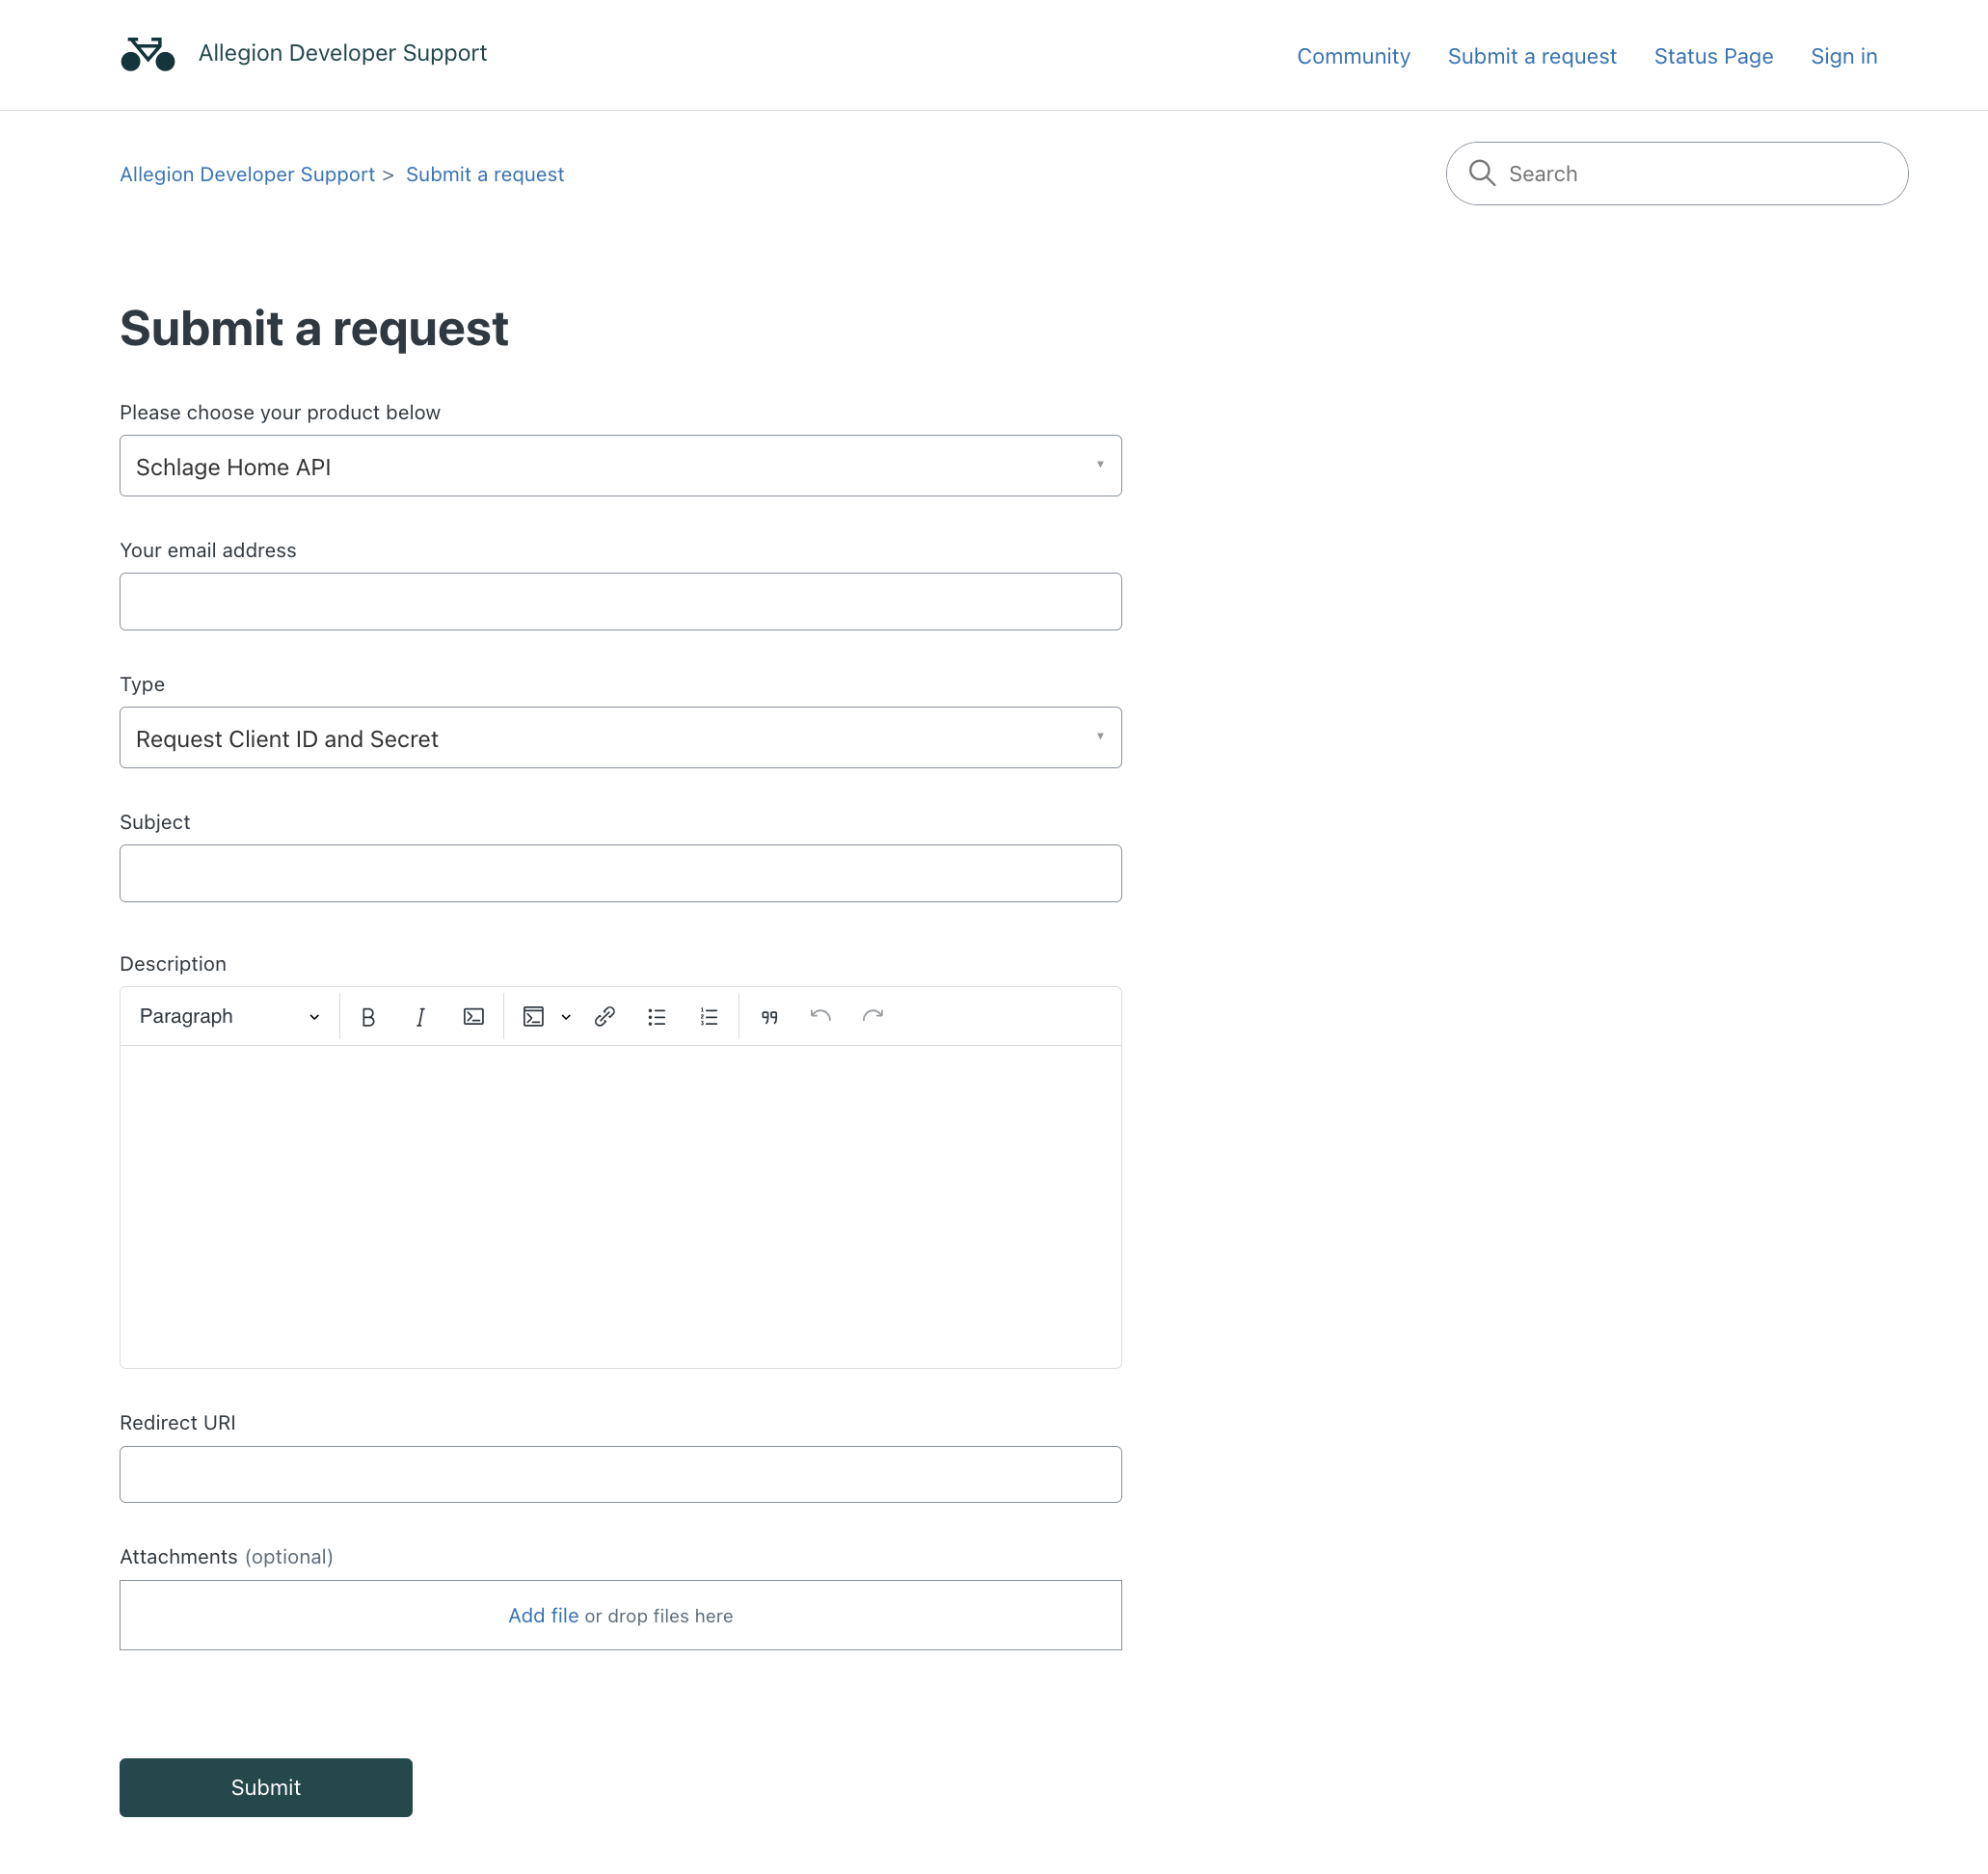
In order to ensure that your application can access the Schlage Home API securely, we support OAuth 2.0 using the authorization code grant type. Please register your client application by submitting a request to receive a unique Client ID and Client Secret on our Zendesk Portal - Request Client ID and Secret. When you submit a request, choose the Product - Schlage Home API and Type - Request Client ID and Secret, then fill out the fields accordingly. We will review your request and respond with the following OAuth 2.0 credentials:
Once your client application is registered, you are now ready to use the Client ID, Client Secret and Redirect URI in the authorization flow to get your access tokens.
If you are familiar with the OAuth 2.0 authorization grant flow, the following table provides a summary of endpoints and parameters you will need to implement the authentication flow.
If you are new to implementing OAuth 2.0, we recommend reviewing section 5. Step-by-Step OAuth 2.0 Guide.
| Endpoint | URI | Description |
|---|---|---|
| Authorization URI | https://account.schlage.com/OAuth2/authorize | The authorization endpoint is the endpoint on the authorization server where the resource owner logs in, and grants authorization to the client application. |
| Token Exchange URI | https://account.schlage.com/OAuth2/token | The token endpoint is the endpoint on the authorization server where the client application exchanges the authorization code, client ID and client secret, for an access token. |
| Redirect URI | <YOUR_REDIRECT_URI> | The redirect endpoint is the endpoint in the client application where the resource owner is redirected to, after access is granted or denied by authorization endpoint. |
| Parameter | Value | Description |
|---|---|---|
| client_id | <YOUR_CLIENTID> | Client ID provided to a third-party partner by an Allegion representative. |
| client_secret | <YOUR_CLIENTSECRET> | Client Secret provided to a third-party partner by an Allegion representative. |
| Scope | email+openid | Limits permissions access to only openId flow and e-mail. |
| Response Type | code | Indicates that the desired authorization grant should be provided in the form of an authorization code. |
| Grant Type | authorization_code | Indicates that the authorization grant provided is in the form of an authorization code. The code should be provided to the token exchange endpoint. |
| API Key | <YOUR_API_KEY> | Client API KEY provided to a third-party partner by an Allegion representative. You will receive two, but either will work. |
| Redirect URI | <YOUR_REDIRECT_URI> | Location to which the authorization server should redirect the user-agent back to once access is granted or denied. |
This section is not intended to be the final guide to OAuth 2.0, but intends to provide relevant quick steps to implement the Grant authorization flow for integrating with Allegion Authorization server. If you would like to familiarize yourself with the OAuth 2.0 and how it works. We recommend following:
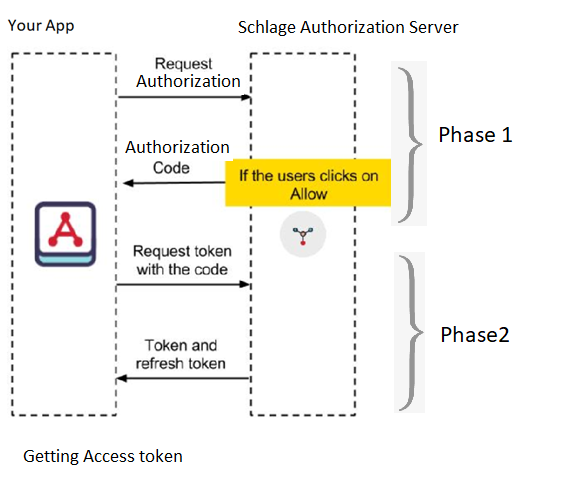
The first phase involves having your app redirect to the Schlage OAuth linking page. The client's app will redirect to <https://account.schlage.com/OAuth2/authorize>.
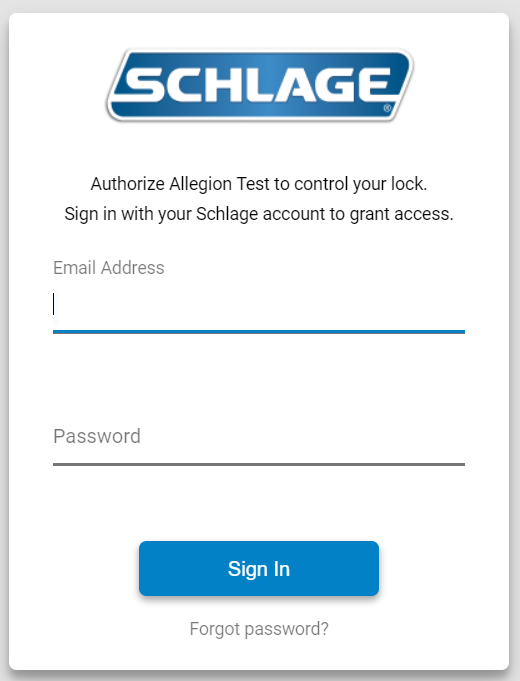
The Authorization server will validate your <YOUR_CLIENT_ID> and <YOUR_REDIRECT_URI> present the following interface to the user to grant your app access to your Schlage lock(s):
<REDIRECT_URI>
https://<YOUR_REDIRECT_URI>?state=&code=<Authorization_code>
This authorization code will expire after a short period and will result the following phase 2 to repond with the error invalid_grant if not done quickly.
In second phase you will need your <YOUR_REDIRECT_URI> handler to send a request to <https://account.schlage.com/OAuth2/token/> to exchange Authorization Code for Access Tokens using following steps.
    POST https://account.schlage.com/OAuth2/token/
        Content-Type: application/x-www-form-urlencoded
        code=<Authorization_Code> (received from Phase 1)
        &client_id=<YOUR_CLIENT_ID>
        &client_secret=<YOUR_CLIENT_SECRET>
        &redirect_uri=<YOUR_REDIRECT_URI>
        &grant_type=authorization_code
If the above request is successful, you will receive your access token, refresh token and the remaining lifetime of the access tokens. Your refresh token is default to expire after 3650 days or 10 years.
You can now use your new access token to make API calls as explained in Step 6.
Your Access Token will expire after 3600 seconds (1 hour), so it is extremely important to always keep the Refresh Token that you received. With that Refresh Token, you will be able to get a new Access Token and its corresponding Refresh Token using following steps:
        POST https://account.schlage.com/oauth2/token -d 'client_id=<YOUR_CLIENT_ID>
            &client_secret=<YOUR_CLIENT_SECRET>
            &refresh_token=<REFRESH_TOKEN>
            &grant_type=refresh_token'
You will need to update the stored Refresh Token every time you ask for a new Access Token, since each Access Token has a unique Refresh Token.
You will receive 401 Unauthorized error code for an attempt to refresh token using an expired token.
At any point the user can revoke an application, so your application needs to be able to handle the case when refreshing the access token also fails. At that point, you will need to prompt the user for authorization again.
The following table provides a list of errors to guard against:
        HTTP/1.1 400 Bad Request

            Content-Type: application/json; charset=UTF-8
            {
                "error":"invalid_request|invalid_client|invalid_grant|invalid_scope|unauthorized_client|unsupported_grant_type|"
            }
| Error | Description |
|---|---|
| invalid_request | The request is missing a required parameter, includes an unsupported parameter value (other than 'unsupported_grant_type'), or is otherwise malformed. For example, grant_type is refresh_token but refresh_token is not included. |
| invalid_client | Client authentication failed. For example, when the client includes client_id and client_secret in the authorization header, but there's no such client with that client_id and client_secret. |
| invalid_grant | Refresh token has been revoked. Authorization code has been consumed already or does not exist. |
| invalid_scope | Scope parameter entries are incorrect. Please check parameters and try again. |
| unauthorized_client | Client is not allowed for code grant flow or for refreshing tokens. |
| unsupported_grant_type | Returned if grant_type is anything other than 'authorization_code' or 'refresh_token' |
Now that you have an access token, you can start making calls to our API endpoints. You will need the Subscription Key and the Authorization tokens from Step 2 to call API calls with the Access token for the Authorization HTTP Header.
Header example:
        Authorization: Bearer <Access_token>
        alle-subscription-key: <Subscription key from Step 2>
Please look under our Products tab or use this link to find documentation on our API Endpoints.
You're now ready to start using the Schlage Home APIs! If you run into any issues or have questions - please submit a new Zendesk ticket under the Schlage Home API product.